Sunday, August 24, 2008

Coil Spring Selection & Preparation

The coil springs originally installed in my Mustang held the vehicle 10.5" up and were rated at 269 lbs/in. These springs are not the best for a performance application so most replace them when rebuilding the suspension.

I reviewed the options available from the various suppliers but did not like the offerings. The two main offerings are a 550 lb and 620 lb spring. Most of these are designed to lower the vehicle about 1". From those I've spoke with the 620 lb springs can result in a rough ride on uneven streets. Regardless of the selection, these springs are all twice as stiff as stock.

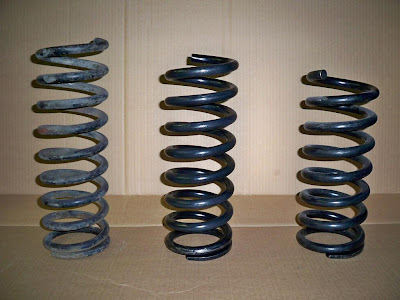
I found a supplier who sells the springs from the Heavy Duty Suspension package offerred on '68 coupes. These held the vehicle 11" up and are rated at 428 lbs/in. I purchased these and cut 3/4 coil off which should put the ride height at about 10.25". This will likely not be the final height but I can cut further if needed. This will put me at a decent height until I decide on the wheels I will use. Cutting 3/4 of a coil of will raise the spring rate some but it will not exceed 450 lb which should give a nice ride with an increase in performance.

The picture below shows (from left to right) the original spring, HD spring, and a cut HD spring. After cutting some off each new spring, I painted them in the Chassis Black paint I have and put them aside for installation later.


Wednesday, August 20, 2008

Inner Fenderwell Restoration

I've spent near fifteen hours restoring the inner fenderwells, radiator support, and front fender aprons over the past two days. Less than an hour ago, I coated all the restored panels with Eastwood's Rust Encapsulator. There was very little rust but I'm using Rust Encapsulator for rust protection. I'll later top coat with their Extreme Chassis Black and Underhood Black paints.

Stripping the grime, undercoating, and paint from these areas was a large task. At first glance it might not seem like much surface area. However, the work is very slow moving. I used chemical paint stripper and a couple of fine wire wheels for the work. Needless to say, I'm glad this portion of the front suspension is complete. The next obstical will be the repair of two rust spots and filling of a few extra holes a previous owner put through the driver fender apron and radiator support. Since I do not know how to weld, I'll need to call in the help of someone else for assistance.

Pictures of the Mustang are included below. Note the condition of the cardboard now versus my last picture.


Saturday, August 16, 2008

Power Steering Parts on eBay

I took the power steering components I purchased as part of a package deal and started cleaning them this afternoon. By the end of the day, I had all the parts cleaned and up for auction on eBay.

After listing everything on eBay, I searched all the 1967 Mustang parts. I found a power steering bracket similar to one I received as part of the package deal. The one I found was currently priced at $40! I never took a picture of it because it seemed insignificant. I intended to toss it in with one of the items already for auction on eBay. With little delay, I cleaned the braket and listed it on eBay also.

I've included a picture below of the power steering system. The guy I purchased the parts from did not seem to want to mess with cleaning it up. He gave the parts to me in a black plastic trash bag. They were disgusting as you can tell from the picture. The bracket I mentioned above is at the bottom right of the picture.


08/24/08 - The auctions ended for a total sell price of 196.65. This brings my suspension and disc brake package cost down to only a little over $500.

Repainting Front Shocks

I plan to reuse the front shocks already installed on my Mustang. They are Monroe gas shocks which should work fine with the springs I plan to use. There are much better alternatives for sale but since these function fine, I will use them and spend that money elsewhere.

The shocks looked fine but I went ahead and cleaned them up today and painted them. The Ford Blue engine paint I had matched the existing paint on the shocks well. I sanded them a little and painted them blue with the tops black so they will match the rest of the engine bay.

Wednesday, August 13, 2008

Sway Bar Preparation

The original sway bar installed on my '67 Mustang is about a 1/2" in diameter. The sway bar included in my recent bulk suspension purchase is a 1 1/8" sway bar from Dallas Mustang. This sway bar is larger than I planned to purchase and is used by those wanting a true performance supension. This type sway bar paired with stiff springs can result in a rough ride on streets but very good performance on the track.

If you are not aware, a sway bar works in conjunction with the springs. The sway bar connects the lower control arm from each side of the supension. When a vehicle enters a corner and begins to lean to one side, the sway bar acts as a lever to involve the spring from the opposite side to counter this leaning motion. This keeps the tires in better contact with the road and allows the vehicle to corner better. It also feels more stable with a larger sway bar as the car does not rock from side to side as much in corners.

I've decided to use the sway bar as my springs are not as aggressive as most choose to use. As a result, the larger swaybar will be offset by the softer springs. This should allow the car to absorb bumps well when driving down the road as this is impacted mostly by the springs. The sway bar will then give me a little better than average cornering ability which is what I am looking to achieve.

The bar was a little scratched up and a strange gold color. I sanded the bar down along with the support brackets. I then painted the bar with Eastwood Satin Chassis Black.


Sunday, August 10, 2008

Front Suspension & Brake Purchase

I drove to McKinney, Texas today to pick up a front suspension and disc brake set. I found the items for sale on a Mustang forum site a few days ago. The individual purchased the suspension parts, installed them, and then decided he would go with a Mustang II suspension for road racing. The brakes were used on one of his vehicles for a couple of hundred miles and then swapped for performance brakes (again for road racing purposes).

The package included the following items:
Upper Control Arms (Open Tracker)......................... $199.00
Lower Control Arms (Open Tracker)......................... $140.00
Roller Spring Perches (Daze Cars)............................ $168.45
Adjustable Strut Rods (Glen’s 5.0)........................... $230.00
Ford Script Dust Shields (Repro 2K004-2A).................. $29.95ea
Brake Calipers (Repro 2B120-3C at NPD)..................... $101.95ea
11” Disc Brake Rotors (NAPA - #85502)...................... $85.96ea
Right Flexible Brake Hose (NAPA - #5453)................... $30.95ea
Left Flexible Brake Hose (NAPA - #5456)..................... $30.95ea
Master Cylinder (NAPA - #4736222)........................... $69.95
Spindles (D0ZA 3107C/D0ZA 3018C).......................... $239.95 ea
Caliper Brackets (0A2C) - sold with above at NPD
Tie Rod Ends (2 MOOG ES387R).............................. $14.95 ea
’69 Power Steering Unit (SMB K 9K07B)
1 1/18 Sway Bar 67-70 .........................................$109.95

The NAPA master cylinder and MOOG tie rods are all still in the original boxes. The suspension was never used and the brakes were only lightly used. I purchased all of these items for $700. Individually, the parts would cost about $1,800. The parts are not all new but they are in very good condition.

Wednesday, August 6, 2008

Confirming Original Motor, Transmission, & Axle

How does one know if the motor, transmission, and rear axle are original on a '67 Mustang?

There are tags and casting numbers on components to indicate when they were produced. These items are then compared to the production date of the vehicle and the vehicle data plate to confirm originality.

The following tag is located on on of the rear axle center section bolts. The numbers WCZ-V1 indicate a 67-70 model rear axle with 2.79 ratio. The next line begins with 2.79 confirming the gear ratio. The next set of numbers (7DC) is a date code indicating the third week (C) of April (D) in 1967. The final set of numbers (930) is the plant code.


The next tag was found on the passenger side of my tranmission near the bellhousing. The RAN D 1 portion indicates a 1967 3.03 3 speed manual transmission. The next number (K063574) is the serial number of the transmission.


There is a casting number on each motor but it is hidden by the starter. I'm unable to remove mine because of the way the headers are welded to the exhaust. However, on the front right flange of the motor an assembly date is stamped. On my motor this stamp is 7D17 for April (D) 17th 1967.


The dates are the most important as my Mustang completed assembly on 04/21/67. Each of these components are date matched to the vehicle. They also match the dataplate which I will not post as it contains the vehicle VIN. These items are the best evidence available to confirm originality on a '67 Mustang.

Monday, August 4, 2008

Radiator Support & Inner Fender Markings

While stripping the paint from the front of my Mustang, I've located many build markings. These were all used as the vehicle was moved throught the assembly line to indicate the components to use on the vehicle.

The first item I noticed was a large 8 on the front passenger side inner fenderwell. The marking was made in a white permanent crayon. It is said to indicate the vehicle was to be equiped with the 289 V8 motor.

The second item I noticed was on the lower driver side of the radiator support. This number (570) is referred to as the secondary rotation number. This number matches a number included on the buildsheet for the vehicle. This number was used to track the vehicle along a second production line for the drivetrain and interior portion of the assembly. It was also made with a white permanent crayon.

The last item I noticed was a set of build codes written in permanent crayon under the engine bay paint. I did not notice these until I began to chemically strip the paint from the radiator support. The numbers are:
5C - Coupe code
I - Lime Gold paint code
4A - Black bench seat interior code

The final code is a little higher on the radiator support and is D112. I've not been able to determine what this code indicates. If by chance you know, please post a comment with details.

For those interested, these were found on a Dearborn produced Mustang built on 04/21/67.


Saturday, August 2, 2008

Mustang Club of Austin Show

Instead of working on the Mustang today, I took a trip to Austin for the Mustang Club of Austin car show. There were about a hundred Mustangs with around ten 67-68's.

I took over a hundred pictures of Mustangs. I took pictures of the exterior and wheels of most of the Mustangs. I took as many pictures as I could of the engine bays of two produced in Dearborn close to the same time mine was produced. These will be beneficial in comparing them to my own when performing the restoration.

I'm ready for the day my Mustang is restored to look as these cars did today. Although I have a Mustang and they might be the same body style, I just tend to focus on the flaws of mine. This may never change but there will no doubt be fewer flaws to mine as the next few years pass.