I managed to find some fastners which would work to mount the trim around the grill opening. I was glad to finish this part as I worried I would not find a way to fasten the trim. It is hard to describe but if you saw the fasterners originally used, you would understand how duplicating them would be difficult.
The other difficult part is installing the single bolt in the lower back side of each fender. There is a nut which slides up into the fender. The nut is like a square welded to a rectangular nut. These side into a square hole and should turn and lock into place. You must then kind of pull on the bolt while tightening to ensure the nut does not spin around in the hole (you can not reach the opposite side).
I finished the driver side and mounted the rocker panel with little trouble. I tried the passenger side but can only get the bolt 75% of the way tightened before the nut begins to spin. No matter what I try, I can't get the nut to stop moving. I decided I would quit for the night and will try again tomorrow.
Tuesday, March 31, 2009
Headlight and Grill Trim Installation
I started off tonight by working on stripping the grime from the bumper mounting arms. I cleaned almost all of one of the four arms. I then decided to move on to something more productive.
I installed the grill trim except for the hockey stick shaped pieces which go along the headlight buckets. This trim requires a special type clip. The originals are bent so badly the cannot be reused. I checked the NPD catalog and a set of these clips is $12. I'll look around the garage to see if I can come up with a different mounting method for now.
I then installed the headlights in the Mustang. I rolled it back to the back edge of the garage and aimed the headlights properly. They are not perfect but I don't intend on driving at night. I'm just glad it all works so I'm able to get an inspection.
Sunday, March 29, 2009
Splash Guards & Reinstalling Sheet Metal
Kyle and his dad stopped by this morning to see the progress I'd made on the Mustang. Kyle last saw the Mustang when we installed the coil springs a week and a half ago.
My next goal is to have the car reassembled and inspected by this coming weekend. To reach this goal, I need to first complete the rear splash shields so the fenders can be installed. I'm going to install a few parts unfinished so I can begin driving the Mustang again. I'll take them off and refinish them as time allows. I'm taking this step as the parts I need to refinish require media blasting and I won't have access to the media blasting cabinet for a couple more weeks.
I stripped and painted one of the back splash guards this past Wednesday night. I then used the undercoat/bedliner on it Friday night and Saturday morning. The rubber surround was attached with the original style stapes last night. I then worked on the other splash guard yesterday and this morning to finish it also.
I started with the fenders and the new headlight bucket (the original driver's side was badly cracked). They were not too difficult to install. I lined them up properly and tighened all the underhood bolts. I then added the hood support (unfinished), grill (unfinished), and stone shield. I stopped as I'm not sure if I want to go ahead and refinish the bumper brackets first since they are going to be hard to remove later.
I'm excited to see the Mustang back together again. While I always knew I would get it back together, there were many times when the path ahead seemed like it would take forever. I started this project on May 21st of last year. I put everything on but the sheetmetal and started the car on March 20th of this year. Ten months is a long time but I've learned a large amount and the car is much better as a result.
I'll try to work a little each night this week. To get the Mustang running and inspected, I need to do the following:
- Alignment
- Shorten the sway bar end links
- Install the bumper
- Install the front valence
- Install the grill trim
- Install the headlights
- Break in the new pads/discs

Saturday, March 28, 2009
Oil Change & Spark Plugs
The engine in the Mustang has seemed to run a little rougher than I recalled. I went to O'Reilly to buy some vacuum caps. While there, I decided to buy spark plug wires since I don't know the age of the current set.
When I arrived home, I started up the Mustang to warm up the motor for an oil change. While it was running, I looked over the spark plug wires again. It was then that I noticed the spark plug in the #8 cylinder was loose. I stopped the engine, tightened the plug, and restarted the car. This cleared up the rough idle.
I've not changed out the spark plug wires. It is a fairly easy project I can do at anytime. This weekend, I would like spend a little time reinstalling the sheetmetal so the car can be inspected.
I did decide to go ahead and change the oil. I used Mobile 1 High Mileage 10w40 oil as I did for the first oil change. I also used a Fram High Mileage HM8A oil filter.
I cut open the original oil Fram filter. I've heard rumor they are not produced very well. It does not look to be constructed poorly. The filter does not look as high quality as I would expect but it might do the job just as well as one which looks better.

Thursday, March 26, 2009
Tire Repair
I mounted the '68 Steel Wheels on the Mustang this past weekend. One of them was low on air so I filled it up on Sunday then mounted it on the car. By Tuesday evening the tire was flat.
I took the tire to a local service station yesterday and they checked the tire. The tire bead had slightly separated from the rim. He took the tire off and put sealant along the rim and mounted it all back together. Unfortunately, he said the valve seems needed to be replaced. He only had rubber ones so this one does not match the others which have chrome valve stems.
Last night I tried to mount the tire and as I rolled it up the driveway, I heard something bouncing around inside. I figured it was part of the valve stem and took it back today. Sure enough, part of the old valve stem was left inside the tire. He fixed it up within a few minutes during my lunch break.
There is a '68 coupe parked outside the repair station. I've seen it a few times over the past few months and it has not moved. I asked about it and found they did some repairs and the owner cannot afford to pay for them. I checked out the car and it is a coupe with bucket seats. It has factory air and clock with the louvered hood. The VIN was covered and I did not want to open the hood so I looked up at the oil pan to see if it was an I6 or V8. It was a V8 but the amount of rust on the frame rails and floorpan was shocking.
Sunday, March 22, 2009
Oil Gauge & Horn
Today I took it easy as it is the last day of my nine day vacation.
The stock style oil sending unit is not working correctly. Since I originally did not think I had oil pressure, I reconnected a SunPro gauge which was installed when I purchased the car. Although I don't want to use it long term, I connected the gauge for now and mounted using some existing holes under the dash. The gauge does not match the others but it provides a much more accurate reading. In the future, I'll switch to the stock gauge.
The back of the steering wheel is a little melted. This results in the horn connections not aligning properly. Since the horn is positive trigger, pressing the horn button results in a short. The previous owner found this out as the turn signal plastic was melted and the horn wires were cut under the dash.
I noticed this situation when I first purchased the car and just ran separate wires for the horn so I could get inspected. Now that I have a better understanding of the horn function, I took the wires he cut and created a negative trigger system which runs through a relay. The system is better as it uses all stock underhood wiring and no one knows any better. I went ahead and completed the project now so I would not forget about it before going for an inspection.
One of the smaller tasks I completed today was to tighten the alternator belt. The belt squeals when I press the gas pedal down with moderate pressure. I did not restart the car just to test it but I will soon. I imagine this problem is now corrected.
To get the car back on the road and inspected, I need to perform the following:
- Rebuild & Install the Splash Shields
- Reinstall Fenders
- Strip & Paint Hood Support
- Shorten Sway Bar End Links
- Alignment
- Restore Turn Signal & Headlight Wiring
Saturday, March 21, 2009
Fuel Gauge Incorrect
The fuel gauge in the Mustang has never worked properly. When I originally purchased the Mustang, it did not read anything so I replaced the sending unit. This helped some but the reading was always too low.
I then believed the problem was with the wiring. I ran a temporary wire to the tank to replace the original and installed a ground wire to the sending unit. These helped also but the gauge would go high when the car was first turned on and would then drop to half the original reading. It was not until during the restoration, I noticed the ground to the body was missing at the firewall.
With the firewall ground in place an my new CVR installed, I expected it would work better. However, the gauge immediately showed full when I turned on the key. After a little research yesterday, I found it was due to a mounting post on the back of the gauge grounding to the casing. I'll need to fill up the car to test the gauge as I'm not longer sure of how much gas is in the tank.
Friday, March 20, 2009
Sway Bar Interference
I'll need to address a problem with the sway bar before driving around much. There is not much travel to the suspension before the sway bar contacts the frame rail.
The gap was around 1" with the first set of end links installed. I switched to a different set which is 1" shorter. This gained about 1/2" at the frame rail which is better but not perfect. The sleeve in the end link is only 1 1/2" so I'm not sure if it would hurt to go shorter or not.
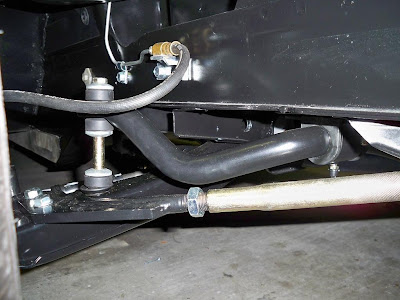
The gap was around 1" with the first set of end links installed. I switched to a different set which is 1" shorter. This gained about 1/2" at the frame rail which is better but not perfect. The sleeve in the end link is only 1 1/2" so I'm not sure if it would hurt to go shorter or not.


Starting the Engine
I started the engine this morning. It cranked for just a 40 seconds total before fuel reached the carburetor and it started up. It ran for a few seconds and I noticed there was no oil pressure reading. I turned the engine off so there would not be any damage.
I went to Ace and purchased a fitting to reinstall the mechanical oil pressure unit which was previously on the car. I started the car and immediately the oil pressure was 40psi. As the car warmed up, the oil pressure dropped to about 20 but would increase when I revved the engine.
The timing was not set properly as I loosened the distributor to clean it and the surrounding parts of the manifold. I connected a vacuum gauge and timing light. The vacuum was at 16 but I could not identify the timing. I turned off the engine and then made darker marks for TDC on the crank pulley.
The second attempt worked a little better. I was able to set the timing at 12 degrees which put the vacuum at 19lbs. If turned to 15 degrees, the vacuum reaches 20lbs. Performance normally increases with timing (to an extent). I've heard of setting timing based on the highest vacuum. For now, I'll just leave it at 12 degrees as it is a safe setting.
I did notice a little blue smoke when reving the engine and on the second start. The smoke goes away quickly but is a sign of oil burning. I'll need to keep an eye on this as I do not remember this occurring before.
Engine Compartment Assembly 4
I decided to not work as much on the Mustang today.
At around 10 o'clock, I headed to the garage and wire loomed the wire to the starter. I then put on the positive battery cable. Next, I filled the radiator with water and some Prestone Super Radiator Flush.
I turned on the key to connect a radio wire to the fuse box which came out during the rebuild. I connected the wire to a terminal in the fuse box. I then checked my connection for the new tachometer and found it was connected to constant power. I switched it to a switched power source and wire tied up all the connections.
I finished installing the driver side shock and both coil covers this afternoon. I then greased all the fittings on the steering and suspension system. I torqued all the steering components but am unable to put cotter pins in all of them. I'll need to pick up a few more from the auto parts store.
Last night, I painted the engine compartment where the brake fluid spilled. I then installed the new wheels on the front and took the car off the jacks. After a year of being jacked up, the front end seemed way too low. I layed a fender on the car just to check spacing and everything looks fine. I guess I've seen it up on jacks more than I've seen it on the ground.
I still need to work out the front alignment as the tie rods and strut bars are currently loose. The wheels are sitting on linoleum flooring with grease between the layers so I can turn the wheels easily for the alignment.
The last things I did last night was install the valve covers, wipe off the car, and sweep the floor. I'm ready to start the car but since it is so late, I don't want to wake anyone up. Additionally, if it does not start immediately, it would ruin the day.
Thursday, March 19, 2009
Engine Compartment Assembly 3
I started back on the Mustang early this morning. I rented a brake flaring took and tried to reflare the rear line connected to the residual pressure valve. After three attempts, I decided to try to replace the entire line using pre-flared lines. I visited NAPA and O-Reilly but they did not have the adapters needed to avoid flaring lines.
I purchased another 60" line and a coupler. I used a fitting which came with the residual pressure valve and the original fitting at the rear flex hose. I was able to flare this new (green polymer coated) line without too much trouble. I then bent the line to fit the car.
Kimberly helped me bleed the brake lines and continue the process of checking for leaks. We bled the brakes and as more air was removed, more leaks were found. I continued tightening all the bolts until they were gone. We worked up to the final test of me pressing the pedal to the floor for 30 seconds without any leaks. I'll check it again tomorrow and then paint the area under the hood which was damaged by the brake fluid.
I then installed both coil springs, the idler arm, center link, and tie rods. I tied up some loose wires under the dash and wired up the wire to the starter. I then completed the shock installation on the passenger side and mounted a tire.
Since I've made so much progress, I think I'll slow down the next few days. I have only four days left of my vacation and don't want to spend all day every day working on the car.


Wednesday, March 18, 2009
Engine Comparment Assembly 2
I started fairly early again this morning. I started working on the little details to complete the work last night.
I installed the spark plug wires, tachometer wiring, and spark plug wires. I spent a little while working on the Mr. Mustang engine gauge harness so it would fit the car properly. I then installed the engine gauge harness, heater hose plugs, A/C panel, and ground to firewall cable. I then located the bolt needed to finish installing the speedometer cable into the transmission.
I installed the brake line clips on the frame rails next, cleaned up the fuel hose routing, and then torqued down all of the suspension bolts according to my '67 Shop Manual. I ran the main wiring harness through the engine bay using the concours clips to hold each section in place. Next came the radiator, hoses, alternator, pullies, fan, and belt.
Kyle arrived and we bench bled the master cylinder. I did not loose much brake fluid installing the master cylinder which was suprising. However, some did get on the new paint which took the paint off.
I moved to the back passenger wheel and we started the bleeding process. Once I stopped seeing bubbles and Kyle noted the pedal getting firmer, I moved to the driver side rear wheel. Kyle filled the m/c with more fluid and we started again. After bleeding about 10 times, Kyle checked the m/c and found brake fluid everywhere. It was coming out of the m/c ports, the top ports of the m/c, and the residual pressure valve.
I loosed and retighten the lines from the m/c to the proportioning valve and we checked it again. This time the only leak was at the residual pressure valve. Unfortunately, the damage had been done as much of the paint is now covered with streaks were the brake fluid ran down the engine compartment.
After taking apart the residual pressure valve, I found the problem was with the end I flared. It looks horrible and if I had noticed I would have never tried to use it. Not sure how this occurred but we called it a night since we were not able to make any additional forward progress.

Monday, March 16, 2009
Engine Compartment Assembly
Yesterday morning, I taped off all holes in the fenderwells from the engine side. I then sprayed three coats of Duplicolor bed liner on each side. I'm using bedliner as undercoat as it is very durable. I tried using a 3M undercoat product on some test metal and the coil covers and it does not seem like it would hold up very well.
I planned to topcoat the Extreme Chassis Black on the frame rails with the Krylon 1613. I tested it on the lower side of the frame rail. It was evident the paint was not going to adhere well. I decided I would just leave the frame rails and undercarriage in the Extreme Chassis Black.
After mailing the items I recently sold on eBay (made about $150), I cleaned out the paint overspray from the garage. I then started the reassembly process at about 3 o'clock. Kyle arrived at 6 o'clock and we continued working until about 11 o'clock last night. The following was installed:
- Steering Box, Column, and Instrument Cluster
- Rubber Plugs for Engine Compartment Holes
- Z bar and All Clutch Linkage Parts
- Throttle Linkage and Carburetor
- Speedometer Cable
- Fresh Air Vent
- Windshield Washer Reservoir
- Battery Tray & Battery
- Combination Vale & Brake Lines
- UCA, LCA, and Roller Spring Perches
- Complete Spindles w/Disc Brakes
- Adjustable Strut Rods & 1 1/8 Sway Bat
- Engine Crossmember
- Fuel Line & Pump
The bolts for the suspension parts are just finger tight. I'll check the shop manual for torque values and then go around checking everything. Afterwards, I'll install the springs and will put the car back on its own tires.
I noticed a small chip on the sway bar and another on the engine crossmember. I'm suprised as they are coated in Extreme Chassis Black with is supposed to be very resistant to any chips. I'll try to touch these up in the morning.


Sunday, March 15, 2009
Engine Compartment Painting 3
I put another coat of Extreme Chassis Black on the undercarriage this morning. By the morning it should be fully dry. I'll then put the undercoating in the fender wells and begin reinstalling parts. The plan is to start with parts mounted on the firewall and then move forward. Hopefully this will ensure (or minimize) the paint is not damaged while reinstalling parts.
The only other forward progress made was painting the battery tray. I also picked upsome wiring at Wal-Mart for the tachometer installation. I want to install the instrument cluster tomorrow as one of the first projects so I do not damage the steering column installing it later.
I can't say how glad I am that the engine compartment is painted. It has taken so long to get to this point it does not seems like I should be at this point yet. I'll install a few parts in the morning and Kyle is coming over to help tomorrow night.
Saturday, March 14, 2009
Engine Compartment Painting 2
The Rust Encapsulator I applied last night had plenty of time to dry this morning. I started off this morning by checking all the panels for runs or rough spots. I found a few and used 400 grit sand paper to clean up those areas. I then used the tack cloth on the engine bay to clean off any residue or dust.
I used three coats of Krylon 1613 on all engine compartment surfaces. I went a little light with the first coat and increased the amount of paint used with each coat. This required about five cans of paint.
I then moved to the undercarriage and coated the undercarriage with Extreme Chassis Black. I don't like the level of gloss with the Chassis Black but it is much more durable than any of the other spray paints. After putting two coast of Chassis Black on the subframe and frame rails, I might top coat with the Krylon for a better appearance.
I'll wait for everything to dry during the day today. I'll probably put undercoating in the wheel wells later this afternoon. The Chassis Black will need to dry overnight and then I'll put another coat of Chassis Black on in the morning. Once it dries, I'll touch up any areas with Chassis Black overspray, put on a little more undercoat in the fenderwells, and then
Friday, March 13, 2009
Engine Compartment Painting
After scrubbing the engine compartment, subframe, and fenderwells with 3M scour pads (and water), I wiped down the frame tonight with Klean Strip Clean-All. This cleaned any remaining grease from the panels. I needed to lightly sand the front frame rails and sway bar mounts. I then used USC tack cloths as a final step in paint preparation.
I then used Rust Encapsulator to coat all of the engine bay and undercarriage of the car. I used almost two cans. Since there was already one coat on all the metal, this provided me with a total of about 2.5 coats. Since I already painted the fenderwells with Rust Encapsulator, I went ahead and painted the outside frame rails with Eastwood's Extreme Chassis Black.
The Rust Encapsulator requires 6-8 hours of dry time and the Extreme Chassis Black requires 24 hours. When I wake up in the morning, I'll put a coat of Extreme Chassis Black on the subframe. I'll then periodically paint the entire engine bay area with the Krylon 1613 until I have at least three coats.
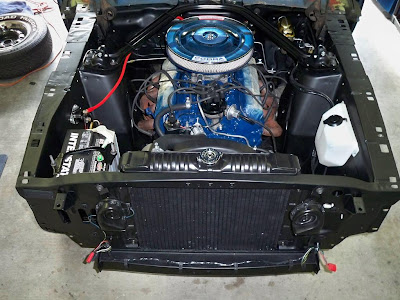
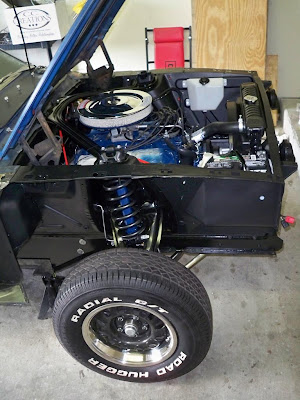
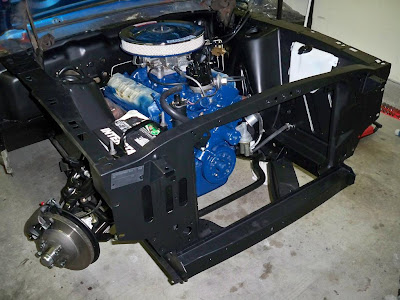
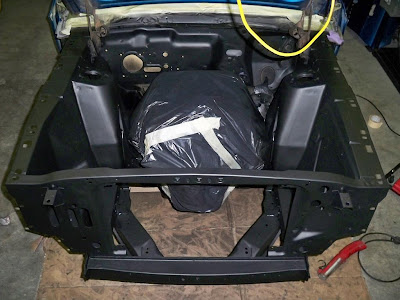
I've included a picture of the engine compartment and garage. The paint is not completely dry and will dry overnight. You can see the overspray all over the floor. The lines in the overspray were created by rolling around under the car on a creeper to paint the undercarriage.

Thursday, March 12, 2009
Instrument Voltage Regulator & Tach
The RetroGauge tachometer I ordered from Mustangs Unlimited last Sunday arrived today. The part looks great and I installed it immediately. The item looks original and will no doubt work better than the column mount VDO tach I previously used.
I purchased all the parts to make a voltage regulator from Radio Shack a little more than a week ago. I started building one then but broke a lead off the regulator and was not sure of how I would mount it to the cluster so it would radiate heat well. I picked this project back up again today so I would be finished with the instrument cluster.
The voltage regulator is made of the following parts which cost about $5:
+5V Fixed-Voltage Regulator 7805
10.0uF 50V 20% Axial-Lead Non-Polarized Capacitor
I built the regulator and mounted it to a strap piece of metal I polished and cleaned up. You would not know it but the piece of metal came from part of a satalite dish distribution block. I've mounted the regulator to it so it would act as a heatsink.
I tested the regulator after building it and it works great. Some have made the part without the capacitors but they help keep a smooth 5V output. This is needed to ensure the gauges accurately reflect oil pressure, water temperatue, and fuel level.
The original regulator included a post with a thin strip of metal which sat on the post. The resistance of this connection caust the thin strip of metal to bounce on the post. This provided an average voltage of about 5V. Since the gauges are not incredible sensative this worked to provide accurate readings. Of coure, the one I created will be must more accurate and reliable.
I've include a picture of the front and back of the cluster and the original voltage regulator.


Wednesday, March 11, 2009
Steering Box Paint & Battery Tray Completion
I ordered two cans of Eastwood's Rust Encapsulator and a can of Spray Gray this week on eBay.
The cans of paint arrived today and I decided to go ahead and paint the steering box. Since the box was already stripped and primered, the job was not very difficult. I put several coats on all of the steering box. I would have preferred to remove the top plate or cover it before painting. However, I know it would just rust as it already started since I first cleaned the box.
I had to move it around a little to access all sides. I would remove the box but on a '67 Mustang, a shaft comes out of the box and runs up the column. This shaft is so long it is not possible to remove the steering box without taking off the exhaust manifold. Since my exhaust is solid from the head to the muffler, this really is not an option.
After painting the steering box, I spent a little more time putting on metal filler and sanding the battery tray area. Over 90% of the area is covered by the battery tray but I want it to look good. After working on the area a while, I primed it and was content with the finished product. I've included a picture of the panel below.

Tuesday, March 10, 2009
Grinding Down Welds
I spent tonight grinding down the welds from last night. The majority of the time was spent on the battery tray area. I'm not as concerned about the fenderwell welds as they can't be made to look perfect and are covered by the fender.
I used a grinding disc with a 4" 50 grit pad. The work took a little while but the battery tray panel is smooth enough to use USC Metal Filler to complete. I've included a few pictures below. I would like to have a picture of each before grinding but we used the grinder while welding to find any gaps in the welds. The pictures below were taken at the midpoint of the process.
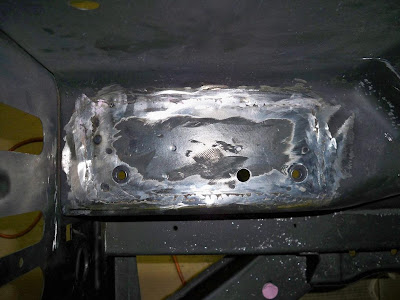

I used a grinding disc with a 4" 50 grit pad. The work took a little while but the battery tray panel is smooth enough to use USC Metal Filler to complete. I've included a few pictures below. I would like to have a picture of each before grinding but we used the grinder while welding to find any gaps in the welds. The pictures below were taken at the midpoint of the process.


Monday, March 9, 2009
Patch Panel Welding Complete
Danny came over last night and helped me weld my patch panel for the battery tray and the area in the driver floorboard.
We spent a little over three hours working on the car with most of the effort on the battery tray area. My patch panel was tacked in with a brass plate behind the panel. I then held the plate in place as he moved around placing additional spot welds. Once it was held in place well, I put on my welding helmet and watched him weld. I've only welded once (if you can call it that) so watching someone is helpful.
I grinded off the welds fairly flat every so often and we placed a light under the panel to see if there were any missed spots. After repeating this process a few times, the weld was solid all the way around. It was about this time Danny remembered we had another patch to weld.
Danny quickly welded the next piece in several long bursts. I held a brass plate on the inside of the car while he welded. The plate was incredibly hot and felt like it was burning my fingers through my welding glove. The welds in this area are much, much larger than the other and will be hard to clean up. Danny suggested I leave much of the weld bead alone to ensure it is strong. I'll follow his suggestion and just clean up the welds slightly.
I'm exhausted as I had Jury Duty this morning, worked the rest of the day, and then worked from the moment I made it home until after 9 o'clock.
Sunday, March 8, 2009
Random Work & Welding Update
Since painting the steering column, I've started thinking of switching to a different tachometer. The one I have is nice but would mount to the steering column. I don't want to mess up the paint with the tach when I don't plan to leave it there long term. Additonally, the tachometer is slow to react to changes in engine speed.
The ideal tachometer would be the stock 4" style but they sell regularly on eBay for $400+. Retrogauge makes one which fills the blank clock spot in my cluster (about 2 1/8") and looks original. This one is offerred for $100 dollars.
I've listed a few unneeded garage door openers, the old brake calipers, tie rods, a Paintucation DVD, and some old car audio installation accessories. I listed some items last Saturday and finished up today. As of now, I've already $60+ in bids so I ordered the tach from Mustangs Unlimited.
I tried to reach Danny a few times over the past week about the welding but had no luck. I spoke with my Dad about it and he felt it was very out of character. He called Danny's ex-wife and left a message then left a message with Danny himself. Danny then called me and stated his cell phone was not working properly. Regardless, he stated he would call me Monday or Tuesday about the welding.
I hope he is able to come by to do the welding during the week. I have next week off work and would love to paint the engine bay then put it back together while I am off work. If the welding works out well, my goal will be to have the Mustang back on its front wheels with the engine running by the end of my week off. I don't plan to have all the sheetmetal on but everything else should be done.
Saturday, March 7, 2009
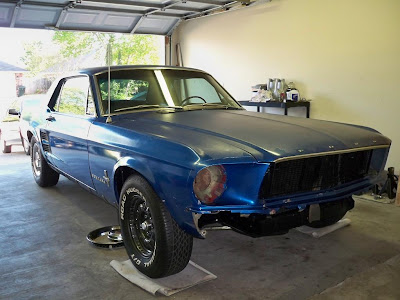
Exterior Clean Up
The Mustang is covered with dirt and dust. I left the car uncovered when I started this project as I only expected to strip the fenderwells. As the project expanded, the layer of dirt and dust on the car continued to thicken. After a while, I stopped worrying about it. Today, I decided I would clean off the dirt and dust.
I used a California car duster I've had for years to clean the majority of the car. I then used some of the Meguiar's Quick Detailer to clean the rest of the dirt off. I'd spray and area and wipe it off with a towel. I've never spent much time cleaning the exterior of the car since I purchased it last January. The paint looks much better than I remember.
I spent a little time cleaning up the garage as well. I can't seem to keep the place clean.
Thursday, March 5, 2009
Brake Problems Corrected
I exchanged an email with Dan from ChockoStang this morning. He stated the holes in the caliepr and pad do not always line up perfectly. He suggested I grind away enough of the pad backing plate to secure the pad to the caliper.
I was able to grind away enough this after work today using my Dremel. I then mounted up the second spindle with little trouble. Both spindles drag a fair amount but I'm told this should go away after I break in the pads.
I was able to grind away enough this after work today using my Dremel. I then mounted up the second spindle with little trouble. Both spindles drag a fair amount but I'm told this should go away after I break in the pads.

I ordered Moog tie rods and sleeves from RockAuto on Tuesday. I used my birthday Visa gift cards on the purchase and paid the rest. The Moog parts are not cheap ($160) but they are the best quality available. They arrived today and I added to my list of parts I'm ready to install.
I've continued to try to reach Danny about the welding. I've received his voicemail every time I called. I called from work and from a payphone just to find out if he is avoiding my calls but he never answers. It is very odd to not hear from him or have him answer his phone in two months of calls. Unfortunately, I'm low on options for someone to help me out and my car is not in a condition to take it somewhere to have the welding done.
I'm off work the week of March 16th. I hoped to have the welding done so I could spend the week reinstalling all these parts I've restored over the months. If the welding is not done, I can't paint the engine bay. If the engine bay is not painted nothing can be installed. I've posted on the VMF forum for opinions and will probably start calling local body shops to see if anyone would help and what they would charge.
Wednesday, March 4, 2009
Additional Brake Caliper Problems
I'm frustrated.
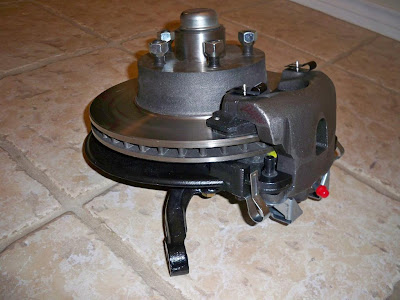
My disc brake calipers arrived in the mail today from ChockoStang. The calipers look great. The quality of these greatly exceeds that of my original calipers or the rebuild ones from NAPA. I loaded a caliper and found it fits over the disc without any trouble.
I installed the passenger side first. It was a little difficult to install the guide pins as the alignment was not perfect. They slid in but not as easily as I imagined. The pad drags slightly on the disc but I'm not sure if this will be an issue after break-in.
When I moved on the to the passenger side, I encountered a problem. The outer pad is attached to the caliper with two locking pins. Unfortunately, the hole in the caliper does not line up with the hole in the pad. I assumed the problem was caused by the pad but I could not reposition it to align the hole as it locks into a certain position on the caliper.
I checked the pad in both my original calipers and the hole aligned perfectly. I expected it to be caused by the pad rather than the caliper. I'm sure I'll have a tough time explaining this to Dan at ChockoStang. He likely already thinks I'm crazy as I've been unable to fit previous caliper and pad combinations over my stock sized rotor.

Monday, March 2, 2009
Steering Column Restoration
I removed the steering column from the Mustang on February 8th. I placed an order with NPD last Thursday. The order included the new lower column seal and paint for the column. Since the order arrived today, I decided to go ahead and paint the steering column.
I tested the paint (Charcoal Metallic) on a piece of scrap cardboard. It was obvious it is very thin and used mostly for a metallic finish coat. I painted the column black first with the Krylon 1613 and then put a couple of light coats of the charcoal metallic paint.
The finished column looks really nice but may have a little more metallic than original.

Sunday, March 1, 2009
Disc Brake Install Problem
On January 11th, I assembled the spindle. At the time, I did not have brake pads to complete the entire spindle/brake system. I've been working to complete the brake system since with little success.
I ordered some brake pads from NAPA on January 19th. I worked to install them that evening but the caliper would not fit over the disc with the pads installed. There was simply not enough space between the pads. Since all the parts were new except the calipers, I assumed they were the cause.
A couple of days later, I tried to push the caliper piston further back in the caliper with a C clamp but it would not move. I took the caliper to NAPA to ask them about the problem. They believed there was an issue the amount to piston stuck out of the caliper bore. Their advice was to order new calipers for $45.49 each ($16.50 core charge). If they did not work, I would not need to buy them.
The new calipers arrived on January 27th. I tried to install them with the same NAPA pads. Unfortunately, they would still not fit over the rotor. They were a little larger but it did not make enough of a difference. The situation does not make much sense as I'm now using NAPA discs, calipers, and pads and everything just does not fit. Unfortunately, NAPA does not understand why this would occur and can only offer to order another set of calipers to see if they are different.
On February 7th, I called all the local auto part stores to determine who had pads, discs, and calipers in stock. I planned to visit each to compare their parts to the ones I had. Unfortunately, I could only find stores with pads in stock. I checked the pads at three stores and found they were all the same thickness as the ones I purchased from NAPA (.55").
I post about the restoration of my Mustang on a Vintage Mustang Forum. I posted about the issue and found someone else experienced the same problem. They went through all the steps I did and they were never able to find parts with worked through a local auto parts store. A Mustang vendor called ChockoStang helped him and mailed him a complete caliper set with pads which worked.
This morning, I called Dan at ChockoStang after emailing him Friday. We reviewed the disc, bearings, and races used in the spindle. Once we confirmed they were all correct, he offered to install a caliper and pads on a complete spindle at his shop and mail them to me. This should ensure the parts fit.
I returned the NAPA pads and calipers this morning. The total from those was $115.04. The total price from ChockoStang was $107.00. While ChockoStang is cheaper, they do not allow me to return the original calipers to get the core charge ($33). I'll likely end up selling them on eBay.
Subscribe to:
Posts (Atom)