Sunday, September 25, 2011

Strange Suspension Sound Fixed!

Since the front suspension rebuild, I would hear a loud thud noise when I hit a bump on the driver side.  It was somthing I mainly heard when driving down a rough road near my house at about 30-35 MPH.

I went through the driver side suspension numerous times trying to locate the cause.  I checked all the bolts, checked clearance, and made sure I was not hitting the bumpstop.  The solution or cause of the problem always seemed to elude me until today (yesterday actually).

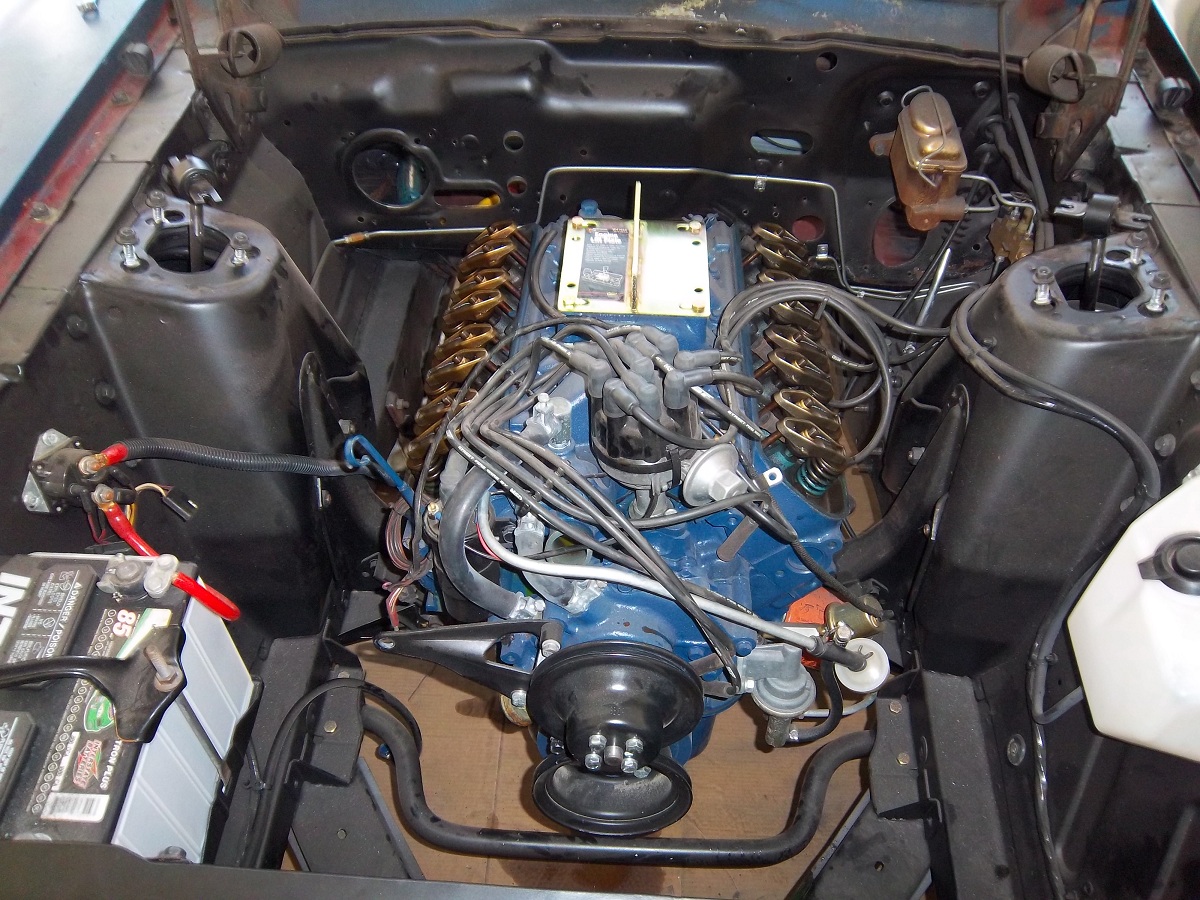
Look at the engine mounts connected to the engine block in the following two pictures:


You will notice part of the mount is missing on the driver side.  It was impossible to tell the mount was damaged until I removed the engine.  The mount is comprised of a metal bracket on top and one on the bottom.  The two pieces are connected by molded rubber.  The rubber separated from the top piece of metal but with the engine weight on the mount, everything looked fine.

It seems the noise I would hear when hitting a bump was actually the engine bouncing on the mount.  Who would have thought that would be the solution to what seemed to be a suspension problem.

Saturday, September 24, 2011

Engine Removal

This morning, I started the various tasks needed to remove the engine.  The task was easier as I've already removed the transmission, throttle assembly, exhaust, and z-bar setup.  

I started by draining all the coolant from the radiator.  I then removed the radiator, alternator, export brace, starter, valve covers, and hood.  I purchased a plate which attached is place of the carburetor for lifting out the motor.  I went ahead and removed the carburetor and installed the lift plate


I rented a 1500 lb engine crane from RedTail Equipment.  I then purchased a 1000 lb engine stand from Harbor Freight.  I covered the sides of the engine bay, front radiator support, and drapped a towel down the back side of the motor so it would not scrap the firewall.  I then attached the crane, removed the engine mount bolts, and started pulling the motor.

The motor came out with relative easy.  It is a little alarming at first to pull the motor and realize the entire weight is on the crane.  Its one of those moments you can see the engine just crashing down into the car and damaging everything.  Fortunately, that did not happen.  I pulled the engine without a single scratch to the engine compartment.

Once the engine was mounted on the engine stand, I started cleaning up the garage.  Coolant drained out onto the floor and created quite a mess.  I'd rolled the Mustang almost out of the garage to get enought space for the crane.  Once I cleaned the floor up, I rolled the Mustang back forward so the garage door could close again.

It is rather difficult to have an engine on a stand in your garage and not start thinking about putting in a new cam or other performance parts.  I just need to focus on finishing up what I need to do on the floorpan.  I'll save doing anything on the engine until the very end. 


More on this later.... I found the following in the engine compartment and I'm trying to decide if it is a valve stem seal or something else.

Monday, September 12, 2011

Unexpected Call from Stanger

In early January, I packaged up my steering box and shipped it to Randy Meyer (Stanger) for rebuild. 

Randy was already behind but stated he could start on the rebuild in February.  I originally expected to finish the dash restoration in March.  This timeline matched with the expectation I had on when the steering box would be restored and returned.  However, as you have noticed the project expanded beyond restoring the dash.

I've sent a few emails to Randy for an update on his progress but never received a response... until today.  Randy called and caught me a little by surprise.  Randy said he expected to finish up the rebuild this week.  He would then give me the amount (probably the $140 basic charge) sometime later this week and we could arrange payment.

Randy believes my steering box does not have many miles on the box or someone took the time to keep it regularly lubricated. Normally there is pitting on the internal gears and wear on the center gear. He said my gears are not really worn at all and there is no pitting. The only issue was a little waviness to the metal were the upper and lower bearings set on the input shaft. He had this machined, replaced the internal wear components, and added a new seal as the old one was leaking.

I'm looking forward to getting the steering box back.  Sounds like it will be just in time.

http://www.stangerssite.com/

10/19/11 Update: While it took a little longer than expected, my steering box arrived today.  The box looks great.  The only down side is the pitman arm is not attached.  I'll need to do that in the coming weeks.

Sunday, September 11, 2011

Driver Fenderwell Finish Work

Today, I worked on the firewall/toe board area which is visible from the driver wheel well. 

There was not much clean up needed in this location because of the toe board welding.  Instead, the work needed was correct a welding job a friend helped me with in 2009.  There was rust from the windshield washer pump.  At the time, I did not know how to weld so he stepped in to help out.  As you can see below, he mounded up weld at the joint and asked me not to grind it off or it would damage the weld.


Since I'm now much better at welding, I decided to fix the eye sore.  I ground down all the welds flat and then welded up any pinholes I found.  The panel was not lined up perfectly when it was butt welded in.  I put a little filler over it to hide that and then coated it with primer. 

I stripped the side panel which is adjacent to this one and in front of the driver door (under the fender).  I then put seam sealer on the gaps on that panel and in this toe board area.  I'm waiting on more of the RT250 Duplicolor bed liner to arrive so I can coat both areas.  When that is done, I'll post and 'after' picture of how it turned out.

Saturday, September 10, 2011

Remaining Tasks on Current Project

At about this piont in each project, I take inventory of the tasks remaining.  The end of the project starts to become visible but just does not arrive fast enough.  Marking tasks off the list is motivating for me as it confirms the project is getting closer and closer to an end.

Anyway, here is the list of things I have left to complete:
- Tighten Leaf Spring Bolts
- Paint Transmission Support Brace
- Prep Rear Floor Seam & Torque Boxes (Strip, Prime, & Seam Seal)
- Prep Driver Torque Box (Strip, Prime, & Seam Seal)
- Finish Work & Paint Toe Board Area in Driver Fenderwell
- Prep Front Frame Rails (Strip, Prime, & Seam Seal)
- Weld Passenger Parking Brake Bracket
- Cut Hole in Floor for Parking Brake Cable
- Repaint Throttle Linkage
- Remove Engine
- Smooth Underside Toe Board Weld
- Undercoat Floorpan
- Install Engine Mounts
- Reinstall Engine
- Seam Seal Upper Side of Floorpan
- Strip Underside of Dash
- Repair Cowl Hats
- Strip and Paint Front of Dash
- Install Sound Deadening
- Install Firewall Pad
- Install Dash Wiring
- Connect Electric Fan
- Install Pedal Assembly
- Install Clutch & Throttle Linkage
- Install Gauge Cluster
- Install Steering Column and Wheel
- Install Transmission
- Install Driveshaft
- Install Exhaust
- Install Parking Brake
- Install Gas Line
- Install Interior

I've a busy September and October ahead of me with work and Boy Scout commitments for my son.  However, I hope to be at the point of reinstalling items by the beginning of November.

Friday, September 9, 2011

Finish Work on the Undercarriage

I decided against working on the dash today.  Instead, I worked the underside of the floorpan.

I welded up the a section on the rear of each of the sub-frame connectors.  I'd saved the final weld until I had the floorpan installed and could jack up the car a little.  Once they were done, I seam sealed over the welds and up the sides of the floorboard along the rocker panels. 

I had very good penetration on all my welds.  A few of the welds for the seat risers and toe boards caused divits on the underside of the car.  I grinded those off and then put a little primer over the bare metal spots. 

I cleaned up the passenger side torque box I added to the car.  I then painted the area where I made the toe board repair which is visible from the driver wheel area.  I then covered the repaired area and the torque box with some Duplicolor TRK250 bed liner.  Its the same stuff I used on the outer fender aprons a few years back and its still in excellent condition.


I cleaned up the welds on the front frame rails, transmission support, and transmission tunnel.  Once I had those smothed out, I coated them with primer as well. 

I've not seam sealed the frame rails, transmission crossmember, or transmission tunnel.  I'll be unable to work on the car tomorrow but might be able to find time to do these on Sunday. 

The day was somewhat productive. It was not as gratifying as welding in the floor. There is just something to be said for finishing an entire part of project. Today was more about wrapping up some lose ends and getting ready to paint the underside of the car.


Thursday, September 8, 2011

Finally Finished Welding the Floorpan

A welcome change in the weather occurred this past Sunday.  The temperatures in Texas dropped from a daily high of around 105 degrees to 90 degrees.   Without the hot garage to fight against, I decided it was time to get moving on the Mustang.  This involved taking today and tomorrow off work to dedicate to the project.

On Sunday, I welded in the passenger side seat riser.  Before welding the riser in place, I sanded the inside and floorboard which would be covered by the seat riser.  I coated them both with Eastwood's Rust Encapsulator and then Satin Chassis Black.  This might not be necessary but I wanted to keep the inside protected as the originals were not and were filled with rust when I removed them from the Mustang.

I started off the morning today by installing the driver side seat riser.  I had already painted it like the passenger side on Sunday.  I used the same installation approach as with the floorpan by fitting the panel and then drilling holes to plug weld the seat riser into place.  Each of the seat risers had about 40 holes in them about 2-3 inches apart.

With the seat risers in place, I turned my attention to the rear section of the floorpan under the rear seat.  The new floorpan did not extend all the way to the rocker panels.  The driver side was close enough to work the metal to get it to fit.  However, the passenger side was at least a 1/4" and there was no way to get it to fit without a fair amount of modification.

To make the passenger side fit, I cut off the end of the floorpan which welds to the rocker panel.  I placed the cut directly over the frame rail.  This would allow me to weld it to the rocker panel and then fill the cut area with weld.  The job was not too difficult as the frail rail flange made welding the gap closed much easier.


With everything welded, I started the process of grinding down all of my welds.  There are a few which a placed two far into a corner to grind down.  This bothers me a little but there is nothing to do about it.  Additionally, only I'll know as I'm going to coat the floor with sound deadener and you will never see it.


I worked from 8AM to 5PM on the Mustang so it was definitely a long day.  Tomorrow, I think I'll work on stripping the area behind the dash.