Sunday, December 3, 2017

Rear Gear Ratio Upgrade - Part One

In June, I purchased a Motive 3.80 rear gear set which has been waiting on my workbench for months now.  Randomly, today I decided I would start the project of getting them installed. 

I decided to tackle the project now as I have a few hours in the morning tomorrow before I need to catch a flight for work.  It is one of the few weekdays in which I have time to drive over to drop off the parts for installation.  Additionally, I'll make it back just early enough on Wednesday to pick up the parts during the work day.  In that regard, the timing is really good.

The task of removing the rear carrier is not very hard and does not take a great deal of time.  However, it is a rather messy job and don't particularly like the smell of rear gear oil much.  I made quick work of it though and within an hour or so had the carrier laying on the garage floor.


The new gears are part number F880380.  I also purchased a new FelPro gasket for the carrier.  I did not buy near bearings as the ones which are in the carrier were replaced from a kit I purchased when I had the 3.25 gears installed.  I'm going back to the same shop so I hope they don't give me any trouble.  I doubt they will as they did not want to warranty this at all the first time as they were using all of my parts so I imagine the same will be true this time.  


Friday, November 17, 2017

Spark Plug and Compression Check

I've been trying to decide what might be causing the puffs of blue smoke and extra oil consumption in the Mustang.  I decided to pull the spark plugs out to check them and run a compression check on the motor.  The compression was very similar across all of the cylinders so the rings have sealed well which is good news.


This is the driver side spark plugs from cylinders 5-8 with eight being the closest to the camera.  You can tell that cylinder number 7 is having a problem of some type. 


This is the passenger side with cylinder 4 being the closest to the camera (basically in the same orientation they came out of the engine).  You can tell that the third cylinder is also having the same problem as cylinder number seven.


I ordered replacement plugs for cylinder 2 and 7.  I'll need to figure out what is going on with those two cylinders.

Sunday, September 24, 2017

Stripping & Painting the Driver Door

My original plan this afternoon was to work on the weatherstripping for the driver door.  However, once I started work, I ended up stripping the paint from the door to repaint it first.

The metal on the interior side of the doors has a textured finish.  At the top of the drivers door, it looks as if the metal has been sanded down in areas.  The outside of the door has a little rust spot which should be fixed.  I decided that I would strip the paint off the inside to see if the metal texture was still there or if it had been sanded off completely making it better to just replace the door.

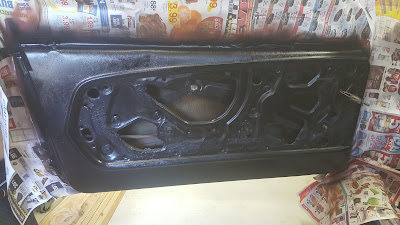
The front section of the door stripped down fine and there was just so much paint you could not see the texture.  However, a little further back on the door, I found a section of Bondo.  It seems the door was dented at the top some.  In their normal fashion, the old owner, drilled three holes to pull the dent and then covered the area with 3/16" of Bondo.  It is ridiculous to have repaired it this way.


With the Bondo removed, the dent remains but in my opinion it looks much better.  Perhaps I will remove the window and hammer out the dent when I do some body work on this door later.


For now, I decided to just weld up the holes and then paint the door.  The repair is not perfect and I'm not sure what you do about the lack of texture in this section but I'll go ahead and paint it and then figure it out later.


Since I had stripped the top of the door, I figured it would be best to just strip the entire door and paint it before putting on weather stripping.  I've painted the passenger door but not the driver as I knew it needed work and it was not really worth the time to just top coat it and compound the work later.  Stripping the door took some time but there were really not many other issues.


With the door stripped, I could see some areas of surface rust which were under the paint.  I decided to top coat with some Rustoleum Rust Primer and the top coat with some Satin Black.  I covered as much of the car as possible with old newspaper pages and masking tape.  I then put two coats of primer followed by two coats of paint.


With this job done, I'll let the paint dry and then get back to the original job of replacing the weatherstripping.

Saturday, September 23, 2017

New Weatherstripping for the Passenger Door

When my son and I drove to the Goodguys show back in March, he could feel a little air coming through the lower portion of the passenger door.  When you looked at the weatherstripping along the lower front portion of the door, you could actually see a little daylight.

While it would probably be better to do the job once after the car is painted, I decided to go ahead and do the weatherstripping now.  The weatherstripping itself is really inexpensive and it could still be a while before I get the car painted.  Doing the job now would make it a little better for driving around which is what I would ultimately like to begin doing.

I replaced the passenger side weather stripping today and the job was pretty easy.  I used Scott Drake weatherstripping and some some 3M Stage 2 Weatherstripping Adhesive which I picked up from the local O'Reilly's.  You put the adhesive on the door and a thin coat on the weather stripping.  Once they dry a little and get tacky, you install the weatherstripping.  Just to ensure it stayed in place, I put some masking tape on the weather stripping about every 3".

Now that the job is done and everything is dry, I can really tell the difference.  It is actually a little hard to shut the door now because the weatherstripping is so thick and stiff.  I'm sure it will break down over time and be just fine.


Tuesday, June 13, 2017

Contemplating Rear Gear Change

I've often considered replacing the rear gear set in the Mustang for improved performance.  My hesitation is with the amount of improvement I would experience versus how it might negatively impact driving at highway speeds and in first gear.   

When driving to the Goodguys show in March, I took the following picture of my gauge cluster.  The cluster shows 70 MPH and 2100 RPM.  However, my wife was following behind and my speedometer showed 70 MPH when I was going 74 MPH.


The current rear gear ratio is 3.25:1.  My rear tires are 26" tall.  My transmission has the following gear ratios:
1 - 3.35 
2 - 1.99 
3 - 1.33 
4 - 1.00 
5 - 0.68

If I switch to a 3.8:1 rear gear, my RPM at 70 MPH would be 2300 RPM which is not too bad.  At 75 which is the speed limit in many places, I'd be at 2500 RPM.  However, I'm concerned about what first gear would be like using a 3.80 rear gear.  

I could switch to a 3.55:1 rear gear and it would be better all around except the performance increase would not be that great since I'm already running a 3.25 rear gear.  At 75 MPH, the 3.55 gears would put me at 2340 RPM.

I calculated these using the following calculator which seems to be one of the better ones I found:
http://www.wallaceracing.com/calc-rpm.php

Sunday, March 19, 2017

Recap of Goodguys Spring Lonestar Nationals Trip

The round trip to the Goodguys show in Fort Worth including driving around town was 454 miles.

For a while, I watched the temp, oil, and a/f guages expecting something to go wrong.  As the miles rolled by, my concern faded as everything went exceptionally well.  In fact, there were no real problems at all.

I expected to have some trouble with the engine temperature.  Despite the temperature outside reached 84 degrees and bumper to bumper traffic, the engine temperature never exceeded 180 degrees.  I suspect the new alternator allows the electric fan to run faster at idle as I previously had some trouble with the temp increasing at stop lights or drive thru's.

The show was great and had more attendance than I've seen before.  This year I did not put the Mustang in the show or run it in the autocross but I might in the future.  However, this was a great chance to run the car and have a great road trip with my son.


As I drove, I did think of a few things that I could do to improve the Mustang for future trips.  Some of them are small but if you don't document them and work to eliminate them, they will always be there.  The ideas I jotted down include:


  • Rattle above clutch pedal when the clutch is pressed.
  • Front speakers are needed to hear the radio with the windows down
  • Passenger window is a little hard for my son to roll down
  • There are a few small holes in the firewall which need to be filled
  • Rattle in driver side rear interior quarter panel
  • Better way to fill with gas without any running out
  • Need to confirm there is no oil usage
  • Rattle on the driver side door pull
  • A/F is a little high when in forth gear
  • Speedo is off 4 mph at 70 (70 is really 74)
  • Better driver side mirror??


Friday, March 17, 2017

Goodguys 7th Annual Spring Lone Star Nationals

Weeks ago, I made hotel reservations for the Spring Goodguys car show in Fort Worth.  I then grew busy with other things and did not think much about going again until this week.  As the week progressed, the weather forecast improved and good weather is expected.

I've not done anything in preparation but have decided to drive the Mustang.  There is no particular reason except I want to take it on a road trip.   My goofy thought is that I will drive it to events occassionally and if they have some type if commemorative sticker, I'll get something small for the rear bumper.

I drove the Mustang to work yesterday and today.  Last night, I cleaned it some, fluid levels, and confirmed my tools and spare parts bin were in the trunk.  Now the only thing left is to do it.

The Mustang is currently waiting in my work parking lot for 5 o'clock to come.