Saturday, December 31, 2016

Trimming Rear Quarter Panels

Last year, I learned that when I have a passenger with me in the Mustang, the additional weight can cause the tires to hit the lip of the quarter panel.  The contact caused some damage to the passenger side tire.  Since both sides are about equal distance from the tires, I decided to trim an 1/8th an inch off each quarter panel lip to see if it and the new shocks help or if I must get some different springs.

I used a set of calipers set to 1/8" and used them to scribe a mark to ensure I trim an even amount.


I decided against trimming using an cutting wheel.  Instead, I used a 60 grit flap wheel to essentially grind off enough metal.  This gave me a smooth surface and allowed me to grind up to exactly my mark and then bevel the sides of the cut just a little.


While I was working on the car, I decided to spray down the rear leaves with some WD40 Silicone spray.  The leafs make squeak noises and this seemed to take care of it.  The stuff I used is suppose to be water resistant so I'm hopeful it will last a while.  

Tuesday, December 27, 2016

Bilstein Rear Shocks

I installed a set of Bilstein rear shocks today which I purchased a couple of weeks back.  I upgraded the front shocks to Bilstein's earlier this year but waited on the rear shocks as they are a little expensive.  

The front Bilstein shocks were dramatically larger than the KYB Gas-A-Just front shocks.  The rear Bilstein shocks are also larger than the KYB versions but the difference is not as dramatic.  The KYB shocks can be compressed without much difficulty.  The Bilstein's seem to be about twice a stiff.

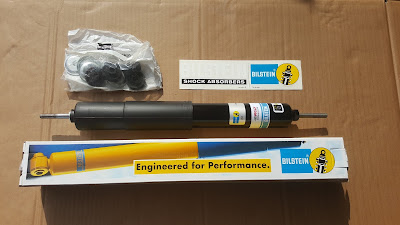
The Bilstein rear shock is shown below with and without the boot beside the KYB shocks they replaced.


This is what came in the package provided by Street or Track.  They were $94 each.


The replacement of the rear shocks does not have as much impact on ride quality as when the front shocks were replaced.  I can tell the car rides better.  When there are a few people in the car, the back will bottom out with 4.5 mid-eye leafs.  I'll need to replace them at some point but I'm curious if the stiffness of these shocks helps the situation at all.  Time will tell.

Sunday, March 20, 2016

Temporary Fender & Valence Repaint (Part 4)

I'd planned to relax a little this afternoon but instead I decided to go ahead and reassemble the Mustang.  Everything had dried enough so I went to work.  After about two hours, I had everything back together and looking good.  Its not a new paint job but at least the car is now one color!

Before:


After:


You can also tell ever so slightly in the second picture that the rear of the car has been raised some.  The front looks a little lower in the second picture but it is more from taking the picture at a different angle

Temporary Fender & Valence Repaint (Part 3)

This morning, I started on the driver fender using the same process described below for the front valence.  I used all the Bahama Blue Metallic paint in no time.  Thankfully, it was enough to fully paint the fender.


With just the Bahama Blue Metallic paint on the panel, it has a real teal color.  The Banzai Blue Metallic darkens it slightly and gets the match better to the current color on the Mustang.


The wind again caused me some trouble.  If it blows even a little, it causes the metallic to not be 100% consistent which is a pain.  However, I'm not going to be in town the next two weekends and wanted it done so I tried to be patient and wait for it to stop and then pushed through with the job.

Once I finished the panel, I covered the fender and the valence with two coats of the Eastwood Diamond Clear.  The paint dries to the touch real quick but needs 24 hours to completely dry.  I started thinking of a place to put such a large fender while it dries so that it would not get damaged.  The led me to install it on the car which is not the best idea with wet paint but I was cautious and hung it with two bolts up top and one on the bottom.

With it in place. I decided to drive the car into the sun and take a quick picture of how it turned out.  The color is not a 100% match and the metallic could be a little more consistent but it turned out quite good.  Much, much better than the black previously on the fender and valence.


The color along the hood does not seem to match but that is because all the clear coat is off the hood and the paint is really faded.


Once I put the rocker back on along the bottom, put on the front valence, and the bumper it should look pretty good.  The metallic matches really well.  The paint in general matches the original panels which still have clear coat really well.  It is a little lighter and the lack of oxidation makes it stand out just a little.  However, once everything is back on the car, I don't know that the average person is going to be able to tell that much.

All in, I've got about $50 in it because the Banzai Blue Metallic was $30 because it was a custom mix which had to be shipped to me.  More than I wanted to spend but not bad.

Saturday, March 19, 2016

Temporary Fender & Valence Repaint (Part 2)

I had a few hours this morning to work on the Mustang so I decided to start on the paint job.  With any luck, I plan to finish it up this week and have everything reinstalled by the end of the week.

My supplies consist of some paint thinner, two cans of Bahama Blue Metallic (8 oz each), a can of Banzai Blue Metallic (12 oz), some 600 grit sand paper, tack cloth, and a can of Eastwood Diamond Clear which is not shown below.


I removed the bumper, front valence, and fender.  I cleaned then first with some standard 409 all purpose cleaner just go get the road grim off as quick as possible.  I scrubbed them all with paint thinner and a 3M scuff pad which removed all the dirt and residual.  In advance of painting the panels, I wiped them a few more times with paint thinner and then took off any lint with the tack cloth.

A few areas needed some sanding to smooth out a paint chip or scratch.  I did not spend too much time doing it as the rest of the car is going to be sub par to this rattle can paint job anyway.  Any area which was down to bare metal was covered with some black Krylon primer I had in the storage closet.  


The weather was rather cold and windy outside so I decided to just paint the parts in the garage so I could get it done.  A jumped right in despite concern the metallic would look strange mixing two paints or that the color would be off once it was placed on a larger panel.  I already had the paint so there was very little to lose.


The light in the garage was not that great so I had to move outside to put the Banzai Blue Metallic paint on the panel.  Since the paint is so thin and not that much different in color, I needed the outdoor light to make sure I did not miss any spots.  The wind caused me a few troubles but it was not too bad.  Once the valence was painted, I had to pack it up for the day as we had plans out of town.

Thursday, March 17, 2016

New Front Bilstein Shocks

I purchased a set of Bilstein shocks for the front of the Mustang from Street or Track.  They are a special set which are custom tuned for a Mustang with stiffer front springs.  They are quite expensive so I did not buy an entire set.  I felt like I could judge the improvement from the front shocks and determine if I want to buy a matching set for the rear.

The first set I ordered arrived with the upper mounting points rusted.  I returned them and Street or Track sent me a new set.  The new set are in better shape without any rust.


The shocks are quite easy to install.  The only catch is that the top mounts to a metal piece in the Mustang.  The mounts for the original shocks were larger.  These larger mounts messed up the paint so I had to repaint the shock tower caps.  I did that Tuesday evening and finished up the install on Wednesday.


You can tell from the picture above the Bilstein shocks (black) are much larger.  They have a larger cylinder and piston which allows for better control of the stiffer coil spring.  They also have a lifetime warranty which is nice.

My wife and I went to Buffalo Wild Wings for dinner in the Mustang and they ride quite smooth.  They are certainly better than the ones which I had.  I think I'm going to upgrade the rear in the next month of two.

Tuesday, March 15, 2016

Temporary Fender & Valence Repaint (Part 1)

Four years ago, I grew tired of looking at the paint damage to the driver fender.  There was a section where the paint was simply flaking away near the front of the wheel arch.  Additionally, there was a section a little higher on the fender which looked to be Bondo.  After a little exploratory work with an angle grinder, I found most of the back half of the fender was Bondo!


I could not put the hacked up original fender back on so I picked up a new one at Mustang Mania in Houston.  I installed it and painted the replacement headlight bucket to match (it was formerly primer gray).  This is the way it has been for the four years since.  I really hate the black fender as it takes the car from a decent 10 footer to a 100 footer.


When I purchased the car, I was told it was painted a stock GM blue color from the 90's.  I found a 1993 PPG paint book for a few dollars on eBay and decided I'd see if I could match the color.  If they produce the color in an aerosol can, I could then paint the fender to better match the rest of the car.  It then would not look so bad while I save money to get the entire car painted.

At first glance, the color appeared to be Bahama Blue Metallic (B22).  As luck would have it, the local O'Reilly had some in a Duplicolor aerosol for $7.99.  I purchased a can and tried it out on a piece of spare metal and compared it to the current color on the car.  Ends up, it has a bit more of a teal color to it but it is really close.  Its actually a nice color and close to what I might end up painting the car later.

I went back to the color panel and checked everything again.  The color was also really close to Banzai Blue Metallic (PC3) which is a Dodge color.  I decided to buy an aerosol can of this paint of eBay.  Once it arrived, I performed the same test and found it was a little darker than the sample in the paint book.  It is actually very thin so I used it to top coat the Bahama Blue Metallic and surprisingly it matches fairly well.

I realize it is rather crazy to take two stock metallic colors and then put them together and expect it to match the current car color.  Additionally, the faded, oxidized look of the rest of the car can't be matched anyway.  I decided I'm just going to do it anyway and see how close I can get it.  If it doesn't match perfectly, that is fine as it at least will look better than the black fender which stands out from a mile away.

Friday, March 11, 2016

Mustang Trip to Goodguys Cancelled..... Again

Unfortunately, I had to decide against driving the Mustang to the Goodguys show again this year.  The chance of rain here is only 30% tonight and on Saturday with is questionable.  


However, the chance of rain this evening, overnight, and tomorrow morning in Keller where the show is located is much greater.  The chance this evening is between 80% and 50% so it is just not worth it.

Update: I made it back from the trip to Goodguys (without the Mustang) and the weather was great for the show.  However, it did rain really hard on Friday evening.  While I really wanted to take the Mustang, it was the best decision to not drive the Mustang this year.  I'm a bit disappointed this has happened two years in a row.  I should not worry as much about the rain but with the rust on the car, I don't want it to cause more damage or get road grime on everything.

Thursday, March 10, 2016

Rear Suspension Height Issues

Last Saturday, the entire family hopped into the Mustang for a trip to Chili's for lunch.  The rear suspension height is really low to start with but with the trunk fully weighed down and everyone in the car, the back end was really low.  So low, that when I hit a bump, I could hear the tire drag.

I checked the car after it happened the first time and found no damage.  I decided it take it easy and finish out the trip.  However, on the way back, we hit a big bump and it sounded quite bad.  When I made it home, I checked the tire to find something damaged the side a little.


I checked the fenderwell and found an uneven piece of metal which must have caught the tire.  I took out the air grinder and made it smooth so that it would not happen again.  However, it was clear the rear of the Mustang was going to need to be raised up some.  I found the best option was a set of extended shackles for the rear leaf springs.  A few days later and Summit had them on my doorstep.

My understanding is that these 1" extended shackles should raise the back end by 5/8".  That is not a ton but it is better than nothing and seems to one of the only options.  Just to check for myself, I started off the process by measuring the rear height and found I'm at 25".  This is with stock shackles and Grab-A-Trak 4.5 mid eye leaf springs.


The actual part is made by Scott Drake.  The part number is C5ZZ-5776-GTL.  


I measured them and compared them to the stock size shackles.  They are 1" longer at 5.5" from bolt center to bolt center.


It took a while to install them over the last two nights.  The bushings just did not want to come out and the new ones were just as hard to get in.  However, I was able to get the job done.

Update: After driving around some, I checked the height of the rear and it seems it was raised by about 3/4".  I drove to Buffalo Wild Wings a few days ago with my wife and the raised height seemed to keep it from rubbing.  The real test will be putting the kids in the back seat and driving around.


Sunday, March 6, 2016

Instrument Cluster Project

As I drove around last night, I noticed two problems with the instrument cluster I'd forgotten about.

The first problem is related to how I installed the Autometer gauges.  When I installed the gauges, I had to remove the bezels to fit them behind the stock panel.   The difficulty is that there is nothing to hold the glass face on each gauge without the bezel.  I'd read a few people had luck with super gluing them on so I took that approach.

The approach worked great until the glass face was back light by the instrument cluster lights.  Then it was apparent there was a residual or haze caused by the super glue.  In order to fix it, I used some super glue remover to take the glass faces off.  I then used some clear epoxy to attach them back on.  I tested the new solution out and it looks much better.

The second issue issue is with the headlights and the instrument cluster lights.  They seem to pulse in intensity.  Additionally, when I turn the dimmer for the instrument cluster lights, they will just turn off.  This was related to the new headlight switch I purchased.  I was replacing the factory one which worked fine because I was afraid it would go out and leave me without headlights.  Luckily, I kept the original and reinstalled it which corrected this problem.


Saturday, March 5, 2016

Preparation for Goodguys

I've spent a little time work on the Mustang to prepare for the drive to Goodguys this coming weekend.  I'm not really worried about the trip but it honesty makes me a little anxious driving the Mustang.  It is almost like I can't relax as  much as I do when going on a trip in any other vehicle.

I purchased a new Kidde auto fire extinguisher and mounted it under the passenger seat.  The 2.5 lb bottle came with a bracket which I mounted to the seat riser.  I don't like putting holes in the car but this keeps it out of the way and from rolling around.  I hope I don't need it but I figured it would be safe insurance.  The old one I've been using is so old I'm a little worried it would not work correctly.


As I prepared the car, I noticed the engine was about a quart low on oil.  I topped it off with Valvoline VR1 race oil (10W30) which is designed for flat tappet cams.  Once the quart was added, the dip stick showed it was between the second to last and the last fill indicators.  The mileage is currently at 2339.

The Mustang is good on brake fluid and transmission fluid but I'll take some transmission fluid just in case.  The coolant level was likely fine but I was able to top it off just a little.  I'll be taking a little extra water also as the most likely issue I'll have will be with cooling the engine.

I adjusted the headlights after dark tonight.  The driver side needed to be angled down a little.  Once that was done, I found that they lit up the road quite well.

I packed up some items in the trunk for the trip as well.  My tool box has just the basic tools that I might need.  I have a little gas, a half gallon of water, and the grey container has all my maintenance parts including plug wires, filters, belts, and other items.  I kept most the items I originally took off in order to use as backups.  I also have jumper cables on the left and a socket set on the right.


Wednesday, March 2, 2016

Disappointment with Bilstein Sport Shocks

I've found that if I hit a bump in the road, the front of the Mustang makes a loud noise.  At first I thought it was something loose.  However, as time has passed, I've considered it is most likely the shocks not being able to adequately control the improved coil springs on the Mustang.  This lead me to searching for a new set of front shocks.

After searching for a while, I settled on some Bilstein sport shocks sold by Street or Track.  It was a tough decision as the shocks are $125 each.  The price of one of these is what I spent on the entire set of KYB shocks currently on the Mustang.  However, I decided to go ahead and buy a set with my birthday money.  If they solve the problem, I'll buy a matching set for the rear.

The shocks arrived a few days ago, and I set the boxes in the garage without even checking the shocks.  I decided to pull them out of the boxes tonight to look them over.  I was surprised to find both of the shocks are rusted on the top mounting points.  Needless to say, I'm rather disappointed that the new $270 set of shocks are rusted.


I've sent an email to Street or Track about the shocks but don't really know what options are possible.  I'd hoped to install these before the trip to Goodguys next weekend.  If I ship these back for a new set, that is certainly not possible.  I could media blast and then paint them and it would work out fine.  I just don't feel that is something I should need to do to make a brand new set of $270 presentable.

I guess I'll wait to see what I hear back from Street or Track.  

Friday, February 26, 2016

Center Console for a Bench Seat (Part 2)

I purchased some black vinyl with grain which matches the factory seat.  It is a little darker since it isn't faded but it will look great.  I spent a little time last night covering pieces and realized the vinyl will not stretch enough to wrap around the contour of the side panel as it rounds up toward the storage compartment.

I thought about the dilemma for a while and decided to wrap the sides in carpet.  Carpet stretches much more and would handle the contour.  It does not look as nice but it would allow me to finish up the job and use this console I've worked rather hard to create.

My wife picked up the carpet for me at lunch today and I started wrapping everything tonight.  I ended up staying up until about midnight to get the job done.  I wrapped all the pieces which run down the center of the console in the vinyl.  I then wrapped the sides with the black carpet.  While I had some padding, I did not use any on the sides or center sections.


The center sections were easy because they could be wrapped and then assembled leaving no exposed seams.  To do the sides, I had to carpet the inside area, screw the side to the center pieces, and then wrap the carpet over the side to cover the screws I just installed to put it together.  It is a little difficult to explain but it worked out pretty well.


Wrapping the top of the console was a little difficult.  I put a dense piece of 1/2" foam long the top and then started wrapping.  It took me two attempts to end up with something I was satisfied with.  The biggest difficulty is finding a way to fold over the edges so that there are no exposed seams and the folded portion looks good.  


I mentioned in the last post that I put two furniture nuts on the lid.  This was so that I could attach a little panel to the bottom.  This panel is only about 1/4" thick and fits quite well in the storage compartment.  This piece covers the seams from the lid, and is a bit more secure so the you can't put too much pressure on the lid from the side bending the piano hinge across the bottom.

I don't have a picture of it but once I put in the cup holders, I did not like that they were loose in the panel.  I found two large radiator style clamps and tightened them around the bottom of the cup holders right against the wood.  This kept cup holders from being lose or from being pulled up out of the top of the console.

While it does not look like a million bucks, the console is very useful and I'm glad to have it done.  I've wanted something like this for a while so that I have some storage and a cup holder.  It will be a big improvement for future road trips.

Monday, February 22, 2016

Center Console for a Bench Seat (Part 1)

I've been working on a center console design for the Mustang.  The goal is to have a convenient place to store some items within hands reach and a cup holder or two for longer road trips.  The largest difficulty with the project is the fact my Mustang has a bench seat.  This requires some creative thinking to make a console as the center hump is covered by the seat.

The current bench seat has a center arm rest which folds up.  My plan is to remove the arm rest completely.  I'll then use the mounting point for the current arm rest to mount the new center console.


I started last Monday evening by making a few cardboard templates.  There were numerous attempts to come up with a shape which suited my needs but did not look out of place with the stock interior.

I then transferred all the templates to 5/8" MDF on Tuesday and Wednesday evenings.  On Thursday evening and Saturday morning, I finished shaping the wood and fastening together the console.


The front sloped area is where I intend to add cup holders.  When making the templates, I drew out this slope such that the cup holders would be perfectly level.  Since the seat bottom leans back slightly, that means that it slopes forward.  However, in the end, it is not exactly level and is leaned forwarded about 1/2" more than it should but I think it will work out fine.


The arm rest portion is roughly the same height as the original arm rest.  I worked it out to fit me perfectly and I really like this part of the console.  Additionally, the compartment inside gives me a considerable amount of room to store plenty of things at an arms reach.  It will be much more convenient than the glove box.  

In this picture you see one of two furniture nut which is installed but not yet recessed in the interior side of the storage box.  This will allow me to line the inside with carpet or vinyl and bolt it in without an exposed nut on the inside.  This is a first for me but it is looking like it is going to work out well.


I used a six inch piano hinge to attach the top of the console.  I expect to wrap the whole piece in vinyl.  Most of the exposed vinyl edges will be hidden but I was concerned about how to hide the edge on the underside of the lid.  I recessed two furniture nuts in the lid for an idea I have to hide the seams on the bottom.  We will see how that part turns out.


Overall, I'm very happy with the design.  I already had the piano hinge, the wood to build it, and the screws.  Since I had all the supplies, I spent essentially nothing to make what you see here.  At this point, I have about six hours in the project.  While I have some vinyl already, I'm going to go look for something which matches the seats a little better.

Sunday, February 7, 2016

Fixing a Loose Shifter Handle

While driving the Mustang today, I noticed how lose the shift lever had become over the last year.  Despite not driving much, the bolts wore down the shift lever enough that it would move front to back slightly.  I decided to take a little time this evening to fix the problem before it became any worse.

The shift lever I'm using is an original 3 speed shifter which has the original mount cut off.  I drilled two holes in the shift lever to match the T5 shifter.  As you can tell, I considered flattening out the round shift lever where the bolts were placed so they hold better but didn't.


I used my air grinder to flatten out both sides of the shift lever.  This allows it to lay flat against the shifter.  Additionally, I now have a flat side where the bolt insert so I can use a couple of lock washers.  I decided to keep the rounded head, allen bolts as they will not damage the shift boot.  However, I did put some high strength treadlocker on the bolts so I will not need to do the job again.


Everything is now back together and the shifter feels good!