Monday, December 27, 2010

Underdash Wiring Restoration (Part 1)

I removed the underdash wiring at the beginning of my current project back on August 29th. I've planned to restore the wiring since the beginning. However, since restoring the wiring was not time sensitive, I just set the project aside for later.

As I worked on other parts of this project, I questioned how to include a constant power for the radio, how to run a wire to the electric choke, and several other non-original items. The best way I found to handle these would be to replace the fuse block. I could add one with additional circuits and upgrade to a new style with blade fuses.

For Christmas, I received a Painless Wiring fuse bock kit. I'm going to incorporate it into the stock wiring using solder and heat shrink. The fuse block includes an additional constant and ignition circuit so I can handle all the non-original items. I can wire everything with this fuse box and have it look as original as possible.
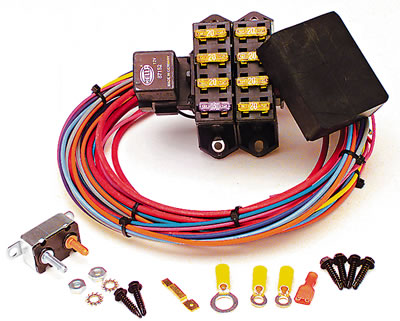


I plan on working on this project for the next several nights. Tonight, I started stripping all the tape from the stock harness. I started with this so I can see where all the stock wiring goes so I can find the best way to incorporate the fuse block. I'll incorporate it first and then continue to work from there.

Tuesday, December 21, 2010

Passenger Toe Board Installation Part 2

I've spent some time over the past few nights working on the passenger side toe board.

The USC All Metal filler is difficult to sand smooth. It gets very hard when it dries. However, I managed to get it sanded smooth. I then painted the panel with some Krylon Rust Tough paint which has a similar color to the stock primer. I then put a little Eastwood seam sealer on the sides of the panels to protect the metal where it is overlapped.

I'm pleased with how the side turned out. I still have the driver side to go.

Sunday, December 12, 2010

Passenger Toe Board Installation

On the weekend of December 4th, I started work on the passenger side toe board. I already had a replacement panel which I ordered from CJ Pony parts a few weeks prior. I slowly trimmed on the panel to place the butt welds in the least visible locations while still removing all the rust. The panel was contoured very similar to the original toe board but it did require some work at the top which took a little while.

After the panel fit perfectly, I slowly started cutting out the original toe board from the car. The picture below is during the process of test fitting and cutting out metal so the new toe board could be butt welded into place. Once I had the panel very close to fitting perfectly, I had to call it a day.


On the weekend of December 11th, I started welding the toe board into place. I used a copper backing plate to keep the bottom side of the weld looking nice. The welding went much better than expected. As beginner, I expected to have a tremendous amount of trouble. While it was not completely necessary, I then spent some time on Sunday grinding down the welds . I'll ultimately cover them with sound deadener but I wanted it to look presentable anyway.

Over the nights of the next few days, I put a little USC All Metal filler on the panel and sanded it smooth. Again overkill but this gave me a little experience and allowed me to see how well I could finish off a panel. I'm fairly happy with the result.

Friday, November 12, 2010

Temp Picture for Someone Else

I've been working to install a torque box on the passenger side of my Mustang.  There is one on the driver side but they did not start installing one on the passenger side until '68.  The box ties the front frame rail to the rocker panel and makes the subframe stiffer.  Paired with the new subframe connectors I should have a stiffer frame.

Some vendors sell the torque box welded together and some sell it in two pieces.  Mine was a two-piece box from Dynacorn.  If it were one piece, I would have had to cut the welds to separate it to get it into the vehicle.  It fits quite well and I'll just need to sand off the paint on the edges and get to welding.

Saturday, November 6, 2010

New Air Conditioning Vents

I recently placed the air conditioning vents which came with my Mustang on eBay. The vents were not original to the car as they came from a '68 with woodgrain trim. I did not want to keep the woodgrain trim so I listed the parts to gain money to purchase replacement air conditioning vents.

I sold the passenger side air conditioning vent for $45. The center vent only sold for $16.50. The driver side control piece was broken along the bottom. I tried to fix it but was not successful so I sold just the removable vent portion for $8.50.

I purchased a new set of air conditioning vents in a single auction for $150. It is a little pricy but all the parts were there and in very good condition. I figure this is $50 each which is a good price from what I've seen on eBay.