Monday, March 27, 2023

HRPT Prep 10 - Transmission Installation (Part 2)

Today, I resumed work on the transmission install by putting in the driveshaft.  This seems like an easy job but for the first time ever... it certainly wasn't.  Despite countless efforts to slide the yoke into the tail housing, it just simply would not go on more than just a few millimeters.  I used a small triangle file to clean any burs off the output shaft and the yoke but still had no luck.  

I test fit the yoke into the old transmission and it slid in without any difficulty.  I ultimately took off the yoke completely and found it would slide on just fine but had to have perfect alignment.  Since I knew it would ultimately go together, I used my press to put the yoke back on the driveshaft.  

To make it go together, I had to take the front of the car off jacks, jack up just one side, and then it still took some time.  It still seemed to bind but I put the transmission in neutral and ultimately had it slide on smoothly after quite a bit of patience.  This might be just how tight the tolerances are with a new transmission but it is certainly new to me.

With that done, I filled the transmission with Valvoline Dex/Merc ATF.  As usual, I made a huge mess but I got it done and then put thread sealer on the fill plug and put it back into place.  It is good to now have the car back off jack stands.  The hard part is done and now I've got quite a few loose ends to complete.

I'm going to need to wait to do more work as I need to order a few items from Summit.  I'm going to take the rest of the evenings this week too list some parts I need to sell (previous T-5, California Pony Cars bellhousing adapter, OpenTracker Z-bar linkage, and a few other items).  

Sunday, March 26, 2023

HRPT Prep 9 - Transmission Installation

On Tuesday, I began the installation of the new T5z and Tilton throw out bearing this evening.  I didn't get an incredible amount done but installed the new block plate, pressure plate (after cleaning with break cleaning and running a tap through the bolt holes), installed the clutch and pressure plate.  All the ARP bolts were reused and cleaned first with a small wire wheel.  I used the red high strength LocTite and torqued the flywheel bolts to 75 ft/lbs and the pressure plate bolts to 30 ft/lbs.  

On Wednesday, I started by removing the ring of counterweights from the Centerforce pressure plate.  The instructions from MDL indicate they must be removed or there will be inconsistent clutch release and excessive pressure at high RPMs.  Once this was removed, I cleaned up the bellhousing casting a little using some 320 sandpaper and then installed it using a new set of ARP bolts (part# 154-0903) I ordered.  I torqued them all down to 45 ft/lbs but did not use any type of LocTite on them.


On Thursday, I set the appropriate amount of spacing for the new Tilton slide-on throw out bearing.  It is a bit of a process because you need to measure the bellhousing mounting surface to the pressure point fingers.  You then measure from the front mounting surface of the transmission to the leading edge of the throw out bearing.  There is a threaded slip collar that you adjust to take up space leaving only .125" (+ or - .025") space between the leading edge of the throw out bearing and the clutch fingers.

I set this on Thursday and then checked it again and made an additional adjustment this morning before putting in the transmission.  The following are the measurements in the event I want them again later.


Strangely, the initial challenge was just to get the new Tilton throw out bearing to slide on to the input shaft retainer.  There is a little rubber O-ring on the inside of the slip collar and it did not want to slide on.  I used a little oil and transmission fluid but had no luck.  It was literally thousands from fitting, so I called Modern Driveline.  They said to clean everything well, run emery cloth over the input bearing retainer to remove any surface imperfections from heat treatment and install with dish soap.  Oil will swell the O-ring when dish soap will not.  Sure enough, that worked.

It is an interesting part.  The rubber O-ring has no sealing purpose.  It holds the threaded inner adjustment sleeve so that it will not rotate on the input shaft during use.  The Tilton housing itself is kept from rotating by swapping out one of the input bearing retainer bolts with a long shaft that the Tilton unit slides along.  You can but the long stud if needed but mine did not protrude long enough for it to matter.  You can see it in the picture with everything mounted up below.


Aaron helped me to get the transmission in place and mounted up.  As you would imagine, it fits perfectly where the old one did with the new bellhousing and other components.  

I then touched up the paint on the MDL transmission crossmember and installed it followed by the starter, speedometer cable with 21 tooth gear, and connected the reverse lights.  I'm not going to kill myself today getting everything back installed.  I mainly wanted to get the transmission in as it is a bigger job and certainly not something I would want to do after work during the week.

At this point, I think I have the following left to do as part of this project:
  • Install driveshaft and torque the retaining U bolts.
  • Fill transmission with transmission fluid.
  • Run hydraulic lines and create brackets to keep them safe.
  • Install bellhousing clutch fork dust cover.
  • Zip tie speedometer cable out of the way.
  • Reinstall shift, carpet, sill plate, & shift boot
  • Tighten hydraulic line fittings at master cylinder.
  • Mount clutch reservoir and fill with brake fluid.
  • Adjust clutch mechanism at pedal.
  • Bleed hydraulic clutch system.
  • Adjust parking brake setup.
So I have it recorded, the current odometer reading is 5215.

Sunday, March 19, 2023

HRPT Prep 8 - T5 Bellhousing & Block Plate Arrive

The T5 bellhousing is slightly different than the original bell housing.  The most notable difference is that the original bell housing extends farther below the vehicle.  The original block plate is then no longer a good fit.  WIth this in mind, I not only purchased a new T5 bell housing but also a new block plate.

The block plate I purchased is a Ford model that is listed as part number M-7007-B on the Summit website but it has part number F4ZE-6A stamped into the part itself.  It is .080" thick just like the original.  If you lay the original over it, all the bolts holes, crank provision, and starter indexing hole match the original perfectly.  I put a quick coat of paint on it last night with some Rustoleum primer followed by Duplicolor DE1606 Dark Ford Blue paint.


The bellhousing I ordered is also a Ford product with part number M-6392-E but there are no identifying marks on the housing itself.  The part arrived in good shape and will no doubt do the job but I'm surprised by how rough the casting is and the transmission isn't really much different.  If you were handling them with bare hands, you would tear your hands up and perhaps even cut yourself.  I'm not sure if I will try to do anything about it before installing them.

To finish it off, I purchased a clutch fork cover to go on the new T5 bellhousing.  I ended up with one sold by Daniel Carpenter (E6ZZ-7513-A).  Unfortunately, it does not fit the bellhousing well so I'm going to need to do a little work on it a bit so it fits. 

I'm not waiting on any other parts to continue with reassembly.  However, I started feeling a bit sick yesterday and have been taking it easy today.  I've had the last week off work but return tomorrow and would rather not be sick on my first day back.

Thursday, March 16, 2023

HRPT Prep 7 - New T5z Transmission

My new Tremec T5z transmission (1352-0251) arrived today by FedEx.  This is the first really large part of this type that I've ordered.  My first time to open something like this up from a wooden crate.  


Aside from opening the transmission and admiring it, I did not get much work done today.  I swapped the shifters from my original and the new transmission.  My existing shifter is a Pro 5.0 clone with short throw and stops to prevent over shifting which I prefer to the simple stock shifter.  I cleaned the housings and shifters up well with paint thinner and 0000 steel wool and sealed them with a thin layer of Permatex 82180 Ultra Black RTV.  

My particular rear gear and tire size combination works best with a 6 or 7 tooth speedometer gear inside the transmission.  The T5z comes with a 7 tooth gear which requires a 21 tooth external gear.  I'll need to pick one up as I've been using an 18 tooth gear with the 6 tooth gear that was in my last T5 transmission.

I expect to end up selling the old T5 transmission and the California Pony Parts adapter plate that I used to mount the T5 to my original toploader bell housing.  I plan to wait to list them until I get the transmission fully installed and know that I will not have any reason to switch back to the old setup.  I'll keep the toploader bell housing and store it with the original transmission in the event I ever want to return to stock.

Wednesday, March 15, 2023

HRPT Prep 6 - Exhaust Gaskets & Other Small Items

To install the power steering system a few months back, I had to remove the header from the driver side to get the new steering box into place.  When I originally installed the header and collector gaskets, I coated both the header and collector gaskets with a high temp sealant.  When I removed the header, it was apparent I should replace all the gaskets too.  I purchased both a Fel-Pro header gasket set (#FEL-1467) and the collector set (#FEL-2001) but only installed the driver side header gasket.  Today, I finished off installing the rest of the gaskets.

Doing this job with the transmission out made it quite a bit simpler.  I can really easily get to the exhaust bolts at the header collectors.  I was able to use a wire wheel to clean all the mating surfaces really well (collector and header) and cleaned them all with paint thinner.  I then put it all together using ARP header bolts (#100-1102) and new hardware for the collectors.  This time, I only used Permatex Optimum Max Temp Gasket Maker (#27038) on the collector gaskets.

While it was apart, I checked the O2 bung to ensure there were no issues with the welds as I've come a long way since I originally welded it into place.  Everything looks solid so I should be in good shape if I decide to upgrade to EFI for Power Tour.  This picture is from before the new gasket and hardware. 


Aside from exhaust work, I removed and cleaned the flywheel, block off plate, and wiped down some oil that was at the back of the engine from a leaky oil pan and from leaking valve cover gaskets.  I'll be working on the small oil leaks a little later as they are an annoyance.

Unfortunately, I also learned that the new Tilton slide-on throw out bearing will not work with my original bellhousing with California Pony Cars T-5 adapter.  The T-5 adapter reduces the size of the opening that the input shaft is slid into.  The Tilton unit is mounted to the input shaft when installed and it is too large to fit through the reduced size opening.  It seems the only solution is to switch to a T-5 bellhousing with matching block plate.  Sadly, I realized this after I cleaned up and repainted my current block plate.


Tuesday, March 14, 2023

HRPT Prep 5 - New T-5z Transmission Order

On Monday, I decided I would purchase a new Tremec T-5z transmission for the Mustang.  It is something I've considered a while primarily to benefit from different internal gearing which work better with rear gears like my 3.80's.  Since the transmission is out of the car and I received a 10% discount code at the Goodguys show this past weekend, I decided now was as good of a time as any.  I'm sure I will appreciate the improved gearing on Power Tour.

The following compares my current T5 gears to the new T5z:

    Gear                        New        Current 
    First Gear:             2.95        3.35
    Second Gear:     1.94        1.99
    Third Gear:          1.34        1.33
    Fourth Gear:     1.00        1.00
    Fifth Gear:          0.63        0.68

According to BF Goodrich, my rear tires are 25.7 inches in diameter.  At 70, the engine is currently at 2,365 RPM which will change to 2,190 with the new transmission.

What is more significant is the first gear ratio changing from 3.35 to 2.95.  When driving with the current gear, I normally switch to second gear at 3,000 RPM which is 18 MPH.  After the shift, I drop down to 1,500 RPM in second gear.  First gear seems to low and the difference between the gears makes it a weird shift change.  

With the new transmission, I'd be at 2,500 at 17 MPH.  If I shift then, I end up at 1,646 in second gear.  If I shift at 3,000 RPM as I do today with the new transmission, I'll be going 21 and end up at 2,000 RPM after the shift.  Presently, second gear is the best gear in the car, I'm thinking first gear will be so much better after this change as it moves it in that direction.

The part number for the transmission is 1352-000-251.  It's produced by Tremec.  It should be here by Friday.  

HRPT Prep 4 - Hydraulic Clutch (Part 2)

The next part of the hydraulic clutch install requires that I remove the transmission to install a slip-on, throw out bearing by Tilton.  I could have used a slave cylinder setup but I don't have a T-5 bellhousing.  I considered buying one but then I'm still using mechanical levers to actuate the throw-out bearing so I figured I'd just really do this job fully.  

This is much more of a process than when you just think about it briefly while sitting in your recliner.  I removed the driveshaft retaining bolts, drained the transmission fluid, and then removed the driveshaft, shifter boot, shifter lever, floormats, sill plates, shifter, crossmember, speedometer cable, reverse switch, and then the transmission itself.

With the transmission out, I took the opportunity to inspect more by removing the pressure plate, clutch, flywheel, and the block off plate.  The goal was to find out where I was leaking oil from as it consistently is running down the back of the block off plate.  As best I can tell, it is coming from the valve covers and the back of the oil pan.  Above the crank it all dry which I would expect to have some oil on it if the rear main seal were bad.  I expect it all just runs down and back eventually getting on the block plate and running to the lowest point to drip off.


The flywheel is in really good condition and the original resurfacing marks are still present.  The pressure plate and the clutch are also in great shape.  I used all ARP bolts and I don't see anything to keep me from cleaning them up a bit and reusing them.


Before I put everything back together with the new throw out bearing in place, I'm going to clean everything and paint the block off plate.  While the flywheel and pressure plate seem clean, the inside of the bellhousing is covered with a light layer of what appears to be oil.  I'm sure when I'm driving it comes off the block plate and ensure up running inside the bellhousing.


Sunday, March 12, 2023

HRPT Prep 3 - Hydraulic Clutch (Part 1)

Today, I began the installation of a Modern Driveline (MDL) hydraulic clutch system.  The Light Foot (LF) kit (# MD910-012C) I purchased, includes a Willwood 260-6088 clutch master cylinder, billet fluid reservoir, unique adapter for the stock pedal, and all the hardware.  The second part I purchased from them is a Tilton 6000 series slip-on, throw-out bearing setup for my T-5 which also works on TKO, TKX, and Toploader transmission.  I didn't realize it at the time, but neither kit came with a hydraulic line to connect the master cylinder to the Tilton throw-out bearing so I'll need to get one of those.


The bracket which mounts to the inside firewall and connects to the clutch pedal took a little time.  Most of the time was spent test fitting it to the firewall, test assembling, and making sure that the way I planned to install it would not result in any binding of the linkage.  After quite some time, I realized there was simply no way to install it so that the master cylinder was perfectly straight up and down.  Once my OCD allowed me to look past that, I drilled the holes to mount it and moved on with the install.


It didn't take long to realize that the clutch master cylinder contacted the brake lines I made just a few months ago.  In order to get it to fit properly, I had to remove the brake lines and bend a new set that cleared the clutch master body and ports.  I made the first line without any trouble on the first attempt.  However, the second brake line was a very frustrating effort that resulted in the following pile of incorrect brake lines.  It took several attempts to get the second line correct.  There were many lines bent wrong, one just a 1/4" too short, and two instances where I fared lines without a fitting.  In the end, these lines are far better looking than the set I quickly put together last time.  


Since installing the new WIllwood brake master cylinder, the system has seemed just a bit softer than before.  I decided to take this opportunity to bleed the brake master cylinder again since I had the lines off.  I ran a few lines from the port into the top reservoir, setup my camera to video the master, and then slowly pumped the brake pedal.  I went through a total of 50 depressions of the pedal since I couldn't see anything and didn't want to do it again.  I later checked the video and saw few bubbles aside from the air in the lines I looped over.  I guess I'll know for sure once I beed the whole system again and try it out.

I was stopped out for the rest of the day because I don't have a second set of hands to install the clutch master and I didn't want to crawl under the car to remove the transmission this late.  I'll get the rest done here in the next few days.

Wednesday, March 8, 2023

HRPT Prep 2 - Front Ball Joint Replacement

Almost three years ago now, I replaced the upper ball joint on the driver's side of the Mustang.  The ball joint was not replaced because it was worn out but because of a cut to the rubber boot which caused it to lose grease.  Since it was not worn out, I only replaced the one side.  The was the right decision at the time but it has come back to haunt me.

I carefully removed the coil spring which is the worst part of the entire project.  With the upper control arm out, I checked the ball joint to confirm it was bad.  It moves quite loosely but does not have any slop in the joint itself.  However, as I moved it around, I noticed it wasn't the ball joint itself but the rivets which hold the ball joint to the arm were lose.  I'm glad I noticed before something broke and caused a large problem.

The proper replacement ball joint is a Moog K8142 which is a bolt in replacement for the original style which was riveted to the upper control arm.  Everything came in good condition and after grinding the old ball joint rivets, cleaning the control arms, and a couple bolts and it was installed.  The instructions state the three mounting bolts should be torqued to 14-19ft/lbs. but I went to 20 ft/lbs. with red High Strength Loc-Tite.


Reassembly of the suspension was fairly straightforward.  I greased the upper control arm itself and the ball joint before installing it.  I torqued the upper control arm to shock tower nuts to 90 ft/lbs. and used red Hight Strength Loc-Tite.  I then torqued the upper ball joint to 70 ft/lbs. and locked it in place with the supplied cotter pin.


I'll be going over the entire front suspension to make sure everything is torqued properly and to grease everything before long.  However, I think I'll move on to the hydraulic clutch installation since I have a few days off and it is a rather large project.

Friday, March 3, 2023

HRPT Prep 1 - Rear Axle & Suspension

I'm going to start my preparation for the Hot Rod Power Tour with the rear suspension.  I don't expect to find any real issues but I want to review everything.  HRPT is a long trip and I don't want to have any problems.  Over the course of the weekend, I took care of the following.

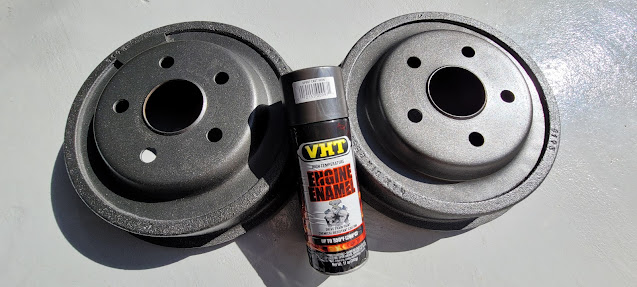
I pulled the rear drums to look over the brake system.  Everything is in great condition.  Plenty of life left on the brake shoes, nothing concerning about the drum surface, wheel cylinder are in good condition without any leaks, and the rubber brake lines are flexible and without any cracks.  I put a light coat of VHT SP997 Cast Iron high temp paint which is the same paint I originally used on them years ago.


The stock rear axle vent tube leaves quite a bit to be desired.  There is essentially a nipple that screws into one of the axle tubes, connects to rubber hose, that is inserted into the frame rail.  The threads for the vent nipple are 7/16"-20 and I found a Strange Engineering vent (STR-H1112B) which is more compact and doesn't have a rubber hose running near the exhaust.  I installed it using the original lock washer that was used with the vent nipple.


I confirmed the torque on several of the rear suspension fasteners.  I used the torque specifications from the 1967 Mustang Shop Manual.  The wheels are torqued to 80 ft/lbs., U-bolts are torqued to 50 ft/lbs., front leaf spring bolt is torqued to 45 ft/lbs., and the shackles are torqued to 20 ft/lbs.  I didn't bother with the axle retainers or the center section as they are leak free and no doubt fine.

While I did not have a chance yet, I want to drive the car around to heat up the gear oil in the rear axle and pump it all out. I purchased Valvoline 80w90 gear oil (VV831 on right below) which meets GL-5 specs and has no friction modifiers.  This is exactly what is recommended by Detroit for the Tru-Trac that is installed in the rear.  This isn't 100% necessary but I have not changed it since installing the Tru-Trac or the rear gears so it is at least worth the peace of mind.


To finish off the weekend, I cleaned up the wheels and tires.  I then filled them up with 32 lbs. of air pressure.  

The next project will be to replace the upper ball joint on the passenger side front suspension.  I noticed some play in the ball joint a couple of weeks ago and the new parts to do the job just arrived from Summit on Friday evening.

I have 14 weeks until Power Tour.