Friday, April 28, 2023

HRPT Prep 16 - Cooling System Upgrade & Leaks (Part 3)

Again, I continued to work on the Mustang a little each evening after work this week.

On Monday, I covered the FelPro timing cover gasket with a thin layer Permatex Ultra Black RTV and installed it.  I already ran a tap through all the bolt holes and cleaned all the bolt threads with a wire wheel.  When I bolted it down, I used more than enough Permatex thread sealant (Part# 59214).  The torque spec for these is 15 ft/lbs. but I'm sure I'm closer to 20.  I went in several circles to ensure they were tight and then checked them again the following day just to make sure all were secure.

On Tuesday, I used the Permatex Thermostat and Water Pump RTV (Parts # 22071) to install the back cover on the water pump and to seal the water pump to the timing cover.  Again, I used the Permatex thread sealant on every bolt to be safe.  I used the gaskets which came with the water pump as they seemed to be of good quality and when covered with RTV it likely isn't crucial.  The bolts were torqued to about 20 ft/lbs. and I went in circles again checking them all to get them even.  

On Tuesday, I also installed the thermostat housing using the Mr. Gasket seal.  I'd sealed the thermostat to the housing using the Permatex 22071 on Sunday.  With that fully dry, I installed the housing without any RTV as it is expected to be installed dry.  The gasket is much thicker so I ended up finding a few 1.25" ARP bolts and cut them down slightly so they would fit perfectly.  While these holes are blind, I put thread sealant on them anyway as I'm so tired of leaks I'm putting it on everything.

On Wednesday, I installed the new Professional Products (#80006) harmonic damper and torqued it to 80 ft/lbs.  I then put on both the crank and water pump pulley using medium Loctite.  I reinstalled the coil, alternator and belt, ground wire to the block, the lower radiator hose, the bypass hose, and the heater hose.  I cleaned up everything and painted the parts which needed it so everything is starting coming together and looking much better.

After Wednesday, I didn't do much on the Mustang.  I'm getting a little tired of working on it daily but I'm getting close to finishing up this project.  It looks much better under the hood with all the clean and refinished engine parts.

While I did not do as much on Wednesday or Thursday, I returned all the EFI system parts those days after work since that project isn't going to happen.

Sunday, April 23, 2023

HRPT Prep 15 - Cooling System Upgrade & Leaks (Part 2)

I'm losing a bit of my enthusiasm for this particular project and the prep process in general.  I've been working a bit each evening but it is a really small amount.  Over the course of this week and a couple hours this weekend, I was able to accomplish a few good items but I'm really only to the point of reassembly.

Since my last post, I drained the oil, removed the oil pan, and then removed the timing cover.  Unfortunately, I ripped the oil pan gasket due to RTV at the corners of the timing cover so I ordered a new Fel Pro OS13260T gasket on Amazon.  While I was at it, I ordered a new Gates 20338 bypass heater hose as the old one was a FoMoCo reproduction and was a bit thin.

I used paint stripper to clean all the old paint and primer from the timing cover.  I used a few little Dremel wire wheels to get in all the small corners.  I then coated it with some Duplicolor DP1612 engine paint and then DP1606 Ford Blue.  I taped off the gasket surface out of an abundance of caution.  After letting it dry, I installed the fuel pump block off plate with a new Fel Pro seal and a light coat of Permatex Ultra Black RTV.  I also had a Fel Pro crank seal so I removed the old one and installed the new one with a very light coat of the same Black RTV on the outer ring of the seal.  

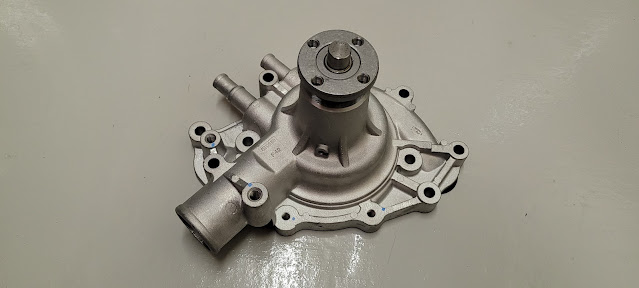
I ordered a FlowCooler high flow aluminum water pump (Part # 1681) that should help a bit with cooling.  I put a coated of Duplicolor DP1612 engine primer and then DP1606 Ford Blue paint on the pump and the exterior side of the backing plate.  I don't have Fel Pro gaskets on hand for the water pump but it came with a set.  I'll have to decide what I want to do with that part.  I also did not paint the gasket surfaces on the water pump out of an abundance of caution.


I cleaned up the thermostat mounting surface on the intake really well and then ran a 5/16" tap completely to the bottom of both holes.  I've cleaned up the thermostat housing so that it looks like new.  I used from Permatex (#22071) water pump RTV to lightly seal the thermostat into the housing.  I'm letting it dry overnight and then have a Mr Gasket 737G aluminum and silicone seal gasket that I plan to use.  I'm not convinced it is a the best option and it certainly wasn't cheap ($25).  However, I've used Fel Pro gaskets on three different occasions, and it has leaked every time despite new intakes and thermostat housings.


I then cleaned all the timing cover mounting surfaces on the engine block with a razor blade, paint thinner, and a small Dremel wire wheel.  I'll need to do some touch up paint on the block where it is discolored from anit-freeze but I'll need to do that a little later.  

I purchased a Professional Products engine damper to replace the one in the car which is the exact same model (Part# PFS-80006) as the old one was rather rusty.  

Somewhat as a tangent, I've been wanting to replace the cheap air box drain that came with the Classic Auto Air system.  What I found is a GM 15-34717 and I took a chance on it for $5 and it fit just fine.  It is much better than the last which was just clear plastic tube that you had to basically fold to form a 90 degree angle.  Once I put it into place, I put the sealing gunk back around the tube as it entered the firewall.


This is where I am at the moment.  Hopefully I get a bit more enthusiasm to finish this up.  Right now, I'm more interested in doing just about anything else.  To get this finished up, I need to...
  • Mount the thermostat with Mr Gasket seal
  • Install the timing cover with Fel Pro gasket
  • Install the water pump with ??? gasket
  • Install alternator and A/C brackets on water pump
  • Install damper, crank pulley, and water pump pulley
  • Reinstall fan shroud and electric fan (temp sensor)
  • Fix wiring for the fan that was cut to remove the shroud
  • Reinstall the various hoses for the cooling system
  • Straighten and repaint the oil pan
  • Reinstall oil pan with new Fel Pro gasket
  • Reinstall valve covers
  • Add oil, swap oil filter, and add coolant

Monday, April 17, 2023

HRPT Prep 14 - EFI System Order Delayed

One of the big upgrades I planned to install for Power Tour was an EFI system.  I ordered it back in early February and it was expected to ship this last week.  Unfortunately, the setup didn't ship and the website now states that it is not expected to ship until June 16th.  At that point, we will already be on the trip.


This is a little disappointing as I was looking forward to not thinking at all about the tune of the car as it would be managed by the EFI system.  The tune of the car is good but I just think it could be better as it is hard to start at times when hot and the choke does not work perfectly.  I also liked the idea of the system controlling the electric fan and adjusting the idle for the A/C.  The car ran fine going to the Ford Nationals and I'm sure it will work just fine for Power Tour.

On the bright side, this will reduce the amount of work that I need to do before Power Tour.  I'll have a bit more time to drive around and put extra miles on it to test it out some.  I might try to work on the replacement fender paint and add something to improve the idle when the AC is running.

I'll now need to decide if I am going to keep this order or return the regulator and EFI gas tank I've purchased that are sitting in the garage.


Sunday, April 16, 2023

HRPT Prep 13 - Cooling System Upgrade & Leaks

The cooling system has leaked in the Mustang for as long as I can remember.  The main locations are from the thermostat housing and from one or two water pump bolts.  I've resealed the thermostat housing many times with Fel-Pro gaskets but it never seems to make much of a difference.  I'm hopeful I can fix it this time as the leaks and discoloration of the engine paint is a pain.

As I started looking things over to decide if this was the next project I wanted to tackle, I noticed the water pump is actually leaking from the weep hole in the bottom indicating a bad internal seal.  That made the decision that I should go ahead and do this job next.  I've thought I should perform some type of cooling system upgrade to keep things cool.  I think with my current state, that would be an aluminum high volume pump.  I really can't fit a bigger radiator or fan so there is little else left to do.

This morning, I drained the coolant from the system and then removed the overflow tank, shroud/fan, radiator hoses, alternator, A/C brackets, thermostat, pullies, water pump, and harmonic balancer.  I then sat them all aside and will get them cleaned up for reinstall later.

This time, the thermostat housing shown below was leaking from the upper right side of it below nearest the top bolt.  This is a newer Scott Drake housing so I don't think it is warped but I'll check.  I found a Mr. Gasket 737G gasket which has a unique rubber seal so I might end up using it.  I plan to just keep using the Mildon thermostat as it is rated to open at 180 degrees.


The water pump was obviously leaking from the weep hole which I think is a newer development.  I think it was also leaking from the bolt immediately above the lower radiator hose and from the lowest bolt on the right side of the picture below.  I'm quite confident I used sealant on these bolts before but I'm going to double and triple check everything this time.


The damage to the engine paint can be clearly be seen on the front of the timing cover below.  While it is not pictured here, where water sat inside the water pump, there is a rust line along the back of the water pump block off plate.  I don't think water should be back there so it must have leaked into the backing plate area without me noticing.


This is where I've left things for now.  The valve covers are off as simultaneously, I'm trying to figure out why the valve cover gaskets are leaking.  The next step will be to drain the oil and then remove the timing cover.  I then need to clean up all the parts, order a new water pump, and get the various parts painted and ready to be reinstalled.  Ideally, I would finish this project up next weekend but everything takes much longer than I initially expect. 

Sunday, April 9, 2023

HRPT Prep 12 -Transmission & Hydraulic Clutch Completion

I'm falling a bit behind on the projects I'd like to complete for Hot Rod Power Tour.  I'm not sure if the Holley EFI I ordered will actually arrive in time or not.  When I ordered, the estimated delivery date was on 04/14/23 and that still shows if I look at my order.  However, if you look at the part on their site today, the current delivery date has been pushed out to 06/15/23.  Even without the EFI system, I've got plenty to do.

Yesterday, I bled all the brakes again with the assistance of my son.  This was necessary due to replacing the brake lines from the master cylinder to the combination valve.  I've run a total of 32 oz of DOT4 through this system between bleeding it today and when I installed the master cylinder.  The brake fluid comes out crystal clear so I expect I'm completely filled with new DOT4.  Plenty of air bubbles came out of the first rear brake I bled but almost no air came out of the front brakes.  I'm hopeful this improves the pedal is it has felt slightly soft since installing the Willwood master cylinder. 

With the brakes bled, I started work on bleeding the new clutch system.  All the paperwork indicates you should use DOT 3 brake fluid but I imagine you could use DOT4.  With all the brake bleeding, I was low on DOT 4 so I purchased some Prestone DOT 3.  The bleeding process is interesting as you essentially use a large syringe filled with brake fluid to force fluid through the system with the bleed open at the bottom.  I had to do that two times to have any pedal pressure.  

The last thing I did was start the car and drive forward and backward in the garage.  I just wanted to ensure the clutch and brakes were working before stopped for the day.  I then checked everything for leaks and found none.  

Today, I went on the first drive and everything works well.  I found a small leak from the clutch reservoir and found the transmission did not shift into 2nd or 4th due to the positive stops being set wrong on the shifter.  Once those were corrected, I did not notice anything else except the clutch only releases at almost full pedal release and the brakes still seem a little soft.  

After driving, I planned to pump the gear oil out of the rear axle.  However, the area inside is so tight it isn't possible to even slide in a tube to pump it out.  The gear oil is at the top of the drain hole so I think I'll leave it alone.  I changed it when putting in the near 3.80 gears and the TrueTrac would have broken in at that point.  That was really somewhat overkill but I thought it was worth it if I could do it without too much trouble.  

At this point, I cleared the following from my list:
  • Rear Brake & Suspension Check
  • Front Brake & Suspension Check
  • Front Passenger Ball Joint Replacement
  • Bleed Master Cylinder & Brakes
  • Hydraulic Clutch Installation
  • Fix Exhaust Leaks
However, I have the following left:
  • Finish Clutch Cover
  • Fix Oil Leaks & Change Oil
  • Cooling System Upgrades
  • Fix Cooling System Leaks
  • LED Light Upgrade
  • Air Conditioner Check
  • Fix Windshield Leak
  • EFI System Install

Wednesday, April 5, 2023

HRPT Prep 11 - Transmission & Hydraulic Clutch Continued

I've been working on a little bit of what remains on this project over the last week...

Shifter & Interior Installation

The new transmission is unique in that the shifter mounting surface is angled toward the driver and the shift pattern seems a little shorter.  I'm not sure why the mounting surface is angled as everything else about the transmission mounts up perfectly level.  I performed a few internet searches and others indicate they noticed the same with their T-5 transmissions.  While strange, with everything installed, you would never know.
 
I used the same setup as before to mount the shifter which is a metal trim ring I made that has a sheet of 1/16" butyl rubber sheet glued to it with 3M weatherstripping adhesive.  I then cut a hole slightly smaller than the shifter top.  I then sandwich it between the shifter base and the top of the shifter.  Before installing the shifter, I cleaned all the grease out and filled it with some Lucas lithium grease that I purchased at O'reilly.


A small piece of wood fits over the top of it and bolts into the stock shifter holes.  The carpet is laid over the top and then the wood is what the Lokar shift boot trim ring mounts to.  While this is a little unconventional, it works great.  


With the shifter done, I was able to put the carpet back in place, the kick panels, sill plates, and floor mats.  The interior is starting to look like a normal car again.

MDL Underdash Clutch Setup

I've left the MDL clutch linkage kit under the dash loose until this point.  There is a considerable amount of adjustability.  The goal is to have the clutch pedal fully extended and equal with the brake pedal without it applying any inward movement on the clutch master cylinder.  Then you need to ensure that when the clutch is pressed to the floor, it does not bottom out the master cylinder.  I worked the adjustments and everything is great on mine.  There is no side loading and the whole setup is quite nice.  It moves like butter and I expect it will be a significant improvement over the original setup.


Lower Bellhousing Bolts

There are two bolts that run through the lower portion of the block plate into the bellhousing.  I know I installed them before in my original bellhousing but they must rattle out.  I decided to buy a few ARP bolts (5/16-18) and put them in this spot.  It is a bit much for the need but I like the look and will no doubt use the other bolts later.  

Master Cylinder Reservoir

I made a small bracket to hold the reservoir to the export brace.  I used 1 1/4" aluminum angle iron with two small provisions to zip tie it into place.  Ultimately, I'd like to make the same exact piece out of metal and weld it to the bottom of the export brace.  I don't need to go that far with it right now and want to get this going and fine tune a bit later.  


Bellhousing Connections

I originally planned to run both of the hydraulic lines through a grommeted hole in the clutch fork cover.  However, as I considered it, I thought it would be better to run it through the original clutch rod hole using a AN bulkhead fitting.  I used an Allstar bulkhead (49-ALL500-93) with a matching nut.  I used a very thin washer I had on one side but didn't use anything on the other.  I expect it will hold up fine but it was a super tight fit.  


Clutch Fork Dust Cover

Since the Daniel Carpenter clutch fork cover I purchased does not fit well, I figured I'd order a different one with the bulkhead fitting.  I ordered a Lakewood model from JEGs.  When it arrived, I found it was just the Daniel Carpenter model with a second sticker on the box.  It does not fit right either and has the same problem as the other one.  I'll mess with this a bit more later.