I'm losing a bit of my enthusiasm for this particular project and the prep process in general. I've been working a bit each evening but it is a really small amount. Over the course of this week and a couple hours this weekend, I was able to accomplish a few good items but I'm really only to the point of reassembly.
Since my last post, I drained the oil, removed the oil pan, and then removed the timing cover. Unfortunately, I ripped the oil pan gasket due to RTV at the corners of the timing cover so I ordered a new Fel Pro OS13260T gasket on Amazon. While I was at it, I ordered a new Gates 20338 bypass heater hose as the old one was a FoMoCo reproduction and was a bit thin.
I used paint stripper to clean all the old paint and primer from the timing cover. I used a few little Dremel wire wheels to get in all the small corners. I then coated it with some Duplicolor DP1612 engine paint and then DP1606 Ford Blue. I taped off the gasket surface out of an abundance of caution. After letting it dry, I installed the fuel pump block off plate with a new Fel Pro seal and a light coat of Permatex Ultra Black RTV. I also had a Fel Pro crank seal so I removed the old one and installed the new one with a very light coat of the same Black RTV on the outer ring of the seal.
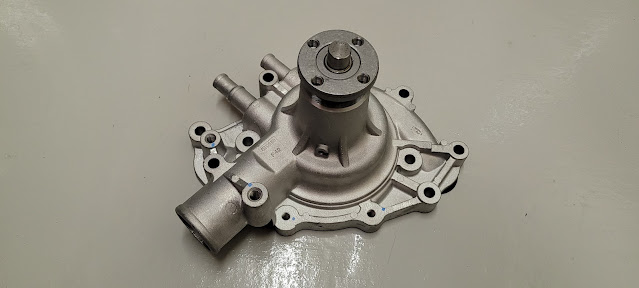
I ordered a FlowCooler high flow aluminum water pump (Part # 1681) that should help a bit with cooling. I put a coated of Duplicolor DP1612 engine primer and then DP1606 Ford Blue paint on the pump and the exterior side of the backing plate. I don't have Fel Pro gaskets on hand for the water pump but it came with a set. I'll have to decide what I want to do with that part. I also did not paint the gasket surfaces on the water pump out of an abundance of caution.
I cleaned up the thermostat mounting surface on the intake really well and then ran a 5/16" tap completely to the bottom of both holes. I've cleaned up the thermostat housing so that it looks like new. I used from Permatex (#22071) water pump RTV to lightly seal the thermostat into the housing. I'm letting it dry overnight and then have a Mr Gasket 737G aluminum and silicone seal gasket that I plan to use. I'm not convinced it is a the best option and it certainly wasn't cheap ($25). However, I've used Fel Pro gaskets on three different occasions, and it has leaked every time despite new intakes and thermostat housings.
I then cleaned all the timing cover mounting surfaces on the engine block with a razor blade, paint thinner, and a small Dremel wire wheel. I'll need to do some touch up paint on the block where it is discolored from anit-freeze but I'll need to do that a little later.
I purchased a Professional Products engine damper to replace the one in the car which is the exact same model (Part# PFS-80006) as the old one was rather rusty.
Somewhat as a tangent, I've been wanting to replace the cheap air box drain that came with the Classic Auto Air system. What I found is a GM 15-34717 and I took a chance on it for $5 and it fit just fine. It is much better than the last which was just clear plastic tube that you had to basically fold to form a 90 degree angle. Once I put it into place, I put the sealing gunk back around the tube as it entered the firewall.
This is where I am at the moment. Hopefully I get a bit more enthusiasm to finish this up. Right now, I'm more interested in doing just about anything else. To get this finished up, I need to...
- Mount the thermostat with Mr Gasket seal
- Install the timing cover with Fel Pro gasket
- Install the water pump with ??? gasket
- Install alternator and A/C brackets on water pump
- Install damper, crank pulley, and water pump pulley
- Reinstall fan shroud and electric fan (temp sensor)
- Fix wiring for the fan that was cut to remove the shroud
- Reinstall the various hoses for the cooling system
- Straighten and repaint the oil pan
- Reinstall oil pan with new Fel Pro gasket
- Reinstall valve covers
- Add oil, swap oil filter, and add coolant


No comments:
Post a Comment