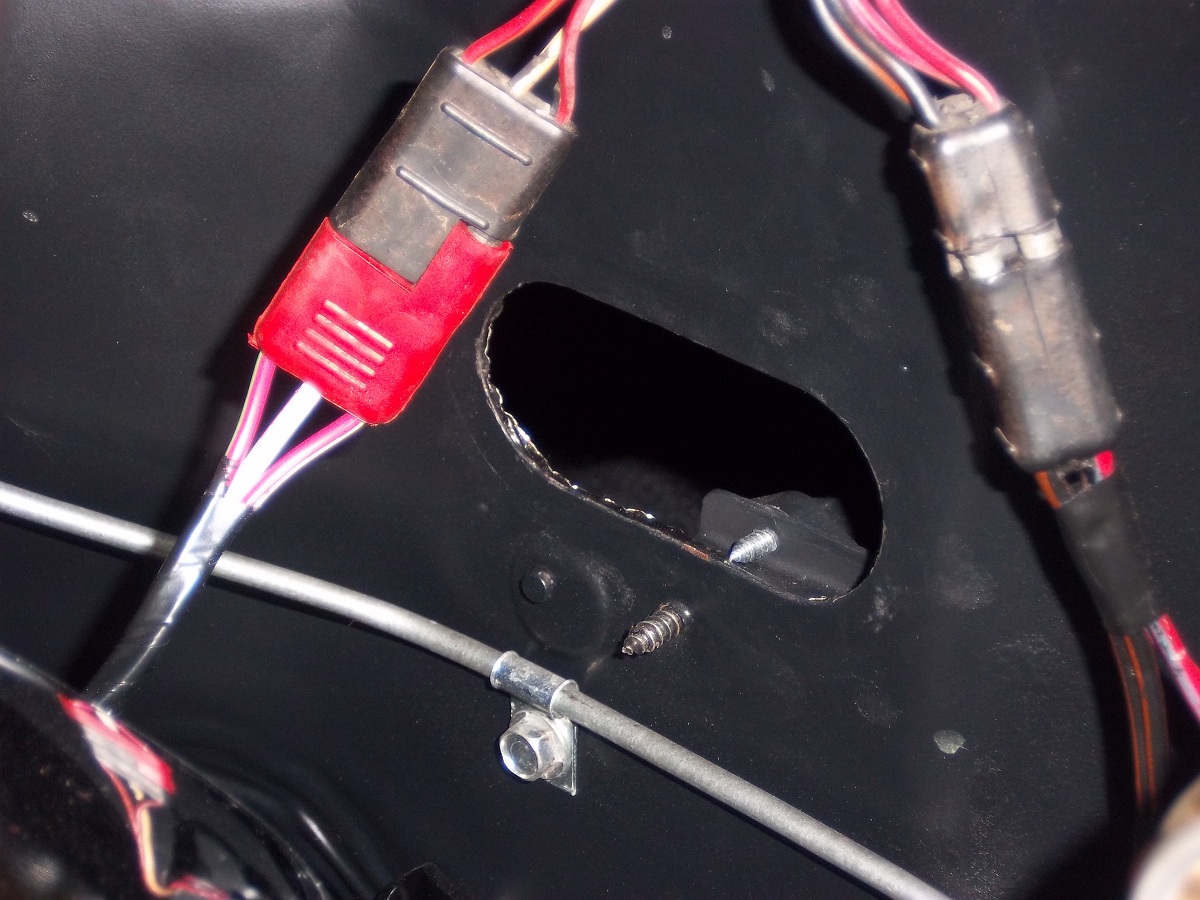
There is a stock knock out plate near the master cylinder on my Mustang. The knock out plug was removed when I purchased the car. The shape and the size of the hole are unique and I've not been successful locating something to plug the opening.
For the past few years, I've used a cut up rear shock plug. It is too tall and too wide to do the job but was better than nothing. It would have been best to tack weld in a piece of metal from the inside when I did the work under the firewall. However, I did not even consider it at the time and the inside portion of the firewall is now covered in Dynamat.
I decided to make a metal block off plate to fill the hole. The front and rear plates are made out of 16 guage scrap from the metal plate I created to separate the rear seat from the trunk area. I then cut out an oval piece of metal which fit about the exact hole in the firewall. The two 16 guage pieces are going to sandwich the oval piece in the hole.
I used RTV to somewhat hold the oval piece on the front piece of metal. I ran a little bead of RTV around the side of the oval and smeared it out rather smooth. This will serve as a little bit of a gasket. I then tack welded nuts on the back piece of metal to make installation simpler. I picked up some nice stainless steel screws to finish it off.
I worked on this little project for a few minutes each night this week. I painted the part and put the RTV on yesterday. Now that the RTV has fully dried, I installed the block off plate. It seems to fit well and should do the job nicely. It is certainly better than the hacked up rubber plug I was trying to make fit.
Showing posts with label Engine Compartment. Show all posts
Sunday, February 12, 2012
Sunday, January 1, 2012
Completed Hood Hinges
I removed the hinges from the engine compartment along with the hood when I pulled the engine. The following shows the condition when they were removed. There was plenty of grime, black, red, and some blue paint on them.
I media blasted the hinges the Friday before Christmas. I then coated them with two light coats of Eastwoods Rust Encapsulator. Finally, I put a light coat of Eastwoods Cast Blast on the hinges. I stuck with light coats so the paint would hopefully not be thick enough to scrape off when the hinges are used.
I purchased some AMK original style mounting bolts and replacement springs from CJ Pony parts. I installed the springs on the hinges after giving a little time for the Cast Blast paint to dry. I'd say the hinges look really good.

I media blasted the hinges the Friday before Christmas. I then coated them with two light coats of Eastwoods Rust Encapsulator. Finally, I put a light coat of Eastwoods Cast Blast on the hinges. I stuck with light coats so the paint would hopefully not be thick enough to scrape off when the hinges are used.
I purchased some AMK original style mounting bolts and replacement springs from CJ Pony parts. I installed the springs on the hinges after giving a little time for the Cast Blast paint to dry. I'd say the hinges look really good.

Thursday, December 22, 2011
Painting Engine Components & Bleeding Brakes
I've a few days off for the holidays and decided to go ahead and start painting a few items for the new engine. I'm hoping to get a call soon stating the engine is ready. Painting the parts now will allow me to get as far as possible while off when I do get the call that the engine is ready.
I started off by painting the timing cover which I stripped I few weeks ago. I then painted the oil pan followed by the water pump, intake, crank pulley, and harmonic balancer. With the exception of the crank pulley, all of the parts were painted with Duplicolor 1606 Dark Ford Blue Paint.
When my wife arrived home at the end of the day, I talked her into helping me bleed the brakes. Since I removed the master cylinder to paint it a couple of weeks back, this would also be needed in order to start driving the car. This took longer than expected but the brakes are now fully bled.
I started off by painting the timing cover which I stripped I few weeks ago. I then painted the oil pan followed by the water pump, intake, crank pulley, and harmonic balancer. With the exception of the crank pulley, all of the parts were painted with Duplicolor 1606 Dark Ford Blue Paint.
When my wife arrived home at the end of the day, I talked her into helping me bleed the brakes. Since I removed the master cylinder to paint it a couple of weeks back, this would also be needed in order to start driving the car. This took longer than expected but the brakes are now fully bled.
Sunday, November 27, 2011
Stripping & Painting Engine Mounting Area
A few years ago, I stripped and painted the engine compartment. I could not reach the entire shock tower as I didn't remove the engine. Since the engine is out, I'm stripping and painting these areas while I have the chance.
I stripped the passenger side yesterday which was not a fun job but not overly difficult. I handled the driver side today. The driver side was a little worse as the oil extension and sending unit leaked when I purchased the car. While I cleaned all the oil up years ago, there was still some hiding under the engine mounts.
I stripped them both with a wire wheel and coated them with Eastood Rust Encapsulator. I've some of the original Krylon paint which I'll put on the area after waiting a while for the Rust Encapsulator to dry.
I also need to strip the motor mounts themselves. I'll save that project for another day. I'm stopping early today to enjoy my last day off for Thanksgiving.
Before:
I stripped the passenger side yesterday which was not a fun job but not overly difficult. I handled the driver side today. The driver side was a little worse as the oil extension and sending unit leaked when I purchased the car. While I cleaned all the oil up years ago, there was still some hiding under the engine mounts.
I stripped them both with a wire wheel and coated them with Eastood Rust Encapsulator. I've some of the original Krylon paint which I'll put on the area after waiting a while for the Rust Encapsulator to dry.
I also need to strip the motor mounts themselves. I'll save that project for another day. I'm stopping early today to enjoy my last day off for Thanksgiving.
Before:
After:
Saturday, October 16, 2010
Upgrading to an Electric Fan System
At the beginning of September, I started preparing to upgrade the cooling system on the Mustang to include an electronic fan. The fan I selected is a 16" Flex-A-Lite Syclone fan (FLX-398 which has S shaped blades. To operate the fan, I purchased an adjustable Flex-A-Lite temperature controller (31147). The total cost for the items was around $142 from Summit Racing.
One the fan arrived, I removed the old fan and spacer from the Mustang. The fan blade was a six blade fan but it was not an original Ford fan. I placed it on eBay with another spare spacer I had which was too long for my Mustang. The set sold for $66 dropping the cost of this project to $82.
I installed the new electric fan today inside the stock fan shroud. It fit perfectly inside the shroud and is much more hidden from view. The casing for the controller was tan so I painted it with a little black paint to hide it better. I mounted it on the lower passenger side fan shoud bolt. The temperature probe is at the top of the radiator by the inlet hose.


I need to wire up a relay and fuse for the fan controller. I'm waiting on this part as I'm tempted to move the battery to the trunk. I'm not sure if I would leave the battery tray or not and I was going to hide the relay under the battery. I'll wait to finish this part of the project up until I decide on what I want to do with the battery.
The following picture shows the engine compartment with the standard fan:

This picture is from a little different angle but shows how the fan is concealed by the shroud.
This new fan generates 2,500 CFM of air when running. It should reduce the load on the engine when running at higher RPM. I'm not expecting an incredible improvement but it should help some. The only issue now is the 17amp draw on the alternator.
One the fan arrived, I removed the old fan and spacer from the Mustang. The fan blade was a six blade fan but it was not an original Ford fan. I placed it on eBay with another spare spacer I had which was too long for my Mustang. The set sold for $66 dropping the cost of this project to $82.
I installed the new electric fan today inside the stock fan shroud. It fit perfectly inside the shroud and is much more hidden from view. The casing for the controller was tan so I painted it with a little black paint to hide it better. I mounted it on the lower passenger side fan shoud bolt. The temperature probe is at the top of the radiator by the inlet hose.
I need to wire up a relay and fuse for the fan controller. I'm waiting on this part as I'm tempted to move the battery to the trunk. I'm not sure if I would leave the battery tray or not and I was going to hide the relay under the battery. I'll wait to finish this part of the project up until I decide on what I want to do with the battery.
The following picture shows the engine compartment with the standard fan:
This picture is from a little different angle but shows how the fan is concealed by the shroud.
This new fan generates 2,500 CFM of air when running. It should reduce the load on the engine when running at higher RPM. I'm not expecting an incredible improvement but it should help some. The only issue now is the 17amp draw on the alternator.
Sunday, February 21, 2010
Hood Support Restoration
I started restoring the hood support about a year ago. I basted the majority of it in my father's media cabinet but ran short on time and could not finish the job. I expected to finish it up in a few weeks so I put a little grey primer on it and reinstalled it on the car. I just made it back to this project this weekend.
I finished blasting the hood support on Saturday night. I primered it this morning and painted it with the Krylon 1613 paint. I placed the hood striker in a bowl of phosphoric acid. After a couple of hours, I pulled it out, hit it with some steel wool, and then installed it. I already had new concours correct SEMS bolts to put it all back together.
The project did not take long but makes the engine compartment look much better. In the picture below, you can see a place where the paint is chipped. This is where the safety latch for the hood slides along the support brace and secures the hood in place.
I finished blasting the hood support on Saturday night. I primered it this morning and painted it with the Krylon 1613 paint. I placed the hood striker in a bowl of phosphoric acid. After a couple of hours, I pulled it out, hit it with some steel wool, and then installed it. I already had new concours correct SEMS bolts to put it all back together.
The project did not take long but makes the engine compartment look much better. In the picture below, you can see a place where the paint is chipped. This is where the safety latch for the hood slides along the support brace and secures the hood in place.
Friday, March 20, 2009
Starting the Engine
I started the engine this morning. It cranked for just a 40 seconds total before fuel reached the carburetor and it started up. It ran for a few seconds and I noticed there was no oil pressure reading. I turned the engine off so there would not be any damage.
I went to Ace and purchased a fitting to reinstall the mechanical oil pressure unit which was previously on the car. I started the car and immediately the oil pressure was 40psi. As the car warmed up, the oil pressure dropped to about 20 but would increase when I revved the engine.
The timing was not set properly as I loosened the distributor to clean it and the surrounding parts of the manifold. I connected a vacuum gauge and timing light. The vacuum was at 16 but I could not identify the timing. I turned off the engine and then made darker marks for TDC on the crank pulley.
The second attempt worked a little better. I was able to set the timing at 12 degrees which put the vacuum at 19lbs. If turned to 15 degrees, the vacuum reaches 20lbs. Performance normally increases with timing (to an extent). I've heard of setting timing based on the highest vacuum. For now, I'll just leave it at 12 degrees as it is a safe setting.
I did notice a little blue smoke when reving the engine and on the second start. The smoke goes away quickly but is a sign of oil burning. I'll need to keep an eye on this as I do not remember this occurring before.
I went to Ace and purchased a fitting to reinstall the mechanical oil pressure unit which was previously on the car. I started the car and immediately the oil pressure was 40psi. As the car warmed up, the oil pressure dropped to about 20 but would increase when I revved the engine.
The timing was not set properly as I loosened the distributor to clean it and the surrounding parts of the manifold. I connected a vacuum gauge and timing light. The vacuum was at 16 but I could not identify the timing. I turned off the engine and then made darker marks for TDC on the crank pulley.
The second attempt worked a little better. I was able to set the timing at 12 degrees which put the vacuum at 19lbs. If turned to 15 degrees, the vacuum reaches 20lbs. Performance normally increases with timing (to an extent). I've heard of setting timing based on the highest vacuum. For now, I'll just leave it at 12 degrees as it is a safe setting.
I did notice a little blue smoke when reving the engine and on the second start. The smoke goes away quickly but is a sign of oil burning. I'll need to keep an eye on this as I do not remember this occurring before.
Engine Compartment Assembly 4
I decided to not work as much on the Mustang today.
At around 10 o'clock, I headed to the garage and wire loomed the wire to the starter. I then put on the positive battery cable. Next, I filled the radiator with water and some Prestone Super Radiator Flush.
I turned on the key to connect a radio wire to the fuse box which came out during the rebuild. I connected the wire to a terminal in the fuse box. I then checked my connection for the new tachometer and found it was connected to constant power. I switched it to a switched power source and wire tied up all the connections.
I finished installing the driver side shock and both coil covers this afternoon. I then greased all the fittings on the steering and suspension system. I torqued all the steering components but am unable to put cotter pins in all of them. I'll need to pick up a few more from the auto parts store.
Last night, I painted the engine compartment where the brake fluid spilled. I then installed the new wheels on the front and took the car off the jacks. After a year of being jacked up, the front end seemed way too low. I layed a fender on the car just to check spacing and everything looks fine. I guess I've seen it up on jacks more than I've seen it on the ground.
I still need to work out the front alignment as the tie rods and strut bars are currently loose. The wheels are sitting on linoleum flooring with grease between the layers so I can turn the wheels easily for the alignment.
The last things I did last night was install the valve covers, wipe off the car, and sweep the floor. I'm ready to start the car but since it is so late, I don't want to wake anyone up. Additionally, if it does not start immediately, it would ruin the day.
At around 10 o'clock, I headed to the garage and wire loomed the wire to the starter. I then put on the positive battery cable. Next, I filled the radiator with water and some Prestone Super Radiator Flush.
I turned on the key to connect a radio wire to the fuse box which came out during the rebuild. I connected the wire to a terminal in the fuse box. I then checked my connection for the new tachometer and found it was connected to constant power. I switched it to a switched power source and wire tied up all the connections.
I finished installing the driver side shock and both coil covers this afternoon. I then greased all the fittings on the steering and suspension system. I torqued all the steering components but am unable to put cotter pins in all of them. I'll need to pick up a few more from the auto parts store.
Last night, I painted the engine compartment where the brake fluid spilled. I then installed the new wheels on the front and took the car off the jacks. After a year of being jacked up, the front end seemed way too low. I layed a fender on the car just to check spacing and everything looks fine. I guess I've seen it up on jacks more than I've seen it on the ground.
I still need to work out the front alignment as the tie rods and strut bars are currently loose. The wheels are sitting on linoleum flooring with grease between the layers so I can turn the wheels easily for the alignment.
The last things I did last night was install the valve covers, wipe off the car, and sweep the floor. I'm ready to start the car but since it is so late, I don't want to wake anyone up. Additionally, if it does not start immediately, it would ruin the day.
Thursday, March 19, 2009
Engine Compartment Assembly 3
I started back on the Mustang early this morning. I rented a brake flaring took and tried to reflare the rear line connected to the residual pressure valve. After three attempts, I decided to try to replace the entire line using pre-flared lines. I visited NAPA and O-Reilly but they did not have the adapters needed to avoid flaring lines.
I purchased another 60" line and a coupler. I used a fitting which came with the residual pressure valve and the original fitting at the rear flex hose. I was able to flare this new (green polymer coated) line without too much trouble. I then bent the line to fit the car.
Kimberly helped me bleed the brake lines and continue the process of checking for leaks. We bled the brakes and as more air was removed, more leaks were found. I continued tightening all the bolts until they were gone. We worked up to the final test of me pressing the pedal to the floor for 30 seconds without any leaks. I'll check it again tomorrow and then paint the area under the hood which was damaged by the brake fluid.
I then installed both coil springs, the idler arm, center link, and tie rods. I tied up some loose wires under the dash and wired up the wire to the starter. I then completed the shock installation on the passenger side and mounted a tire.
Since I've made so much progress, I think I'll slow down the next few days. I have only four days left of my vacation and don't want to spend all day every day working on the car.

I purchased another 60" line and a coupler. I used a fitting which came with the residual pressure valve and the original fitting at the rear flex hose. I was able to flare this new (green polymer coated) line without too much trouble. I then bent the line to fit the car.
Kimberly helped me bleed the brake lines and continue the process of checking for leaks. We bled the brakes and as more air was removed, more leaks were found. I continued tightening all the bolts until they were gone. We worked up to the final test of me pressing the pedal to the floor for 30 seconds without any leaks. I'll check it again tomorrow and then paint the area under the hood which was damaged by the brake fluid.
I then installed both coil springs, the idler arm, center link, and tie rods. I tied up some loose wires under the dash and wired up the wire to the starter. I then completed the shock installation on the passenger side and mounted a tire.
Since I've made so much progress, I think I'll slow down the next few days. I have only four days left of my vacation and don't want to spend all day every day working on the car.

Wednesday, March 18, 2009
Engine Comparment Assembly 2
I started fairly early again this morning. I started working on the little details to complete the work last night.
I installed the spark plug wires, tachometer wiring, and spark plug wires. I spent a little while working on the Mr. Mustang engine gauge harness so it would fit the car properly. I then installed the engine gauge harness, heater hose plugs, A/C panel, and ground to firewall cable. I then located the bolt needed to finish installing the speedometer cable into the transmission.
I installed the brake line clips on the frame rails next, cleaned up the fuel hose routing, and then torqued down all of the suspension bolts according to my '67 Shop Manual. I ran the main wiring harness through the engine bay using the concours clips to hold each section in place. Next came the radiator, hoses, alternator, pullies, fan, and belt.
Kyle arrived and we bench bled the master cylinder. I did not loose much brake fluid installing the master cylinder which was suprising. However, some did get on the new paint which took the paint off.
I moved to the back passenger wheel and we started the bleeding process. Once I stopped seeing bubbles and Kyle noted the pedal getting firmer, I moved to the driver side rear wheel. Kyle filled the m/c with more fluid and we started again. After bleeding about 10 times, Kyle checked the m/c and found brake fluid everywhere. It was coming out of the m/c ports, the top ports of the m/c, and the residual pressure valve.
I loosed and retighten the lines from the m/c to the proportioning valve and we checked it again. This time the only leak was at the residual pressure valve. Unfortunately, the damage had been done as much of the paint is now covered with streaks were the brake fluid ran down the engine compartment.
After taking apart the residual pressure valve, I found the problem was with the end I flared. It looks horrible and if I had noticed I would have never tried to use it. Not sure how this occurred but we called it a night since we were not able to make any additional forward progress.
I installed the spark plug wires, tachometer wiring, and spark plug wires. I spent a little while working on the Mr. Mustang engine gauge harness so it would fit the car properly. I then installed the engine gauge harness, heater hose plugs, A/C panel, and ground to firewall cable. I then located the bolt needed to finish installing the speedometer cable into the transmission.
I installed the brake line clips on the frame rails next, cleaned up the fuel hose routing, and then torqued down all of the suspension bolts according to my '67 Shop Manual. I ran the main wiring harness through the engine bay using the concours clips to hold each section in place. Next came the radiator, hoses, alternator, pullies, fan, and belt.
Kyle arrived and we bench bled the master cylinder. I did not loose much brake fluid installing the master cylinder which was suprising. However, some did get on the new paint which took the paint off.
I moved to the back passenger wheel and we started the bleeding process. Once I stopped seeing bubbles and Kyle noted the pedal getting firmer, I moved to the driver side rear wheel. Kyle filled the m/c with more fluid and we started again. After bleeding about 10 times, Kyle checked the m/c and found brake fluid everywhere. It was coming out of the m/c ports, the top ports of the m/c, and the residual pressure valve.
I loosed and retighten the lines from the m/c to the proportioning valve and we checked it again. This time the only leak was at the residual pressure valve. Unfortunately, the damage had been done as much of the paint is now covered with streaks were the brake fluid ran down the engine compartment.
After taking apart the residual pressure valve, I found the problem was with the end I flared. It looks horrible and if I had noticed I would have never tried to use it. Not sure how this occurred but we called it a night since we were not able to make any additional forward progress.
Monday, March 16, 2009
Engine Compartment Assembly
Yesterday morning, I taped off all holes in the fenderwells from the engine side. I then sprayed three coats of Duplicolor bed liner on each side. I'm using bedliner as undercoat as it is very durable. I tried using a 3M undercoat product on some test metal and the coil covers and it does not seem like it would hold up very well.
I planned to topcoat the Extreme Chassis Black on the frame rails with the Krylon 1613. I tested it on the lower side of the frame rail. It was evident the paint was not going to adhere well. I decided I would just leave the frame rails and undercarriage in the Extreme Chassis Black.
After mailing the items I recently sold on eBay (made about $150), I cleaned out the paint overspray from the garage. I then started the reassembly process at about 3 o'clock. Kyle arrived at 6 o'clock and we continued working until about 11 o'clock last night. The following was installed:
- Steering Box, Column, and Instrument Cluster
- Rubber Plugs for Engine Compartment Holes
- Z bar and All Clutch Linkage Parts
- Throttle Linkage and Carburetor
- Speedometer Cable
- Fresh Air Vent
- Windshield Washer Reservoir
- Battery Tray & Battery
- Combination Vale & Brake Lines
- UCA, LCA, and Roller Spring Perches
- Complete Spindles w/Disc Brakes
- Adjustable Strut Rods & 1 1/8 Sway Bat
- Engine Crossmember
- Fuel Line & Pump
The bolts for the suspension parts are just finger tight. I'll check the shop manual for torque values and then go around checking everything. Afterwards, I'll install the springs and will put the car back on its own tires.
I noticed a small chip on the sway bar and another on the engine crossmember. I'm suprised as they are coated in Extreme Chassis Black with is supposed to be very resistant to any chips. I'll try to touch these up in the morning.

I planned to topcoat the Extreme Chassis Black on the frame rails with the Krylon 1613. I tested it on the lower side of the frame rail. It was evident the paint was not going to adhere well. I decided I would just leave the frame rails and undercarriage in the Extreme Chassis Black.
After mailing the items I recently sold on eBay (made about $150), I cleaned out the paint overspray from the garage. I then started the reassembly process at about 3 o'clock. Kyle arrived at 6 o'clock and we continued working until about 11 o'clock last night. The following was installed:
- Steering Box, Column, and Instrument Cluster
- Rubber Plugs for Engine Compartment Holes
- Z bar and All Clutch Linkage Parts
- Throttle Linkage and Carburetor
- Speedometer Cable
- Fresh Air Vent
- Windshield Washer Reservoir
- Battery Tray & Battery
- Combination Vale & Brake Lines
- UCA, LCA, and Roller Spring Perches
- Complete Spindles w/Disc Brakes
- Adjustable Strut Rods & 1 1/8 Sway Bat
- Engine Crossmember
- Fuel Line & Pump
The bolts for the suspension parts are just finger tight. I'll check the shop manual for torque values and then go around checking everything. Afterwards, I'll install the springs and will put the car back on its own tires.
I noticed a small chip on the sway bar and another on the engine crossmember. I'm suprised as they are coated in Extreme Chassis Black with is supposed to be very resistant to any chips. I'll try to touch these up in the morning.

Sunday, March 15, 2009
Engine Compartment Painting 3
I put another coat of Extreme Chassis Black on the undercarriage this morning. By the morning it should be fully dry. I'll then put the undercoating in the fender wells and begin reinstalling parts. The plan is to start with parts mounted on the firewall and then move forward. Hopefully this will ensure (or minimize) the paint is not damaged while reinstalling parts.
The only other forward progress made was painting the battery tray. I also picked upsome wiring at Wal-Mart for the tachometer installation. I want to install the instrument cluster tomorrow as one of the first projects so I do not damage the steering column installing it later.
I can't say how glad I am that the engine compartment is painted. It has taken so long to get to this point it does not seems like I should be at this point yet. I'll install a few parts in the morning and Kyle is coming over to help tomorrow night.
The only other forward progress made was painting the battery tray. I also picked upsome wiring at Wal-Mart for the tachometer installation. I want to install the instrument cluster tomorrow as one of the first projects so I do not damage the steering column installing it later.
I can't say how glad I am that the engine compartment is painted. It has taken so long to get to this point it does not seems like I should be at this point yet. I'll install a few parts in the morning and Kyle is coming over to help tomorrow night.
Saturday, March 14, 2009
Engine Compartment Painting 2
The Rust Encapsulator I applied last night had plenty of time to dry this morning. I started off this morning by checking all the panels for runs or rough spots. I found a few and used 400 grit sand paper to clean up those areas. I then used the tack cloth on the engine bay to clean off any residue or dust.
I used three coats of Krylon 1613 on all engine compartment surfaces. I went a little light with the first coat and increased the amount of paint used with each coat. This required about five cans of paint.
I then moved to the undercarriage and coated the undercarriage with Extreme Chassis Black. I don't like the level of gloss with the Chassis Black but it is much more durable than any of the other spray paints. After putting two coast of Chassis Black on the subframe and frame rails, I might top coat with the Krylon for a better appearance.
I'll wait for everything to dry during the day today. I'll probably put undercoating in the wheel wells later this afternoon. The Chassis Black will need to dry overnight and then I'll put another coat of Chassis Black on in the morning. Once it dries, I'll touch up any areas with Chassis Black overspray, put on a little more undercoat in the fenderwells, and then
I used three coats of Krylon 1613 on all engine compartment surfaces. I went a little light with the first coat and increased the amount of paint used with each coat. This required about five cans of paint.
I then moved to the undercarriage and coated the undercarriage with Extreme Chassis Black. I don't like the level of gloss with the Chassis Black but it is much more durable than any of the other spray paints. After putting two coast of Chassis Black on the subframe and frame rails, I might top coat with the Krylon for a better appearance.
I'll wait for everything to dry during the day today. I'll probably put undercoating in the wheel wells later this afternoon. The Chassis Black will need to dry overnight and then I'll put another coat of Chassis Black on in the morning. Once it dries, I'll touch up any areas with Chassis Black overspray, put on a little more undercoat in the fenderwells, and then
Friday, March 13, 2009
Engine Compartment Painting
After scrubbing the engine compartment, subframe, and fenderwells with 3M scour pads (and water), I wiped down the frame tonight with Klean Strip Clean-All. This cleaned any remaining grease from the panels. I needed to lightly sand the front frame rails and sway bar mounts. I then used USC tack cloths as a final step in paint preparation.
I then used Rust Encapsulator to coat all of the engine bay and undercarriage of the car. I used almost two cans. Since there was already one coat on all the metal, this provided me with a total of about 2.5 coats. Since I already painted the fenderwells with Rust Encapsulator, I went ahead and painted the outside frame rails with Eastwood's Extreme Chassis Black.
The Rust Encapsulator requires 6-8 hours of dry time and the Extreme Chassis Black requires 24 hours. When I wake up in the morning, I'll put a coat of Extreme Chassis Black on the subframe. I'll then periodically paint the entire engine bay area with the Krylon 1613 until I have at least three coats.
I then used Rust Encapsulator to coat all of the engine bay and undercarriage of the car. I used almost two cans. Since there was already one coat on all the metal, this provided me with a total of about 2.5 coats. Since I already painted the fenderwells with Rust Encapsulator, I went ahead and painted the outside frame rails with Eastwood's Extreme Chassis Black.
The Rust Encapsulator requires 6-8 hours of dry time and the Extreme Chassis Black requires 24 hours. When I wake up in the morning, I'll put a coat of Extreme Chassis Black on the subframe. I'll then periodically paint the entire engine bay area with the Krylon 1613 until I have at least three coats.
Wednesday, March 11, 2009
Steering Box Paint & Battery Tray Completion
I ordered two cans of Eastwood's Rust Encapsulator and a can of Spray Gray this week on eBay.
The cans of paint arrived today and I decided to go ahead and paint the steering box. Since the box was already stripped and primered, the job was not very difficult. I put several coats on all of the steering box. I would have preferred to remove the top plate or cover it before painting. However, I know it would just rust as it already started since I first cleaned the box.
I had to move it around a little to access all sides. I would remove the box but on a '67 Mustang, a shaft comes out of the box and runs up the column. This shaft is so long it is not possible to remove the steering box without taking off the exhaust manifold. Since my exhaust is solid from the head to the muffler, this really is not an option.
After painting the steering box, I spent a little more time putting on metal filler and sanding the battery tray area. Over 90% of the area is covered by the battery tray but I want it to look good. After working on the area a while, I primed it and was content with the finished product. I've included a picture of the panel below.
The cans of paint arrived today and I decided to go ahead and paint the steering box. Since the box was already stripped and primered, the job was not very difficult. I put several coats on all of the steering box. I would have preferred to remove the top plate or cover it before painting. However, I know it would just rust as it already started since I first cleaned the box.
I had to move it around a little to access all sides. I would remove the box but on a '67 Mustang, a shaft comes out of the box and runs up the column. This shaft is so long it is not possible to remove the steering box without taking off the exhaust manifold. Since my exhaust is solid from the head to the muffler, this really is not an option.
After painting the steering box, I spent a little more time putting on metal filler and sanding the battery tray area. Over 90% of the area is covered by the battery tray but I want it to look good. After working on the area a while, I primed it and was content with the finished product. I've included a picture of the panel below.
Tuesday, March 10, 2009
Grinding Down Welds
I spent tonight grinding down the welds from last night. The majority of the time was spent on the battery tray area. I'm not as concerned about the fenderwell welds as they can't be made to look perfect and are covered by the fender.
I used a grinding disc with a 4" 50 grit pad. The work took a little while but the battery tray panel is smooth enough to use USC Metal Filler to complete. I've included a few pictures below. I would like to have a picture of each before grinding but we used the grinder while welding to find any gaps in the welds. The pictures below were taken at the midpoint of the process.

I used a grinding disc with a 4" 50 grit pad. The work took a little while but the battery tray panel is smooth enough to use USC Metal Filler to complete. I've included a few pictures below. I would like to have a picture of each before grinding but we used the grinder while welding to find any gaps in the welds. The pictures below were taken at the midpoint of the process.

Monday, March 9, 2009
Patch Panel Welding Complete
Danny came over last night and helped me weld my patch panel for the battery tray and the area in the driver floorboard.
We spent a little over three hours working on the car with most of the effort on the battery tray area. My patch panel was tacked in with a brass plate behind the panel. I then held the plate in place as he moved around placing additional spot welds. Once it was held in place well, I put on my welding helmet and watched him weld. I've only welded once (if you can call it that) so watching someone is helpful.
I grinded off the welds fairly flat every so often and we placed a light under the panel to see if there were any missed spots. After repeating this process a few times, the weld was solid all the way around. It was about this time Danny remembered we had another patch to weld.
Danny quickly welded the next piece in several long bursts. I held a brass plate on the inside of the car while he welded. The plate was incredibly hot and felt like it was burning my fingers through my welding glove. The welds in this area are much, much larger than the other and will be hard to clean up. Danny suggested I leave much of the weld bead alone to ensure it is strong. I'll follow his suggestion and just clean up the welds slightly.
I'm exhausted as I had Jury Duty this morning, worked the rest of the day, and then worked from the moment I made it home until after 9 o'clock.
We spent a little over three hours working on the car with most of the effort on the battery tray area. My patch panel was tacked in with a brass plate behind the panel. I then held the plate in place as he moved around placing additional spot welds. Once it was held in place well, I put on my welding helmet and watched him weld. I've only welded once (if you can call it that) so watching someone is helpful.
I grinded off the welds fairly flat every so often and we placed a light under the panel to see if there were any missed spots. After repeating this process a few times, the weld was solid all the way around. It was about this time Danny remembered we had another patch to weld.
Danny quickly welded the next piece in several long bursts. I held a brass plate on the inside of the car while he welded. The plate was incredibly hot and felt like it was burning my fingers through my welding glove. The welds in this area are much, much larger than the other and will be hard to clean up. Danny suggested I leave much of the weld bead alone to ensure it is strong. I'll follow his suggestion and just clean up the welds slightly.
I'm exhausted as I had Jury Duty this morning, worked the rest of the day, and then worked from the moment I made it home until after 9 o'clock.
Tuesday, February 10, 2009
New Fan Spacer
I purchased an original style fan spacer for use on my Mustang this week. The spacer is actually from a 1968 Mustang (notice the C8AE-E cast into the base). However, the fan spacer looks almost identical to the size used in '67 and is the same size as the one previously on my car.
The spacer was already media blasted and arrived ready for paint. I primed the part and then painted it with Plasti-Kote 282 Cast Aluminum paint. The piece is now ready for installation.
Wednesday, January 14, 2009
New Distributor Cap & Rotor
I regularly check eBay for original or cheap parts I could use. I watch them and check back occassionally until the auctions end.
I came home for lunch today and happened to check eBay. A new distributor cap and rotor I started watching was set to end later during the day. I marked it because I need a new cap and this one started at $.99 with free shipping. I placed a maximum bid of $3.00 and returned to work. When I came home, I found I had won the parts for $1.04 (again free shipping).
A small victory but it is nice to find a deal when working on your car because everything cost more than you expect.
02/07/09 Update: The distributor cap and rotor has not arrived. The individual who listed the part on eBay is not responding to my emails. I suppose I should be thankful I'm only out $1.04. Sometimes, you just can't win!
I came home for lunch today and happened to check eBay. A new distributor cap and rotor I started watching was set to end later during the day. I marked it because I need a new cap and this one started at $.99 with free shipping. I placed a maximum bid of $3.00 and returned to work. When I came home, I found I had won the parts for $1.04 (again free shipping).
A small victory but it is nice to find a deal when working on your car because everything cost more than you expect.
02/07/09 Update: The distributor cap and rotor has not arrived. The individual who listed the part on eBay is not responding to my emails. I suppose I should be thankful I'm only out $1.04. Sometimes, you just can't win!
Subscribe to:
Posts (Atom)


