Wednesday, December 28, 2011

Performing the Shelby/Arning Drop

I performed the Shebly drop on my front suspension today. This involves removing the shocks, springs, and then the upper control arms.  The mounting holes for the upper control arm are then relocated 1” down perpendicular to the centerline of the original UCA mounting. This was something planned by Ford (Klaus Arning) during the design of the Mustang but it was actually not performed so the car would understeer if pushed to the limit.


This was a change made by Shelby on the GT350 cars. I took on the project since I'm just standing around waiting for the motor to be rebuilt.  While I had the springs out, I removed a 1/4 coil from my front coil springs to drop the ride height slightly.  Although the car is back together, I can't see the difference yet as the engine is not in the vehicle.


The Shelby drop is highly recommended as it lowers the center of gravity on the front of the car, reduces body roll by 7% to 9%, and improves the camber curve.  I often read of the benefits on Mustang forums but waited as I really did not want to drill non-stock holes in the engine compartment.  While I've not departed an incredible amount from stock, I'm no longer as worried and would perfer the drive improvements.

Friday, December 23, 2011

Transmission Preparation & Parking Brake Work

Today, I drained all the fluid from the transmission while it is out of the car.  There was some discoloration to the oil which caught me off guard at first.  I then remembered using moly lube on all the parts.  This should account for the strange dark streaks in the oil.

I cleaned up the outside of the transmission and touched up any paint which was damaged during the undercarriage project or when removing the transmission.  It still looks as good as it did when I rebuilt it about two years ago.

I don't believe I've mentioned the replacement parking brake lines are too short.  They can't be connected together using the stock connector and then still reach the adjustment rod.  I purchased a longer adjustment rod from Mustangs Unlimited (as well as a new air cleaner for my K&N filter) and installed it today.

I lifted the rear of the Mustang and took off the wheels to make sure the drums are still adjusted perfectly.  I then adjusted the parking brake such that it works very well but is definitely fully disengaged when the handle is pushed in. 

I've still not heard back on my engine.  I'm hoping they call before I need to go back to work next Thursday.

Thursday, December 22, 2011

Painting Engine Components & Bleeding Brakes

I've a few days off for the holidays and decided to go ahead and start painting a few items for the new engine.  I'm hoping to get a call soon stating the engine is ready.  Painting the parts now will allow me to get as far as possible while off when I do get the call that the engine is ready.

I started off by painting the timing cover which I stripped I few weeks ago.  I then painted the oil pan followed by the water pump, intake, crank pulley, and harmonic balancer.  With the exception of the crank pulley, all of the parts were painted with Duplicolor 1606 Dark Ford Blue Paint. 

When my wife arrived home at the end of the day, I talked her into helping me bleed the brakes.  Since I removed the master cylinder to paint it a couple of weeks back, this would also be needed in order to start driving the car.  This took longer than expected but the brakes are now fully bled.

Sunday, December 18, 2011

Odds & Ends...

I really enjoy working on the Mustang in a clean garage.  Everything seems much more organized and as if it is going better.  I suppose it the obsessive compulsive side of me.

Anyway, I spent about half the weekend cleaning up the garage and the other half working on some random Mustang projects.  I painted the oil pan, block plate, water pump, water pump pulley, dipstick, and coil bracket.  Aside from the painting, I made a pin switch for the hood and mounted my alarm siren.

I ordered most of the remaining parts to complete the engine.  I'll need to check the proper push rod length with an adjustable push rod.  I'll then be able to order the proper size and some break in oil.  However, before I can do any of these things, I need the engine back from the machine shop.

I called about the engine last Tuesday and was told it was build decked.  I called again this Wednesday to check on things and was told the decking was done and it was "in line".  After waiting for him the elaborate, he said it could be done sometime this coming week.  I told him I had time off after Christmas and it would be great if it could be done next week. 

Saturday, December 10, 2011

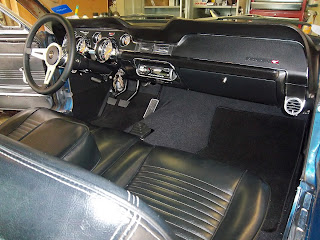
Dash Restoration Complete!

Two weeks ago, I managed to break the lens on my AutoMeter oil pressure guage.  AutoMeter sent me a replacement lens about a week ago and I installed it last night.  I then connected all the wiring in preparation for installing the instrument cluster today.  The install was easy and the final product looks incredible.


With the interior complete, I'm running out of projects to complete without the engine.  I checked on it earlier this week and they had finished mocking up the motor to measure the deck.  They have taken it apart and are now going to mill the deck to get the pistons flush with the deck (zero deck). 

I decided to go ahead and work on installing my Flowmaster exhaust system.  The tailpipes hang from hangers connected where the original tow hooks are at on the rear frame rails.  I took off the tow hooks and installed those brackets.  I then removed the rear seat as there are brackets which connect through the back of the seat area and hold up the mufflers. 

Once the brackets were in place, I had to remove the shocks to get the tailpipes in place.  Everything fits excellent.  I went ahead and installed the DynoFlow mufflers and the H-pipe to make sure everything fit without any trouble.  I'm a little worried the exhaust is not going to be long enough to mate up to my short tube headers.  Unfortunately, I've no way to know for sure until the motor arrives. 

I worked on cleaning up the engine pullies, coil bracket, and block plate.  I'm ready to paint them but I'm not sure if I want to use the DupliColor 1606 or Plastikote 224 paint.  I'll probably look for some of the Plastikote tomorrow so I can try them both out to see which I like best. 

The last think I did was install my registration sticker which has been sitting around a while.  The one of the car expired almost a year ago.  I did not want to forget about it and I'm really getting close to having it in drivable condition.


 placed the registration sticker on the windshield today as the old one expired exactly a year ago. 

Sunday, December 4, 2011

Steering Column, Wiring Repair, and Underhood Prep Work

This past Wednesday, I received a new roll of friction tape in the mail from NPD.  I removed the under dash wiring harness from the car and cut all the told tape off to inspect the wiring.  The black/green wire which was damaged was only slightly damaged.  While it likely was not entirely necessary, I replaced a 10" section of the wire closest to the instrument cluster. 

I put the wiring harness in this weekend and replaced the bulbs in the dome light and tail lights.  I went through and tested everything and I have a functional horn, headlights parking lights, radio, brake lights.... in short, everything works.  I'll just need to install the gauges to finish off the interior.

I put a few coats of paint on the shock towers and then reinstalled the centerlink and crossmember in the engine bay.  I reconnected the idler arm, rebuilt steering box, and tie rods to the center link.  I then installed the column, handled the column wiring, and installed the new steering wheel.  Lastly, I put on the new turn signal and emergency flasher parts on the column.

The last thing I did today was paint the accelerator pedal linkage and installed it in the car.