Sunday, February 21, 2010

Hood Support Restoration

I started restoring the hood support about a year ago. I basted the majority of it in my father's media cabinet but ran short on time and could not finish the job. I expected to finish it up in a few weeks so I put a little grey primer on it and reinstalled it on the car. I just made it back to this project this weekend.

I finished blasting the hood support on Saturday night. I primered it this morning and painted it with the Krylon 1613 paint. I placed the hood striker in a bowl of phosphoric acid. After a couple of hours, I pulled it out, hit it with some steel wool, and then installed it. I already had new concours correct SEMS bolts to put it all back together.

The project did not take long but makes the engine compartment look much better. In the picture below, you can see a place where the paint is chipped. This is where the safety latch for the hood slides along the support brace and secures the hood in place.

Sunday, February 14, 2010

Odometer Ticking Noise

While driving around last weekend, the speedometer suddenly started making a loud ticking noise. The frequency of the noise increased with my speed. However, the speedometer continued to work and did not jump or change when the noise occurred. I was not sure of the cause and since it was already Sunday, I just parked it.

I noticed the noise again this weekend. After driving around a while, I noticed the odometer was no longer working. Tonight, I took out the speedometer to determine the cause. I spun the speedometer by hand and was able to get it to make the click noise. I'm still not sure of the cause.

More than a year ago, I purchased a '67 instrument as the one currently in the Mustang is from a '68. I took out the '67 speedometer, set the odometer to the correct number, and installed it in the Mustang.

A cold front came in today and it is late so I don't want to start up the Mustang to make sure it works. I'll do it in the next few days. I'm sure this will fix it as long as there are no problems with this untested speedometer.

02/20/10 Edit: I had a chance to drive the Mustang this week and the speedometer problem is fixed.

Saturday, February 13, 2010

Shocks and Ignitor II Installed

I installed the KYB shocks I received for my birthday. All the shocks I removed were in bad shape. They would not compress smoothly and did not rebound quickly.

Replacing the shocks gave me an opportunity to fix the shock tower caps. The paint on them chipped around the bolts when I installed them about a year ago. I sanded them down and put a lighter coat of paint on them so it would not chip.

I drove around the block after installing the shocks. The ride is improved when going over small bumps. When I hit a large bump, I still hear a loose bolt sound on the front driver side of the car. I checked the bolts this morning and cannot find a cause for the noise.

I also installed a new Petronix II. It took all of 10 minutes to install and will hopefully correct the issue with the engine dying randomly. I drove for about 20-30 minutes after replacing the parts and had no trouble.

Friday, February 12, 2010

New Shocks for My Birthday

The Mustang rides well on smooth roads. When I drive down a road with even small bumps, the front of the car sound like a few bolts are loose. I originally thought there were loose bolts but after checking numerous times I've never found any. I later though it was the sway bar end links but was incorrect.

I know believe the cause is the shocks. The shocks were one of the few items I did not replace as they seemed to be in good condition. I decided it was time to replace them and my wife purchased a set of KYB GR2 shocks for my birthday.

I pulled the passenger side shock to compare to the new shocks tonight. The old shock is a Monroe Monro-Matic 33059. They are nitrogen filled to provide a smooth ride. The shock is a little larger in circumference than the KYB measuring 5.25".

There is something obviously wrong with the Moroes. The first half of the compression is easy to compress and then it stiffens to match the KYB. The opposite is true of the rebound as it rebounds quickly at first and then slows greatly. A total of 7 seconds is needed for the shock to rebound. If you compress it entirely, it sticks and does not rebound at all.

The new shock is a KYB GR2 343146. They are a low pressure gas shock produced to perform better than stock. The KYB is 4 7/8" in circumference. I can compress the new KYB shock but it requires a good amount of force. Once compressed, it rebounds back out completely within 2 seconds. The fact they are smaller makes me question them a little.

These are not performance shocks. I considered performance shocks by Bilstein or Koni but they are between $100 and $125 each. These were only about $100 for the entire set. I can then us the money saved to improve the car in other areas. Most recently my thoughts are on making it faster!s

Sunday, February 7, 2010

Speedometer Gear Mystery

I can't seem to select the proper speedometer gear. I learned the speedometer in the Mustang was incorrect early on. I've tried three different speedometer gears but have had no luck.


My Mustang has a 3 speed toploader transmission (1:1 final gear), 3.25 rear gears, and 25.5" tall rear tires. As seen in the picture below, the internal transmission speedometer gear has 6 teeth.
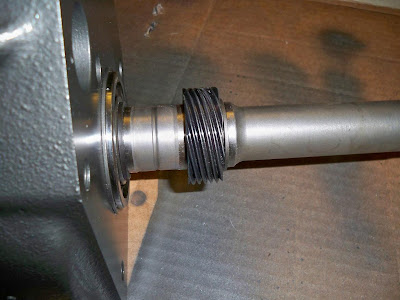


According to NPD, the first step is to calculate tire revolutions per mile using the following calculation:
63360/(3.1415*tire diameter) = tire revolutions per mile
63360/(3.1415*25.5)
63360/80.108
790.9298 tire revolutions per mile


I then insert tire revolutions per mile into the following calculation to determine the speedometer gear needed:
(# drive teeth X rear gear ratio X tire revolutions per mile) / 1000 = speedometer gear teeth
(6 X 3.25 X 790.9298) / 1000
15423.13 / 1000
15.423


I started off today with a 18 tooth speedometer gear which was obviously not correct. Using some online calculators, I found I should be at 3,000 RPM at 70MPH. With the 18 tooth gear, when the speedometer stated I was going 70, I was at 2650 RPM. With a 16 tooth gear, when the speedomter stated I was going 70, I was at 2400RPM. While the calculator states the speedomter gear should be have fewer teeth, my test seem to indicate that is taking me in the wrong direction.

Saturday, February 6, 2010

Ignition Problem Strikes Again!

I decided to take the car around the block and it would not start. From past experience, I knew I only had a few minutes to troubleshoot the cause so I started immediately.

I connected my test tool which replaces the spark plug to confirm the ignition is working. The tool clips to a ground and has an adjustable gap which the spark should jump across when trying to start the car. There was no spark.

I checked voltage to the positive side of the coil and there was 12 volts. I then disconnected the coil and check continuity between the positive and negative terminals. It was at 3 ohms which is correct for the coil.

The next step was to check the Ignitor using the procedure I published before. I tried it and there was nothing registering on the volt meter. I came in and checked the document again. I walked out and started testing it again with no result and then it started registering voltage. I connected everything back together and the car started fine.

While I really believe I was testing it properly the first time. The fact it started working while I was testing makes me think I was missing something. I'll likely just order another Ignitor as that is all I could imagine causing the issue at this point.

Exhaust Leak Repair & New Radio

I've mentioned previously the exhaust is welded solid from the header flanges to the tailpipes. In order to get the transmission out, I had to cut the passenger side exhaust pipe. I tried to put it back together with a patch piece and a few clamps from O'Reilly. This leaked horribly.

I received a set of band exhaust clamps from Summmit as a Christmas present. I installed on today. I had to put a little RTV along the clamp area so it would seal. Once tightened up, it looks nice and works great.

I hoped to have the new Alpine CD player installed by now but it has not arrived. I sent an email about the radio and the seller responded stated he had not mailed it yet! He did not realize I had paid. I ready to have it installed.

I switched back to the size 35 accelerator pump nozzle and the car runs much better. The timing curve changes paired with the new nozzle has fixed much of the hesitation.

I've not been able to get the car to die in the garage. I drove to the gas station today and it died on the way home. I was able to restart the car without any trouble. I drove it home and let it run for 10 minutes but it did not die again. I performed a baseline check on the coil voltage and it was at 11.2.

Thursday, February 4, 2010

Adjusting the Timing Curve Further

I've been attempting to duplicate the problem which causes the engine to die randomly. I've started the Mustang and let it run at least twice a night for the entire week. The issue has not reoccured.

I decided to work on the timing curve tonight. I thought running the engine and working with the distributor parts might cause the problem to happen again. Unforatunely, I was not so lucky but I feel better about the timing curve.

When I started, my timing curve was as follows:

850 - 14 Degrees BTDC
1000 - 14 Degrees BTDC
1500 - 20 Degrees BTDC
2000 - 31 Degrees BTDC
2500 - 39 Degrees BTDC


I originally had a hard time getting the timing to increase early. Total timing would come in earlier with the new springs I purchased but not as early as had been recommended.

I worked on bending the mount tabs for the springs and actually switched to use one slightly stiffer spring. I basically use a light spring to control early movement. The stiffer spring is looser and keeps all the timing from coming in too early. This resulted in the following:

800 - 14 Degrees
1000 - 18 Degrees
1200 - 22 Degrees
1500 - 24 Degrees
1800 - 26 Degrees
2400 - 34 Degrees
2600 - 37 Degrees


The comparison of the two timing curves looks as follows:


The new timing curve works a little better than the previous curve. With a base timing of 14 and the reluctor arm set to 10L, I should not have more than 34 total degrees of advance. However, I set the timing light to 34 and reved the engine and it passes 34 to about 37 or 38.


When it reaches the 37 or 38 number, the timing seems to bounce around more. I'm not sure if this is because of the quality of the original distributor or something else. It could be cross fires across cylinders since the distributor cap is small.