I ordered new gears a few minutes ago from Summit Racing.
The gears are $189.95. I used $40 in Summit Bucks I received after purchasing the rear differential. Additionally, I received a gift from Summit and on the receipt was a code to redeem for another $20. Finally, I paid using PayPal which had $35.61 from recent eBay auctions for a final price of $94.34!
I decided on a gear ratio of 3.25. This will put me at 3,000 RPM when driving down the road at 70. This is high but is reasonable considering the amount I drive on the highway. These will also work with a T5 transmission if I ever upgrade.
I'm told this is a great rear ratio. This is suppose to be one of the best performance modifications you can perform. I look forward to the result but will likely wait a little while to install the gears.
Monday, December 28, 2009
Sunday, December 27, 2009
Miller Regencye 250 Welder Connected
I received a Miller Regency 250 welder from my father earlier this year. I've been unable to use it as I needed a 220 outlet and some additional parts. I wired the 220 outlet on Monday of last week and picked up the wire feed box (S-22A) and the cabling this past weekend.
The wire feeder was not in very good condition. The 14 pin connecting plug was damaged such that it could not be connected. An extention was included for the 14 pin connector which was made out of standard electrical cord. I used this to create a 50' cable but it took at least an hour of reviewing wiring schematics for the unit.
There was an 1/8" of grease and grime in the bottom of the wire feed machine. I disassembled much of the box and cleaned up all of the components. I was able to test it out an everything seems to be working just fine. I hope to get better at welding over the next few months so I can replace the floorpans.
Tuesday, December 15, 2009
Quarter Mile Test
Although the carburetor hesitation is not fixed, I wanted to see what type improvement switching to the Holley made. It was about 45 degrees outside tonight so it was at least 30 degrees colder than it was when I performed the same test back in July.
I tried to avoid the hesitation and not spin the tires which led to a slow start. I ran up to 100 to make sure there was no issue with the meter as I experienced previously. Despite the slow start and wheel spin, I ran a 16.75 at 85.4.
My time decreased only by a 1/4 second but the MPH increased by 5 MPH. According to a calculator I found on the internet, the best ET possible with this MPH is 15.87. The best ET with my previous MPH was 16.85 (actually ran a 17.0).
My '60 time in July was 2.63 with wheel spin. My '60 time today was 2.83 so I easily lost .2 seconds with my slow start. If I had the same '60 time as before, I would have run a 16.55.
I still run up to 4500 RPM which may or may not be needed. I don't want to do anything more as I'm not sure the engine could handle it. I really only do this when testing the car and try to stay under 4000 the rest of the time.
Sunday, December 6, 2009
Intake Gasket Replacement II
I was undecided on how much I wanted to work on the Mustang today so progress was slow at first. The thermostat housing was discolored around the gasket so I decided to replace the gasket. When I removed the housing from the gasket, I found the gasket was wet. I’m not sure if it was loose or because I used RTV on it originally.
I cleaned up the thermostat housing with a wire wheel and primed the part. I put a thin bead of RTV on the inside where the actual thermostat is placed. I then covered the gasket with the High Tack Gasket Sealant I used on the intake last time. I put it on both sides of the gasket and on the metal. I torqued it down to spec (15 ft/lbs) and then waited about 15 minutes. I checked it again and found it was no longer to spec so I tightened it again.
I needed to turn the heater hose elbow mounted in the intake when I removed the spacer a few months back. When I removed the hose, coolant covered the top of the engine. I tried to soak some of it up but decided I would just wash off the engine afterwards. Ends up, the coolant discolored all the recesses in the intake. I took the time today to clean the intake with Acetone and put another coat of paint on it and on the thermostat housing.
I considered stopping at this point to just relax. I’ll be helping my parents move to their new house next weekend and the following weekend starts my Christmas vacation. This was the motivation I needed to decide to finish up this project today.
I started scraping the gasket material off the head. It seemed to have been sealed very well. I noticed a little paint discoloration around the water passages at the front. Once I removed the gasket, I cleaned the heads with Acetone and a towel until I could no longer see any dirt or oil on the towel. I then cleaned the intake at least three times with the Acetone.
When I installed the intake the first time, I only used the gasket sealant on the gasket. This time, I covered the gasket and the head. I waited about 10 minutes so it would get sticky and then installed them. I pressed the gasket down firmly around all the passages. I then lined the front and back on the lifter valley with a ¼” bead of RTV. I also put a small amount around the water passages on the intake itself. After the RTV set up, I installed the intake. I torqued it down to spec using the Shop Manual torque sequence.
I decided I would let the RTV dry overnight before doing anything more. However, after about an hour, I decided to see if the bolts were still tight. I found they were not tight at all. I torqued the outside four to 15 ft/lbs again and the inside eight to 25 ft/lbs. I’m going to leave the bolt heads unpainted for now so I can check them again tomorrow and after the engine is warmed up for the first time.
I’m not sure why the bolts keep working their way lose. I did not put thread lock on the bolts as the instructions just indicated a sealant was needed since they are exposed to oil and possibly water. I wonder if this is something which happens with everything and I’m just now figuring this out.
Saturday, December 5, 2009
Replacing Intake Gaskets
Today I decided to remove the intake to fix the leaks. I was able to take the intake off fairly easily. I tried to slowly loosen the bolts so I would not warp the intake. I was surprised to find the back right bolt was not tight at all. I suppose these worked their way lose much as the intake bolts did. Regardless, I was able to remove the intake with no trouble.
The current gasket I originally installed still looks great. I posted on StangFix about using the same gasket again. It looks brand new but most suggested I go ahead and use a new one. This was the best idea. Once I started removing it, I found it was not sealed perfectly along the bottom. So much so I wondered if I could have had a leak into the lifter valley.
I decided to stop at this point as I had been working all day. Kimberly went shopping in Houston for the day so I was lucky the kids let me get this much work done. Since it was extremely cold, they did not even want to come outside and spent much of the day playing inside and watching TV.
Thursday, December 3, 2009
Water Pump Leak
I noticed there was a small leak from the water pump a few days ago. I was only able to notice as the leak discolored the paint on the block slightly. Otherwise, I’ve not noticed any fluid on the ground or on the engine.
I checked tonight and realized the leak is actually at the timing cover. I suppose when I took off the water pump, loosening those bolts also loosened up the timing cover. This created a gap in the timing cover gasket which was not sealed when I tightened the water pump back down.
I checked the Shop Manual and the water pump should be torqued down to 15 ft/lbs. I checked the bolt closest to the source of the leak and found it was lose. I checked the one next to it and it was also lose. I believe I can probably fix this problem by just tightening all the bolts back to spec. I suppose they loosened after driving the car around and heating the engine up.
I’ll need to take off the water pump pulley and fan to tighten all the bolts. I’d also like to paint the area of the block which is discolored. I’ll wait and handle this project when I decide to replace the intake gasket.
Monday, November 30, 2009
Spark Plug Condition - Running Rich
I was thinking of a good way to fix the carburetor troubles and decided to pull the plugs to see how they look. I started with the number 1 cylinder and the end of the plug was black. This indicates either the engine is running rich or the plug is too cold.
I pulled each of the other spark plugs and noticed the #1, #4, and #7 plugs are the worst. These are all fed by the same side of the carburetor. Since I’ve done more idling than driving lately (to test the coil), this is likely related to the idle mixture screws.
These screws should be set the same distance out on each side and should be set to generate the highest vacuum. Unfortunately, my vacuum does not change when I turn the mixture screws. However, the screws are set the same distance out so you would expect the same plug appearance on both sides.
I checked the screws again and they are about the same distance out. The passenger side, which feeds the plugs in question, was possibly a little further out. I turned it in by 1/3 turn just to get closer to the right spot until I can fix the carburetor tune.
Sunday, November 29, 2009
Rear Quarter Window Cranks
I started work on the rear window cranks today. I restored the rear quarters about 1.5 years ago. The driver side rear window crank would never fit on the regulator shaft. It fit on about 1/8” which was not enough to use the retaining screw. The passenger side fit a little better and could be installed but fell off a few weeks later. They have both been off the car for at least a year now. I’ve wanted to fix it but there have always been more important projects to address.
I started by using a rubber mallet to tap around the regulator shaft on the rear quarter panel. This reshaped them enough that the regulator shaft stuck out enough to attach the cranks. This worked very well and did not distort the panels at all.
I cut the end off of one of my old, original window cranks. Since the allen screw is under the arm of the crank, this would allow me better access to the hole. I then drilled out the threads with a slightly larger drill bit. I then used the old crank as a template to drill holes in the regulator shaft. This allowed me to then install the new crank and tighten the retaining screw into the small divot. This should keep the window cranks from falling off the shafts.
Later in the afternoon, we were running errands today and drove by JoAnne Fabric. I went it and picked up some dense ½ foam. I removed the arm rest from the bench seat, removed the upholstery, covered the stock padding with the foam on four sides, and then reinstalled the upholstery. The arm rest looks a little better now. You could previously tell the foam inside was deteriorating. It was a five dollar fix and I think it was work the money and effort.
Wednesday, November 25, 2009
Troubleshooting the Engine Dying
A couple of days ago, I let the Mustang run twice for 15 minutes each time. The car did not die as it did previously. I left the old coil in to test it more after Thanksgiving.
I let the Mustang run for 15 minutes again today and the car did not die. I drove around the block a little and then swapped back in the Petronix coil. I started the car and let it run for 15 minutes and it did not die. I’m a little stumped by the whole thing. I’m not sure what the cause is as it does not seem to happen often now.
I tried to rotate the clamp I used on the new exhaust pipe coupler to stop the exhaust leak. This stopped the leak at the old location but now it leaks at a different spot. I’ll either need to find a way to slide the exhaust further forward, or buy a different type of clamp to hold the pieces together better.
Monday, November 23, 2009
Deciding on the Next Project
I’m a little bothered by the problem with the Mustang dying randomly. It is difficult when you spend so much time restoring something like the transmission to have something else immediately stop you from driving the car. I expected to drive it around for a couple of weeks before starting the restoration of the rear undercarriage.
I already have the limited slip differential and installation kit. I’m really ready to put it on. However, I don’t look forward to stripping the entire rear undercarriage of the car. I really don’t like the job at all. The other problem is the carburetor is not tuned right, the intake leaks, and the car keeps dying. I’m not sure I want to keep moving on to another project when the last few don’t quite feel complete.
What I might do is just work to correct the issues with the car. If I get them handled quickly, I might go ahead and do the rear undercarriage. If not, I’ll just remove the rear axle, clean it up, and install the new differential and gears. This is not what I originally planned but I feel I should be doing what I enjoy with the car rather than slaving my way through the restoration when I’m not feeling up to it.
After thinking about it a little while, I was able to come up with the following list of items which need to be handled. It is a little longer than I expected. Many of them are small and could be handled quickly.
1. Fix Ignition Problem
2. Restore Core Support
3. Fix Exhaust Leak (leaking at new coupler)
4. Stop Brake Rattle
5. Fix Rear Window Handles
6. Paint Spot on Firewall (missed a small spot during trans tunnel stripping)
7. Restore Rear Axle & Install Gears
8. Check Water Pump (seemed like it could be leaking again)
9. Paint & Tighten Harmonic Balancer (damaged by water pump leak)
10. Fix Alternator Squeal (this has never gone away)
11. Reinstall Intake
12. Touch Up Valve Covers
13. Fix Distributor Angle (currently touches fuel line)
14. Fix Carburetor Hesitation
15. Set Choke Properly
16. Fix Shock Tower Caps
17. Work on Front Suspension (rides a little rough)
Tonight, I swapped back in the original coil. I ran the engine for 15 minutes and it did not die. This is good but it ran the same length of time a few nights ago without dying but then started up again. I decided I would let it cool a little and then take it for a drive. I drove a large circle around the neighborhood without any trouble.
I think I’ll leave the old coil in for now. I’ll start it a few times over the next few days to see if it will die. If it is the coil at least it is something simple. However, I will be upset that the coil is only a couple month old and is already not working.
I checked the water pump and I believe it has a very small leak. It is mostly visible as the fluid has taken the paint off the motor. It is very small but worth fixing when I take care of the intake. The radiator will already be drained so it will not add too much work.
Sunday, November 22, 2009
Engine Dying Randomly
Last night I decided to drive the Mustang to Wal-Mart. The car again died as I was backing down the driveway. It did not want to start until about the eighth attempt. Since it happened earlier and then went away, I did not think it would harm driving the car to Wal-Mart but I was wrong.
I made it to the end of the street and it died again. I planned to turn around but the car died three more times before I could get around the block and back home. The problem is really strange as the car just dies as if someone has turned the key off. It does it when idling and when driving down the road at 2000 RPM.
I thought I might be crazy and it could just be really low on gas. I filled up this morning and drove around some and had no trouble. However, this afternoon, I decided to drive to O’Reilly in the Mustang. It again died twice before I could get around the block and back home.
I’m wondering if it is something electrical like the ignition switch. I tried to test it in the garage tonight. I started the car and it died in about 3 minutes. All the connections on the coil and solenoid are correct. Everything which should have power does have power. There is plenty of fuel in the see-through fuel filter.
I started it again and it died again. I repeated this one last time and it died a third time. Each time, the car would start back up immediately without the use of the gas pedal. I posted on the StangFix forum about it. They agree it is something electrical and suggest I start by going back to the stock coil. I’ll likely try this in the next few days.
Saturday, November 21, 2009
Transmission Install Continued
While the transmission is technically installed, there are several items left to address:
· Install shifter
· Reinstall sill plates and kick panels
· Repair cut exhaust
· Bolt up and connect starter
· Connect parking brake
I started on these projects at about 10 o’clock today and finished up around 3 o’clock. The two difficult jobs were installing the starter and fixing the exhaust.
As I’ve mentioned before, the starter is trapped by the exhaust. I had a hard time balancing it between the exhaust and the flywheel. I thought I had it in place but I did not. It is not high enough. The only way to get it in the correct location is to remove the transmission or remove the exhaust manifold. Considering the options, I removed the exhaust manifold. This was a little difficult but not too bad.
The second difficult part was managing to link back together the two pieces of the exhaust on the passenger side. I had a coupler and two clamps. The rear section of the exhaust is welded directly to the car. I had to bend the mounting bracket to move the exhaust tub back to fit it into the coupler. I cut a little off the tube, installed it in the coupler, and then had a very hard time bending the mounting bracket back so the exhaust would slide forward.
The rest of the job was not bad at all. Once I was done, I cleaned up the interior and exterior of the Mustang. It was incredibly dirty from stripping the undercarriage. I started the car on the jack stands to set the clutch linkage and to make sure the clutch would engage. Since all was well, I took the car off the jacks.
I was not able to drive the Mustang until later tonight because of rain. When I drove it around, it drove nicely. It seems smoother and quieter than before (especially at highway speeds). The clutch is about as stiff as stock if not a little easier to press. There is about a 1-1.5” zone between starting to engage and fully engaged. The old parts were so worn it was about a 2.5-3” zone for the clutch to fully engage.
The only odd thing which happened during my test drive was the engine died while backing out of the driveway. I started it back up but it was rather odd that it died for no reason.
Friday, November 20, 2009
Transmission Installation
I made it home tonight and cleaned up the bolts for the bellhousing. Everyone was feeling a little lazy and just watching TV. I decided I would go ahead and install the bellhousing. Before long, I was working the transmission into place.
I moved the transmission under the car using the creaper. I then laid the wood support block I created on the bottom of the transmission and rolled it onto the jack. Once balanced on the jack, I filled the transmission with some 85W90 gear oil I purchased from NAPA (same type used previously). This is much better than building some crazy tube to squeeze the fluid into the transmission after it is installed.
Installing a transmission by yourself is not an easy job. Balancing it on the jack is not incredibly difficult but a little dangerous. When you then have to line up the throw out bearing and input shaft, two hands no longer seems to be enough. Adding to the difficulty was the fear of scratching up the freshly painted transmission tunnel.
While it would have been nice to have an extra set of hands, I don’t know if having a helper would have been very good. This is one of those jobs you somewhat feel your way through. If you feel a little resistance on one side you are often off center. If you don’t have perfect communication with the person helping you just waste more time pushing when you are off center.
After I put the transmission in, I bolted it to the bell housing and then put the support bracket in place. I decided to call it a night as I had actually planned on taking care of all this tomorrow.
Thursday, November 19, 2009
Transmission Preparation
This morning I painted the front of the transmission with the VHT Cast Iron paint. I wanted to wait until the RTV dried before painting the front. Painting it in the morning will allow plenty of time for it to dry so I can install the front bearing retainer after work today.
When I made it home, I installed the front bearing retainer using the original bolts and a new gasket which came in my rebuild kit. I coated the gasket with a thin layer of RTV to avoid a leak. I torqued all the bolts down to 34 ft/lbs per the Shop Manual.
I then installed the tail housing on the transmission. I reused the original bolts which I have already cleaned a phosphate coated. The bolts were covered with thread sealant (like those on the front bearing retainer) so oil would not seap through the threads. I slid the driveshaft into the end of the tail housing before torquing it down completely as I did not want it to bind.
The last thing I did for the night was bolt up the shifter to set the shift linkages properly. The shifter works much better now. The setup is very simple. You put the transmission in neutral, push an alignment pin in the shifter mechanism, and then tighten the shift linkage to the shifter. It then works perfectly without any additional adjustment.
I unfortunately lost one of the nuts which go on the shift levers. They are a standard size with no special marks. I’ll need to pick up another one at Ace Hardware tomorrow at lunch. Once I have that, I should have no trouble finishing up the project this weekend.

Wednesday, November 18, 2009
Flywheel and Clutch Install
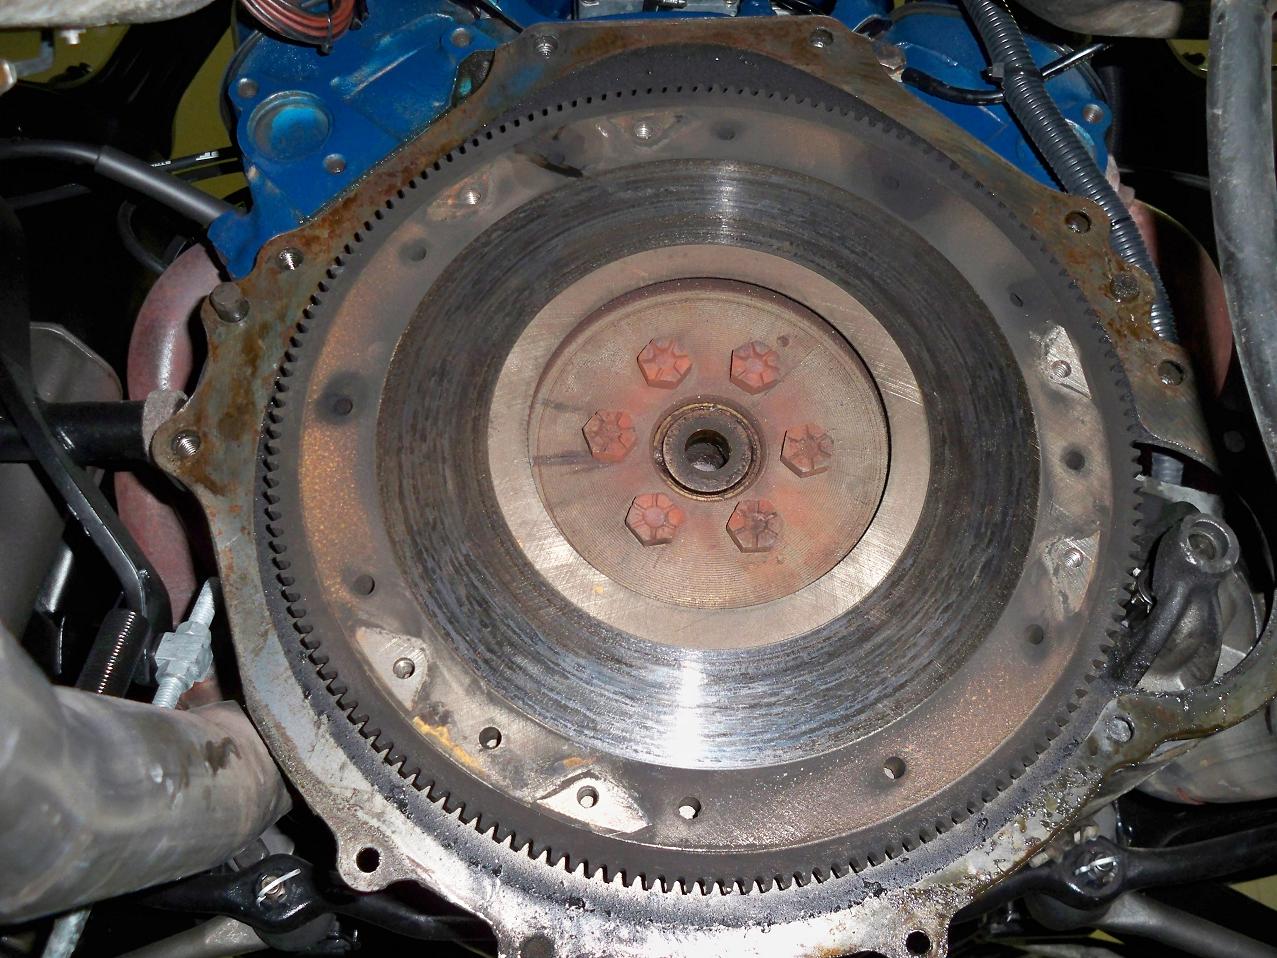
Tonight I installed the block plate, flywheel, starter, pressure plate, and clutch.
The job of installing the starter and flywheel was difficult. Since the starter is trapped between the flywheel and exhaust, I had to hold it in place while I align the flywheel and bolt it up. I weighed these parts and they are each about 17 pounds. If I had three hands it would have been significantly easier.
When I mounted the flywheel I reused the original bolts. I installed them with thread sealant and High Strength Loc-Tite. They were then torqued down to 85 ft/lbs per the Shop Manual. I cleaned the resurfaced face of the flywheel with Acetone and then installed the clutch and pressure plate.
I cleaned the pressure plate with Acetone and then held it and the clutch in position. I started each of the original six bolts to hold the pieces in place. I then used the lose transmission input shaft to line up the clutch with the new Ford Racing roller pilot bearing I installed. The input shaft slide into place easily and held everything in alignment while I removed the bolts one at a time, coated them with Loc-Tite, and then torqued them down in the proper sequence to 20 ft/lbs (per the Shop Manual).
I’ve not cleaned up the bellhousing bolts so I decided to install the input shaft in the transmission. I loaded it with 15 bearings and a new brass blocking ring and slid it into place. I then rolled over the transmission and lined up the dummy countershaft bar (made of PVC) so I could install the real countershaft. I tapped the countershaft into place from the rear of the transmission and then put in the new roll pin through the fill hole.
The last thing I did was put RTV on two spots at the front of the transmission. I covered the shift rail plug and the end of the countershaft with RTV. I then smoothed it out using a small putty knife. This is done to ensure no oil is able to leak out between the casing and either of these shafts.

Monday, November 16, 2009
Input Shaft Ready
I went to Vila’s at lunch today. They had a transmission plug I needed to cover the end of one shift rail passage. This part was not provided in the kit I purchased. They also agreed to remove the old bearing and press on the new one. By 2 o’clock they called to say the job was done and the total charge was only $10.50. This is much better than the $80 I paid to have the rear axle bearings pressed on!
I posted on the VMF Concours forum this evening about the undercarriage color for my Mustang. I was always led to believe the undercarriage was a red oxide color. When I was stripping the undercarriage, I did not find any paint on the tunnel but did on the transmission cross support. The paint I found was a medium gray color. Ends up Dearborn used left over paint on the undercarriage so many were painted gray (or other colors).
When I made it home from work, I painted the transmission tunnel with Krylon 1613. I used a total of three coats with the second and third coat being rather thick. I tried to keep overspray from entering the engine compartment using cardboard to block off the area. Hopefully, I was successful but I won’t know until I can clean all the dirt on the car from stripping the undercarriage.
After painting the underside, I took pictures of the parts I’ve restored, installed the plug in the shift shaft hole of the transmission, and I dried off the bolts I had in a mixture of phosphoric acid and water. I’m fairly confident I’ll be able to reinstall the transmission this Saturday so I did not wear myself out with work. I’ll slowly progress through the rest so I’m ready on Saturday.
Sunday, November 15, 2009
Transmission Tunnel Work
I put on old clothes this morning and started work stripping the transmission tunnel. I wore goggles, a breathing mask, and gloves to protect myself. The job was very slow moving with the fine wire wheel I started using. After working about an hour, I decided to head to the store to get something a little more aggressive.
I returned with a pilot bearing removal tool from O’Reilly and a course wire cup from Truck and Tractor Supply. The wire wheel made quick work of the dirt, old paint, and rust. I’ve heard the undercarriage of the Mustang was painted a red oxide color originally. I was not able to see a color for the front part of the tunnel but the center cross support was the same grey color as the inner fenderwells.
I only stripped the areas I knew would not be replaced later. I plan to replace the entire floor pan and the toe boards. This made the job a little easier. By doing this now, I hopefully will not need to remove the transmission when I start replacing the floor pans.
I managed to fix the hole in the transmission tunnel. I could reach one are through the shifter hole with a dolly. I then used my hammer from the top side to smooth out the metal. The end result was great. The metal is smooth and the hole is completely sealed. Although I can’t weld it closed now, I have no concern about being able to weld it up as is later. Since there are no gaps, I’m not concerned about dirt entering through the hole either.
I tried to clean the front tunnel area out to about one inch past the toe boards. The toe boards have several rust holes and will need to be replaced. I wanted to make it out one inch so I could overlap the panels. I think this will work except for the lower corners have holes on each side. I did the best I could and will determine the best way to patch the areas when I get to that point.
I was able to put two coats of Eastwood Rust Encapsulator on all the metal. Eastwood states you should wait 6-8 hours before painting over the Encapsulator. I’ll paint it tomorrow with the Krylon 1613. I’m not sure the Krylon will be my final choice for the entire undercarriage but it will work for this project.

I then cleaned the block plate, primered it, and painted it with the Krylon blue paint I used on the engine. I cleaned all the bolts I’ll need to reuse and placed them in a phosphoric acid mixture. Finally, I made a little plate out of wood which will hold the transmission on the jack. It has a hole for the drain plug and wood lining the sides to help keep the transmission steady.
Saturday, November 14, 2009
Transmission Rebuild
I’m not looking forward to stripping the transmission tunnel. I planned to do the job today. Since it is such a dirty job, I decided to procrastinate doing it until tomorrow.
I started off this morning by cleaning the transmission gears in the utility room sink. I cleaned them with a plastic bristle brush, a brass bristled brush, and some degreaser. The gears came out amazingly clean. After cleaning them, I washed them with water, dried them off, sprayed them with WD-40, and sat them in the sun. The WD-40 was used to displace the water and keep surface rust from forming.
I started off this morning by cleaning the transmission gears in the utility room sink. I cleaned them with a plastic bristle brush, a brass bristled brush, and some degreaser. The gears came out amazingly clean. After cleaning them, I washed them with water, dried them off, sprayed them with WD-40, and sat them in the sun. The WD-40 was used to displace the water and keep surface rust from forming.

The kit I purchased came with Nachi brand input and output bearings. I immediately assumed they were generic and posted about them on the StangFix.com forum. I learned they are made of high quality steal and are some of the best bearings available. This eased my mind considerably.
The kit came with plastic thrust bearings for use at the ends of the countershaft and reverse gear. I researched the use of plastic thrust bearings on the internet but could not find much information. I posted about these also and someone indicated they are used as other metals do not embed in them as easily. This does not make much sense as they are plastic and you would think hot metal would stick in them. Since the size provided would only work on the reverse gear, I decided to just reuse the copper ones as they are not worn.

I slowly assembled the transmission using my Shop Manual and disassembly pictures as a guide. The parts were not difficult to install. There are suppose to be alignment marks at the ends of the gears (according to the shop manual) but I could never find any. The gears slid together much easier than they came apart.
I’m a little concerned by two left over snap rings. I really should not be as they are too small to fit the output shaft. Additionally, the kit did not come with enough snap rings so I had to reuse one to hold on the speedometer gear. I took pictures of all the gears and installation process (with snap rings installed) so I can remember how everything went together in case I wonder later.

I was able to install the output bearing with a little ingenuity. I placed the entire transmission in the bottom of the refrigerator (yes the whole thing). After a few hours, the cold caused the metal to constrict slightly. I then used a hair dryer on the output bearing which made the metal expand. I was then able to slide the bearing on when I was not able to do so with both parts at room temperature.
The transmission is now complete except for the input shaft. I was not able to remove the old bearing. I think I’ll take it to Vila’s on Monday. Since they are fairly priced, it will likely not cost much to have them do it for me.
The next job I finished was painting the top cover for the transmission. I soaked the top cover in phosphoric acid after cleaning off all the grease. This cleaned off the rust and left a phosphorus coating which does not rust. I then primed the part and painted it with the VMT Cast Iron paint.
The last job for the day was the tail housing. I used an old brush to clean the inside of the tail housing. I then a seal/bushing installation tool I rented from O’Reilly to install a new rear bushing. I then painted the tail housing using the Plasti-Kote Cast Aluminum paint. Once the part dried, I installed the new rear oil seal.

Friday, November 13, 2009
Random Transmission Preparation
I spent a little time this evening restoring the shift linkage for the transmission. These long parts were rather dirty but cleaned up easily. As I cleaned the dirt off, they appeared to have a black finish originally. Once completely clean, I primered the parts and painted them satin black with Krylon 1613.
There are two rectangular pieces of metal which connect the shift rods to the transmission shift levers. I cleaned the grease off of these tonight and put them in a large container of diluted phosphoric acid. This will give the parts a nice phosphate coating which should look nice and keep them from rusting. I added a few bolts into the container as well as the top plate for the transmission.
I soaked the bearing retainer last nice in Gunk engine cleaner. Tonight I gently scrubbed it with a brass brush and all the grease came off without any trouble. I primed the part and then installed the oil seal. Once this was done, I went ahead and decided to test out my new paint on the part. I used the VHT Cast Iron (SP997) paint I purchased from Mustangs Unlimited and it looks great. It has the correct color with just the right amount of metallic flake.
Wednesday, November 11, 2009
Shifter, Bellhousing, and Starter
I dropped off my flywheel at Vilas Motor Works at lunch today. I received a call from Rick about two hours later stating the work was done. Since they are in downtown Bryan, I’ll need to pick it up tomorrow. They only charged $26 for the work which is much better than the $65 Bryan Drivetrain quoted me.
I checked the contents of the transmission rebuild kit first. The kit contains the brass syncro rings, input shaft bearing, output shaft bearing, front and rear seals, needle bearings, thrust plates, and lock rings. The bearings are made in Japan by a company call Nachi. I’m not sure what to think of them or their quality but they look like the originals. The other oddity is the trust bearings as they are made of a plastic material instead of metal like the originals. I posted on a new website, StangFix.com, about these items to see if anyone has used them before.
Tonight I installed the clutch release lever, lever boot, and throw out bearing on the bellhousing. The bellhousing has a few small areas of discoloration from the grease buildup. However, the part has a great classic look to it and I would not think of painting it. The bellhousing is now ready to be reinstalled in the car.

I put two coats of the Krylon 1613 satin black. The starter is not original but looks almost identical to the original. The same style was used from 1966 to 1973. This particular starter has a D2 prefix to the part number. This is likely a rebuilt starter which was installed years ago. There is a small amount of a label left on the starter but it was too difficult to read. The starter cleaned up good and is also now ready to be reinstalled in the car. I would buy a new one but don’t want to pay over $150 to replace a functional part.
I rebuilt the shifter mechanism tonight, covered it which a light coat of primer, and then put two light coats of Plasti-Kote 282 Cast Aluminum paint on it. The color is not perfect but it looks much better than the slightly discolored bare metal. To ensure everything works well, I wet sanded where parts rubbed against one another with 400 grip paper. I also used a hammer and dolly to bend the shift lever retainer so there would be a tighter feel to the shifter. Finally, I then put some lubricant on all the parts so they would move much easier.
The only item I was not able to correct on the shifter with a retaining pin at the point where the shifter attaches. The pin hammered into place firmly. However, the U shaped piece around it wiggles on the pin slightly. I tried to heat the pin and mushroom the end slightly but had no luck. The pin must be made of very high strength metal. This is not a big issue but something I wish I was able to correct.

I checked the rest of my order before going to bed. The transmission mount is similar to the original except the mounting holes are oval to allow more movement to fit the transmission location. The throw out bearing is produced by National and is of good quality. It looks like all the parts I ordered are going to work out well.
Tuesday, November 10, 2009
Removing Flywheel, Block Plate, and Starter
The Mustangs Unlimited order arrived today. All of the parts arrived except for the Centerforce pressure plate which seems to have been shipped separately. I checked the order and everything looked great. The clutch disc looks similar to the original except the material is different. It is not much thicker than the one I removed. Seems the clutch might not have been that old after all.
I had Kimberly hold a socket wrench at the crank pulley while I removed the flywheel bolts tonight. The ’67 Shop Manual states they are torqued to 80 ft/lbs but it seemed like much more. With only a little struggle, I was able to remove all six of the bolts.
The flywheel came of fairly easily and is heavier than you might imagine. Since the starter is trapped by the exhaust, it was held in place by the flywheel. Once the flywheel came loose, the starter did also. I spent a little time juggling these two before getting them safely to the ground. I then removed the block plate from the motor.
Since Aaron had a flag football game and Cub Scouts tonight, I did not have much time to work on the car. After removing the parts, I painted the transmission mount and then worked on cleaning up the starter. By the end of the night, I had the starter casing in primer. I’ll let it dry overnight tonight and put a couple light coats of black paint on the casing just to improve the appearance.
Monday, November 9, 2009
Restoration of Transmission Mount
I stripped and primed the transmission mount tonight. As with all the other parts, it was covered in dirt and grease. It took a while to clean it up to the point it could be painted. I then coated it with Rustoleum Rusty Metal primer. I'll paint the part tomorrow night with some black paint after it dries overnight.
The transmission mount has a date of 04 11 stamped on it indicating it was made April 11. There are similar stampings on all the sheetmetal parts. However, this part has a strange R stamped on the side with a different type stamp than is used on all the other parts. I'm not sure why it is included it is very clear now that I've stripped the part.
My goal for the transmission project is to have it complete by Thanksgiving. I'm currently on track. I've a little sheet of tasks in timeline order so I can finish. Might sound crazy but I want to be a little more planful so I don't run into another 9 month project like I did last year.
Once it is close to Christmas, I'll start the rear suspension and undercarriage project. I'll likely start with the rear axle first. Once Christmas is over, I'll move on to stripping the undercarriage. I like this approach as it saves the dirty work until after the holidays are over.

Sunday, November 8, 2009
Parts Ordered for Transmission Rebuild
I placed an order today with Mustangs Unlimited and NPD.
I purchased a Centerforce II pressure plate, clutch, roller pilot bearing, shifter rebuild kit, and cast blast paint from Mustangs Unlimited. This was my first order with them. I decided to buy the pressure plate and clutch from Mustangs Unlimited as their price was $50 less than NPD.
I ordered the transmission rebuild kit, throw-out bearing, and transmission isolator mount from NPD. I trust NPD more for providing a complete transmission rebuild kit. Their catalog lists a rebuild kit for the V-8 3 speed and a separate kit for the inline 6 version (2.77). Mustangs Unlimited lists only one. There must be a reason NPD does it separately and I trust their experience over MU.
The parts should arrive next Tuesday. I'll need to remove the flywheel in the next few days to have it resurfaced. There is a local machine shop (Villa's) who stated they would resurface it for only $25.
Thursday, November 5, 2009
Main Transmission Case Cleaned
I've worked on cleaning the main portion of the transmission case for the past few nights. I finished up the work tonight by removing the last of the grease deposits.
I cleaned it using Gunk engine cleaner, brake cleaner, and a wire wheel. To get to the small corners, I used a tiny wire wheel on a dremel. When I was done, there was no sign of grease on the case.
I then painted it with some Rustoleum primer for rusty parts. I used this because there was a slight bit of surface rust on the piece. I wiped it down with pre-paint prep but it did not get all the rust off. I'm not concerned and think it will end up looking great.
I'll leave the part in primer while I rebuild the transmission. I'll primer the front bearing retainer and top plate separately also. Once rebuilt and reassembled, I'll paint it with a cast blast paint which resembles the appearance of cast iron (but does not rust).

Sunday, November 1, 2009
TrueTrac Rear Differential Order
I ordered a few parts from Summit Racing yesterday..
I decided to go ahead and order the TrueTrac differential and ring gear installation kit. By purchasing by October 31st, I receive $40 in Summit Bucks which is basically a discount on my next purchase. Once I receive the Summit Bucks, I'll order the ring gear and pay the difference.
I decided to go ahead and order the TrueTrac differential and ring gear installation kit. By purchasing by October 31st, I receive $40 in Summit Bucks which is basically a discount on my next purchase. Once I receive the Summit Bucks, I'll order the ring gear and pay the difference.
The TrueTrac differential is great. Unlike others, it is a helical gear design which does not use clutches. There are no parts inside which would wear out. It engages so smoothly it is suggested for use even on front wheel drive vehicles. Finally, when engaged, it is a direct connection of the two rear wheels rather than a partial locking of the secondary wheel.

However, it is hard to justify sending so much on the rear axle based on the budget for my build. I have the $86 from the carburetor, $40 in Summit Bucks, and $50 in cash back bonuses on my Discover card. This helps a little and I hope to sell more unneeded parts to help make the purchase reasonable.
I'm now trying to determine which rear gear ratio I should use. Since I am going to be using the 3 speed for a while, I want something which is not too bad on the highway. I'm not sure if I will ever get a 5 speed but if I do it would be best to not need to replace the rear axle. While a 3.25 or 3.40 would work they would not be ideal. I guess with either one I would probably want something larger.
I'm leaning toward the 3.25 gears right now. They should put me a little under 3,000 RPM at 70 whereas the 3.40 gears would put me around 3,100. Of course, there would be a slight gain in performance by going with the 3.40 gears. Decisons. Decisions.
Bellhousing Cleaning & Transmission Dissasembly
I soaked the bellhousing for a while yesterday and cleaned it up this morning. The part came really clean despite the large amount of grease on it. The inside is as clean as the outside. After I took this picture, I removed the clutch lever and will restore it over the next few weeks.

I soaked the tail housting also and it turned out nice. There is still grease residue which would not come out of the inside. I'll need to get a brush which will fit down the middle to clean it further.

This afternoon I pulled all the gears out of the transmission. It took a little longer than I expected. It was like a big puzzle you had to take your time to get apart. The bearings had the FoMoCo markings on them so this transmission has never been rebuilt. Considering the condition, I would say the transmissions must be built really well from the factory.
The case is now empty and I'll be able to clean it thoroughly. I'll then rebuild it in the next few weeks.

Saturday, October 31, 2009
Bellhousing and Clutch Assembly Removal
This morning, I removed the bellhousing off the Mustang. It is the original bellhousing with six mounting bolts. The outside is covered in grease. Oddly, the inside is worse but the grease is not on the flywheel or clutch assembly.

The pressure plate has "Made in the USA" on it along with "Model 10 CF". I searched the internet and found a posting on a HiPo forum stating it is a Hays unit which was used on HiPo engines. The plate has three fingers, nine springs, and weighs much more than you would expect. There are no groves in the plate but it looks like it has had a rough life.


The clutch disc is worn but not really worn out. It looks like the disc had groves around the edges. It is now worn so that it is almost flat all the way around. The only identifier on it is an 8M on the back of one of the rivets.

Friday, October 30, 2009
Transmission Cleaning
I've spent a little time each of the past few nights working to clean up the transmission. While I knew it was incredibly dirty, it is taking longer to clean it up than I expected.

Once I cleaned the main case, I removed the top plate and tailhousing. I cleaned these up in the large sink in my utility room. The tail housing cleaned up well but the top plate has a significant amount of rust on the top.
With the top plate off, I was able to inspect the gears. Althought it shifted fine, I was concerned I would find chipped or missing teeth. I was glad to find everything looked good on the inside. The only thing I noticed is the inside of the case and tailhousing have what appears to be baked on gear oil. I'm not sure how I would get this off without coating the gearset with grease cleaner or water.

I've been reading about the steps involved in rebuilding a toploader. It does not seem to be very difficult. However, I'm sure it is harder than it appears.
Monday, October 26, 2009
The Transmission is Out!
After putting the kids to bed, I could not resist going to the garage to work on the car a little longer. Around 10:30, I walked into the house with a transmission laying on the garage floor.
I worked on it for a while but could not slide the transmission back enough for the input shaft to clear the bellhousing. The shifter mechanism was stuck through the hole in the floorboard and the transmission would not drop low enough for it to clear. I then fould the final bolt to remove the shifter mechanism under a large amount of grease.
With the shifter mechanism out, I was able to move the transmission back enough. While sweating bullets about the weight of the transmission, I carefully lowered it an inch at a time. Once all the way down, I rolled it onto a creeper and pulled it out from under the Mustang.

After work today, I cleaned up the garage and my tools. I moved the transmission to the low traffic side of the garage and then put a piece of cardboard under the car so I would not make much of a mess removing the bellhousing.
I weighed the transmission out of curiousity and it weights 78 lbs.
Sunday, October 25, 2009
The Next Project Begins... Transmission Repairs
I decided today would be a good day to start the next phase of my Mustang restoration. I drove around alittle this morning then went to Sears to get a second set of jack stands. Around 1 o'clock, I jacked up the car to begin removing my transmission.

The transmission has leaked fluid from the shift seals since I purchased the car. The entire undercarriage and transmission is covered with transmission fluid. The fluid then runs back towards the rear axle causing an even larger mess.
I placed a small bottle jack under the back of the motor to hold it steady while the transmission is out. I then placed another jack under the transmission. I jacked the transmission up enough to take the bolts out of the transmission crossmember. I then reached a temporary stopping point as I can't remove the crossmember because of the exhaust. Unfortunately, the exhaust is welded solid (headers all the way to the tailpipes).


The transmission has leaked fluid from the shift seals since I purchased the car. The entire undercarriage and transmission is covered with transmission fluid. The fluid then runs back towards the rear axle causing an even larger mess.
I started by jacking up the car to provide 13" of clearance between the frame rails and the floor. I then removed the shifter, drive shaft, rear parking brake lines, and drained the transmission.
I placed a small bottle jack under the back of the motor to hold it steady while the transmission is out. I then placed another jack under the transmission. I jacked the transmission up enough to take the bolts out of the transmission crossmember. I then reached a temporary stopping point as I can't remove the crossmember because of the exhaust. Unfortunately, the exhaust is welded solid (headers all the way to the tailpipes).

After thinking about it a little bit, I decided to just cut the exhaust pipe. I can find a piece to slide over the ends and put clamps on it to hold it. The exhaust is obviously horrible so it will need to be replaced at some point anyway. I was thinking of cutting if out to do the rear axle clean up anyway.

With the exhaust out of the way, I was able to remove the crossmember. There is nothing stopping me from removing the transmission now. I even have the bolts which hold it to the bellhousing loose. I just need to determine the best way to get it out. I think I will lower it with a jack and then roll it on to a creeper to pull it out from under the car.
Saturday, October 24, 2009
My Apline TDA-7554 Died
I've owned a Alpine TDA-7554 radio for 13 years now. I've had the radio in three different vehicles and most recently the Mustang.
I went for a short drive this morning in the Mustang. I was driving along listening to Slow Ride and the radio just turned off. There was no strange noise or anything. I assumed a fuse blew or a wire came lose. When I came home, I checked all the wiring and everything was fine.
I removed the radio and wiring. I then bench tested the radio to ensure it was not a bad speaker or something causing it to turn off. I then opened it, removed the tape mechanism, and checked the circuit board for any fuses. Unfortunately, I had no luck with any of these attempts.
I've a changer which works with this radio but no use for it anymore. I would sell it on eBay but the only one out there is selling for $5.
I managed to take a new picture of the Mustang this weekend:

Wednesday, October 14, 2009
Preparing for the Next Project
I've begun to think of what moderate size project I could handle over the winter. I would love to replace the floorpans but I've not learned how to weld. I'm considering fixing the transmission leak and then restoring the rear undercarriage. I can then do the middle undercarriage (floorpans) in the middle or late next year.
I've decided to start selling off a few random Mustang parts which I don't need. This will help me save up a little additional money. I'll need plenty if I decided to restore the rear undercarriage as I will want new gears and a TrueTrac differential.
I've started by selling the Autolite 2100 carburetor which came on my Mustang. It is not original and had a production date of 1971 stamped on the bottom. The casting number was 2PL which I've not been able to decode completely. However, I believe the carburetor was original to a 351 Mustang. I was surprised to find the carburetor sold for $86.00.
Sunday, October 4, 2009
Taking a Little Break
I've not given up on correcting the driveability issues with the new carb. I'm just taking a little break. I noticed a small oil leak at the back and front of the intake and really don't want to remove and reinstall it right now. Since it has been raining a lot the past few weeks, I've just given myself some space with the project.
I'll get back on it soon after a little time away.
I'll get back on it soon after a little time away.
Tuesday, September 15, 2009
Adjusting Ignition Timing
I've been posting a few technical questions on a new forum I found for engine builders. I posted about how the car seems to take off at 3000 RPM but hesitates and does not perform very well below 3000 RPM. The responses I've received suggest it is because of my timing.
I posted the mechanical advance curve I posted to this blog a few days ago:
850 - 11 Degrees (my initial advance) BTDC
1000 - 13 Degrees BTDC
1500 - 17 Degrees BTDC
2000 - 25 Degrees BTDC
2500 - 31 Degrees BTDC
3000 - 38 Degrees BTDC
I was told a better curve would be as follows:
850 - 18 Degrees BTDC
1000 - 24 Degrees BTDC
1500 - 32 Degrees BTDC
2500 - 36 Degrees BTDC
3000 - 38 Degrees BTDC
I'm a little concerned about using 18 degrees initial timing. Most engines with 9.5:1 compression ratio create the most power with between 38 and 42 degrees total timing. It is recommended that all of this timing come in by 2500RPM. In order to make this happen, I need to switch the advance mechanism in the distributor from the 15L (30 degrees advance) side to the 10L side (20 degrees advance). If I then set my initial advance to 18 my total would then be 38.
I switched the internals parts of the distributor tonight. When you switch the side of the arm used, the distributor is 180 degrees out. I pulled the distributor and put it back in back in the correct alignment. It took a few minutes to get the timing set perfectly but it worked out.
My base timing is currently set at 16 degrees. I tested the rest of the mechanical advance with the vacuum line plugged. I recorded the following results:
850 - 16 Degrees BTDC
1000 - 16 Degrees BTDC
1500 - 23 Degrees BTDC
2000 - 34 Degrees BTDC
I stopped at this point as it is 9 o'clock and I needed to put the kids in bed and did not want to wake up the neighbors kids. I'll need to work on it a little more tomorrow night. I would prefer to have more advance earlier but also space out how the advance is applied. I'm not sure of the best way to do this so I'll need to research and experiment some.
09/19/09 Edit: I've been working on the timing curve a little more. I'm not sure how to change it much more as the only adjustment left after switching to light springs is to bend the tabs they attach to. However, I was able to adjust and test it and found the following:
850 - 14 Degrees BTDC
1000 - 14 Degrees BTDC
1500 - 20 Degrees BTDC
2000 - 31 Degrees BTDC
2500 - 39 Degrees BTDC
I'm not sure how I reached 39 degrees advance since I have 14 initial and 20 mechanical. This should limit me to 34.
Sunday, September 13, 2009
Still Working on the Carburetor
I still have a bit of hesitation off idle which I cannot fix. I've asked about it on a few Internet forums but have not found a solution.
I thought it could be the idle mixture screws. However, when I change them it has only a very, very small impact on vacuum. From what I've read, these should be set to where you get the highest vacuum reading.
Someone asked about a leak around the intake on one forum. I said I had already checked it using WD-40 around the intake but could not find any leaks. I walked out to look it over again today and found oil behind the rear intake seal. It was only a small amount and was not there two or three weeks ago.
I cleaned the oil off and took the car out for a 10 mile drive. When I made it home, I checked and there was no oil. I'm not sure if this would be responsible for the problem or not. Unfortunately, I would need to buy another $30 bottle of Mobile One synthetic oil and drain all the fluids again to fix this seal leak. At this rate, the supplies are going to cost more than the intake itself.
Monday, August 31, 2009
Ignition Timing Check
I tested my ignition advance on Saturday morning. To test it, I removed the vacuum tube from the distributor and plugged it with a golf tee. I then used a timing light to check the base advance and the mechanical advance at a few RPM points. I recorded the following:
850 - 11 Degrees BTDC
1000 - 11 Degrees BTDC
1500 - 15 Degrees BTDC
2000 - 23 Degrees BTDC
2500 - 29 Degrees BTDC
3000 - 36 Degrees BTDC
With an initial timing of 11 degrees and the 15 degree plate in the distributor, my total advance should be 41 degrees. I did not check the advance at 3500 RPM but I'm sure all 41 degrees is present by that point.
To get better performance, I could replace the other stiff, stock spring with the light version I received in the kit. This would provide all the advance by around 2800. Since I cannot change my vacuum advance settings, I'm concerned this could result in pinging which I would not be able to correct. Since this works well, I will leave it alone for now.
Sunday, August 30, 2009
Carburetor Tuning Continued
I called O'Reilly from work yesterday and they said they could get the Holley pump cams by 5 o'clock. I ordered them and paid a premium price ($27.99). However, I would have paid the same to get the from Summit after the shipping cost.
I put on the new coil this morning and the new spark plug wires. I then switched from the stock orange pump cam to use the new size up which is black. I then checked the front float level and found it is not set as high as I remember. I raised the front float level and then took the car for a drive.
The hesitation on accelration if fixed. It seems there is a small hesitation at very low RPM. This is likely because the idle mixture is off or because I could function with the orange cam with the raised float level. I'll fine tune it later. For now, I'm just happy the drivability is much better.
The current setup is shown below.

Thursday, August 27, 2009
Carburetor Tuning Continued
I received the new distributor springs, Petronix FlameThrower Coil, and MSD Street Fire spark plug wires in the mail today. The springs are rated to deliver full mechanical advance by 2,400-2,800 RPM. I was concerned that would be too quick so I used one and one of the stock springs.
I drove the car around tonight with only the new spring installed. This seemed to help low RPM performance some but did not fix the hesitation. I posted on a few Mustang forums to get some additional help with the problem. The only response so far requests I try new pump cams.
I drove the car around tonight with only the new spring installed. This seemed to help low RPM performance some but did not fix the hesitation. I posted on a few Mustang forums to get some additional help with the problem. The only response so far requests I try new pump cams.
Tuesday, August 25, 2009
Ignition System Upgrade
I removed the distributor cap and top plate today. I wanted to check the internal parts to determine how much mechanical advance was possible. I found a 15 degree arm installed which would provide 30 degrees over the base timing.
The RPM at which the timing increases is controlled by two springs. The stiffer of the two springs was stretched and did not fit properly on the mounting points. The other spring fit well but had less resistance. I'm going to replace these springs while I have the distributor apart. The new springs should allow for full advance by 2800 RPM.
I tried to locate new springs all over the city but no one sells them. I ordered them from Summit with a new coil and some spark plug wires. They should arrive by Friday and I'll install the parts this weekend.
I hope the additional advance corrects the hesitation I feel when accelerating.
Sunday, August 23, 2009
Carburetor Tuning... Still
I've tried numerous different things to get rid of the hesitation on acceleration. I've tried new accelerator pump nozzles, changed the pump cam position, and changed secondary springs. Unfortunately, none of the combinations of things I've tried have fixed the problem.
I removed the spacer today. The spacer should add power but can move it up the power band and create a lean condition. I was not sure this would make much of a difference but it was worth an attempt. I found the hesitation remains but seems to disappear at high RPM (over 2500).
I've asked on the VMF about the situation and I've received a variety of responses. Several suggested new jets, others said new pump cams, and others have questioned the timing. It is unfortunate so many things can cause the same type situation.
I'm going to expore the timing next as I think I've eliminated many of the carburetor variables as being the entire cause. I took the distribution apart and found 15 degree plates. One spring was very tight and the other is soo lose it could fall off. I think I try to find some at a local auto parts store and then check my mechanical advance with a timing light.
Tuesday, August 18, 2009
Carburetor Tuning Continued
I received the new accelerator pump nozzle a couple of days ago. I'm replacing my fence and have spent the last few days taking down the fence and removing the poles. I had some time tonight so I installed the nozzle and took a test drive.
The hesitation changed with the new nozzle. If felt like two short hesitations with a quarter second feeling of normal acceleration between the two. I took off the carburetor with plans to remove the spacer and found a leak at the back of the carburetor spacer. I installed a new gasket and then went for another test drive.
There is now only the single hesitation which is short but still present. I'll try to switch back to the .031mm accelerator pump nozzle next to see if it works better with the carburetor spacer leak fixed. Unfortunately, I've run out of time for today so I'll need to try that later this week.
Wednesday, August 12, 2009
Suspension Alignment
Since I had the day off, I called around to find someone who could perform an alignment on the Mustang. I found a local place call Pilger which could do they job. I stated my concerns about damage to the undercarriage I just completed. He stated they would not damage anything so I took the car up there this morning.
I was given a results sheet showing my camber and toe were correct but not the caster. Here are the figures from the sheet:
Left:
Before: +.4 camber, -.1 caster, and -.05 toe
I was given a results sheet showing my camber and toe were correct but not the caster. Here are the figures from the sheet:
Left:
Before: +.4 camber, -.1 caster, and -.05 toe
After: -.1 camber, -2.3 caster, and .00 toe
Right
Before: -.3 camber, -.3 caster, -.06 toe
After: 0.1 camber, -2.8 caster, and -.06 toe
The car seems to run much better now. They said it is normal to add more caster to the right side due to the way roads slope down on the sides.
I checked under the car when I made it home. I found they were not as careful as I asked with the suspension parts. The sleeves for the adjustable strut rods are very scraped up from tool teeth marks.

Tuesday, August 11, 2009
Carburetor Tuning
I drove around some after installing the new carburetor. The car seems to drive fine under moderate acceleration. Once I press the gas about half way, the car hesitates for about a half second and then takes off. I've watched a video which came with the carburetor and performed some internet research and this is suppose to be related to the accelerator pump nozzle size.
I've ordered a new .035mm accelerator pump nozzle from Summit. However, the part will not arrive until I return from my vacation in Las Vegas. I'll need to wait until then to see if this fixes the hesitation.
I've ordered a new .035mm accelerator pump nozzle from Summit. However, the part will not arrive until I return from my vacation in Las Vegas. I'll need to wait until then to see if this fixes the hesitation.
Saturday, August 8, 2009
Installation of Intake and Carburetor II
I made a final cut on the gas line and installed it this morning. I then filled up the radiator and changed the oil. I then tried to start the motor and it started but was not running well.
I checked the timing to find it was 25 BTDC. I could not adjust it to less because the vacuum module of the distributor was hitting the intake. I rotated all the spark plug wires on the cap and rotated the housing. I then could not get the engine to start because the timing was off.
My wife held the timing light as I cranked over the engine. It would start for just a second and she could see the location of the TDC mark. I made two adjustments and the engine started with the timing at 15 BTDC.
The RPM of the engine never seemed to drop. It was then I noticed the stator terminal on the alternator was only putting out 7 volts. I used a jumper to the batter but still did not have much luck. I turned off the car and thought I would watch the Holley tuning video which came with the carburetor again.
The video stated you needed to wait for the engine to warm up and then start with the idle mixture screws. I took a picture of their initial position and then moved them out 1.5 turns as the instructions stated. The engine idle never dropped so I got concerned and tried to turn off the engine. It kept trying to run and died after blowing a mist of gas vapor out the top of the carburetor.
I waited a few hours and then perform the following steps:
1) Checked coolant level
2) Changed choke setting (set wrong from box)
3) Started the car & waited for it to warm up
4) Adjusted the curb idle to 600 RPM
5) Set timing to 15 degrees BTDC
6) Adusted the curb idle to 600 RPM
7) Set the idle mixture screws to get the best vacuum reading
8) Adjusted the curb idel to 600 RPM
9) Set the float levels
This is exactly right according to the instruction video. The engine seems to be running better. I'm going to let it cool and then check the choke setting. Earlier in the day I would get a pop out the exhaust when I blipped the gas. I'll check then to see if it is still happening.
I took the following picture after the first startup. Shortly afterwards, I removed the air cleaner and started tweaking on the carburetor.

Friday, August 7, 2009
Installation of Intake and Carburetor
I started on the installation of my new Weiand Stealth intake and Holley Street Avenger carburetor last Sunday. I started rather late in the day as we were out of town for most of the weekend. However, I removed the distributor, drained the coolant, and removed the stock intake. I then installed the thermost and mounted the housting the new intake. Finally, I primed and painted the Stealth intake Ford Blue.

On Monday, I intalled the temperature sensor, vacuum port, and a plug in an extra hole in the back of the intake. I cleaned up and installed the factory bracket for the throttle spring. I then painted over these with the Ford Blue. Finally, I painted the black plastic 1" spacer with some aluminum paint to make it look more like the original spacer.
On Tuesday, I ordered a heater elbow and a few other parts from NPD. I checked locally but no one had a heater elbow which fit the intake. After work, I intalled the intake. I took my chances with the cork seal coated with RTV at each end. I used Felpro gaskets and some high tack sealer on the head side of the gasket. I tightened it to spec (15 on ouside bolts and 25 on the inner 8) in 5 ft/lb increments.

On Wednesday, I noticed the cork end seal pushed out a little overnight. I was a little discouraged and concerned about a leak but moved on. I touched up the valve covers with a little Ford Blue. I then bent a new fuel line out of 3/8 brake line. I tried to locate metal fuel line but the auto parts store indicated this was all they carried.
On Thursday, I cleaned up the distributor and worked on reinstalling it. It was difficult to mount because the oil pump shaft was laying against the side of the distributor hole. I asked on VMF and found this is common. I used their advice and put a little Vasoline in the hole to hold the shaft in the middle. This did not work perfectly but made things slippery enough it slid into place after about 12 attempts.
Tonight, my parts arrived from NPD at about 7 o'clock. I was concerned they would not arrive. Once they made it here, I mounted the carburetor, installed the throttle linkage/spring, ran the spark plug wires, connected the heater elbow, and connected all the heater hoses.
I need to make an adjustment to the fuel line, change the oil, and add water to the system in the morning. Once these are done, I'm ready to start the car. I'm told the carburetor should be set well out of the box. My main concern is how off my timing is after removing the distributor.
Comparision
The original intake weighs 38 lbs. The new one is 18 lbs. The ports are much larger. The intake looks very tall when natural aluminum but once painted it looked more like a Ford intake. The height is actually about the same as the stock intake with a 1" spacer.

Sunday, July 26, 2009
Rear Brake Adjustment & Gas Gauge
When I replaced the rear brakes, I set the shoes so they did not contact the drum. I then drove around the block some and found a road without houses. I drove backwards and applied the brakes a few times as I was always told this sets the adjusters to the appropriate clearance between the shoes and drums.
I posted on the Vintage Mustang Forum a few days ago about my brake pedal feel. I always assumed the brake pedal would firm up once I replaced the rear brakes. However, it did not really make any difference. I did not have much pedal feel for the first half of the movement but could still lock up all the brakes with little effort.
The responses I received stated I needed to set the shoe/drum clearance so they slightly drag. I did this yesterday morning and then took the Mustang for a drive. This made a big difference and the brake pedal now has the firm feel I expected.
Today I worked on the gas gauge a little more. It has never been correct but I've ruled out all the components leaving the need to adjust the sending unit. I worked on it for about three hours this afternoon. My current setup shows 1/8 tank when there about 4 gallons of fuel. It shows 1/4 tank with 6 gallons. I filled up the rest of the way and it now goes way beyond full. I guess it is better than before when it showed 1/2 full and then dropped to empty when the tank was still half full.
Friday, July 24, 2009
Ordered a Weiand Stealth Intake
I ordered a Weiand Stealth intake today from Summit. The intake was $159.95. I applied the $98 from the sale of my original intake to the purchase. I also had $40 in discounts built up from two previous purchases with Summit. This dropped the price to about $19.95 (in my mind at least).
I ordered a new Miloden thermostat, Fel-Pro gaskets, and ARP bolts for the intake. I sold a few other things on eBay this past week which more than offset the entire purchase. The intake should arrive early next week.
I've included a picture of the intake below.

I ordered a new Miloden thermostat, Fel-Pro gaskets, and ARP bolts for the intake. I sold a few other things on eBay this past week which more than offset the entire purchase. The intake should arrive early next week.
I've included a picture of the intake below.

Thursday, July 23, 2009
Brake Pedal Squeak
My brake pedal squeaks when I press it. I'm not sure why but decided I would find out tonight.
I was under the dash applying the brake and could not really place the sound. I knew it was not from the master cylinder which is good. I decided I would take off the brake light switch to see if it would help. If not, I would just keep going until I found the culprit. Fortunately, it was the brake light switch.
I depressed the switch while off the car but it did not squeak. I covered it with a little WD-40 but suspected it would just all evaporate and the problem would resurface. I decided to use something a little thicker. I had a small tube of disc brake lubricant which I put on it. I was going to just through it away but it is slippery and stays in place. I put the switch back on and the squeak was gone.
Wednesday, July 22, 2009
Tightening Shifter Bolts
When I drive down the road, the shifter rattles. I know it is attached with two bolts. I was concerned they were loose so I pulled up the sill plates, kick panels, and carpet to tighten the bolts.
Once I had everything apart, I noticed the bolts were tight. I took the shifter out and found it is because the trunions on each side are badly worn. A rebuild set is about $20. Since I've been considering a T5 transmission and it would cost another $10 to get the parts here, I put it back together.
I made up some insulators from thick vacuum hose. The bolts which mount the shifter side through them. They did not make much difference but they were better than what was left of the originals.
I've made some progress this week with a few small projects. After thinking about performance parts so much lately, I drove around the block last week. I noticed several small things not right with the car and found I was moving away from the goal with my thoughts of performance. I'm working to take care of these things so the car will run as it should.
Sunday, July 19, 2009
Deciding on a 4v Intake Manifold
Three weeks after buying the Mustang, I found a stock 4v intake on eBay. I was interested in keeping everything stock but did want the performance of a 4 barrel carburetor. This particular intake was also date coded to match my motor. I decided to go ahead and buy the intake at a final price of 68.51 (and $40 shipping).
I cleaned the intake up a couple of weeks ago after buying the Holley carburetor. I used stripper on the top to take off all the old paint and the engine decreaser to clean it the rest of the way. I then painted it with the Krylon paint I have from NPD.
The intake looks really nice. The more I read about intakes, the more it seemed the stock one was very restrictive. Since my car does not come with a 4v intake or a Holley carburetor, I questioned if it mattered if I used a different intake.
I found a Weiand Stealth intake which looks nice. It does not have many casting marks and I think they would all be covered by the distributor and carburetor. If I painted it blue, I'm not sure most would notice it is not the stock intake. However, I would not really want to take a loss on the intake I already purchased.
I decided to list my intake on eBay for $89.85 with a buy it now price of $99.95. I figured if someone bid $89.95, they would convince themselves to just buy it then and I would break even. The auction ended today and it sold for $89.95 with $40 for shipping. If I can ship it reasonable, I should get close enough to breaking even.
I took several pictures of the stock intake today, measured a runner, and weighed the intake. The intake weighs 38 lbs which is a lot. The runners are 29/32" wide and 1.75" tall. I took several pictures of the height to compare to the Weiand. It is difficult to say the exact height without it installed but the carb flange is about 2" above the top of the surface which mounts to the head.
The Weiand should be a little taller and should weight about 20 lbs less. The ports on the Wieand are 1.02" wide by 1.83 tall. They are rated to work well from idle to 6800 RPM.
Cleaning A/C Components
I had a little time today to work on the Mustang. I decided to get a couple of A/C parts from the attic to start work on them.
The first piece I pulled was the center A/C duct. This directs air from the blower through the center vent and to the two side vents. It has a vacuum operated flap which is used to change the flow of air from the front vents to the defroster vents.
The first piece I pulled was the center A/C duct. This directs air from the blower through the center vent and to the two side vents. It has a vacuum operated flap which is used to change the flow of air from the front vents to the defroster vents.
Replacement air ducts for the two side vents are available. I don't see replacement duct tube for the rectangle shaped piece which extends to the center vent. I'll check a Mustang forum to see if someone has a source for this piece before removing it as it is stapled to the plastic duct.

I tested this piece by starting the Mustang and connecting it to a vacuum source. It works properly but looks rough. I'll also post about a way to clean this up and possible treat the rubber inside to make sure it lasts a while.

Sunday, July 12, 2009
Engine Compression Test Results
I ran a few tests on my motor this evening. The results seem pretty good but I'm not an expert. I posted them on two different internet forums to get a few additional opinions.
Oil Pressure:
At idle (~600RMM), my oil pressure is 40psi when the motor is cold. It drops to 20psi after the engine is fully warmed up. I held it at 2000RPM in neutral and the oil pressure was 40psi.
Vacuum:
My engine vacuum is 17 at idle (~600RPM). It stays about that amount from 8 to 16 degrees advance (based on 40 year old harmonic balancer markings.
Engine Compression:
Let me first detail how I tested compression. I warmed the engine, blocked the fuel line, disconnected the coil, held the thottle wide open, and then had my wife crank the motor over.
The psi continually rose with each crank so I was not sure when to have her stop. I measured it at what looked to be the 6th compression stroke and on the 8th compression stroke. I stopped on the 6th cause it seemed to be enough cranking (in my mind) and at 8 because that was about the max for each.
The results are:
1 - 143 @ 6 / 152 @ 8
2 - 150 @ 6 / 160 @ 8
3 - 145 @ 6 / 150 @ 8
4 - 150 @ 6 / 155 @ 8
5 - 150 @ 6 / 160 @ 8
6 - 150 @ 6 / 160 @ 8
7 - 148 @ 6 / 160 @ 8
8 - 142 @ 6 / 152 @ 8
The shop manual states compression should be between 130 and 170 for a 289. Based on my math, the biggest variance is only 7% which is under the recommended number of 20%.
Spark Plug Appearance (@600 miles)


A little background is I purchased the car 1.5 years ago and have put 1000 miles on it. I've not had any trouble but I've occassionally seen a hint of blue smoke if I start it and then rev it a little before it is completely warm.
When I purchased it, I was told by the 25 year old owner that it was rebuilt before he purchased it from his girlfriends dad. He said the motor was rebuilt 8 years prior. When I asked for mileage since rebuild, he said 160,000. However, he told me he drove the car on weekends only, it had not been inspected in a year, and the odometer read 70,000.
I'm skeptical on the history of the motor but would like to make sure it is ok to work with it as is. I don't have much money but would like to add a 4 barrel intake and a few other parts to make the car a little more fun. If the motor is not up to the task, I'll save the money and just have the motor rebuilt in a year or two.
Subscribe to:
Posts (Atom)